Book review: 365 Photography Days

365

‘All I want,’ I moaned to a friend ‘is to be a sent a book to review about which I can be positive.’ I know that there are good books out there, you see, but none of them had made its way into my review pile recently. But it seems as if someone, somewhere, was listening to my plaintive calls, for I was sent what is a rather beautiful coffee-table photography book for review. (Whilst I seem to have someone’s ear, perhaps I should put in calls for world peace and an end to oppression, too?)

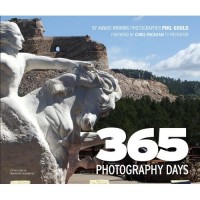
It’s 365 Photography Days, by Phil Gould. It charts Gould’s year-long around-the-world trip that he decided to take after escaping with his life from a plane crash in Alaska. He mapped out just where he would like to go, and being a photographer, set himself the challenge of capturing a defining image for each day of the journey. From South Africa, to South America, to North America, to Australasia, and back to South Africa (often via London) he gave himself the opportunity to get some fabulous shots. He didn’t disappoint, either.

Day 314: Zebra at the waterhole, Pilanesberg National Park, South Africa.

For me, the best shots were certainly his wildlife ones, whether chipmunks, cheetahs, or kangaroos. It seems to be where he’s most comfortable practising his craft. However, that doesn’t mean his portraits or architectural photos aren’t worth looking at. They definitely are, and even more so when viewed in the context of such a remarkable travelogue. Even the photo of the toilet roll holder in his bathroom, the day that he had food poisoning and couldn’t go anywhere, contributes to the vast horizon that he experienced.

This is a coffee-table book, and the photos are given centre stage accordingly. Still, there is also the requisite degree of commentary along with a photographic tip for each image. It’s the photos that tell the story, though, just as Gould intended.

For anyone who states travel or photography as their interests, I could recommend this book as a gift. Do take a look.

365 Photography Days, by Phil Gould. Published by Book Guild Publishing and available from Amazon UK and Amazon US.

Nikon offers a leg-up to budding photographers

Nikon logo

Breaking into a creative market professionally can be utterly soul-destroying. I’m sure that the bitter tears of frustration shed by budding actors, artists, musicians, photographers, and writers could sink a fleet of battleships. (My family has probably contributed more than its fair share; we’re a mixture of actors, musicians, photographers, and writers.) Over at Nikon, though, they’re trying to ease the course for at least one up-and-coming photographer.

They’ve just launched the Nikon Foundation. Through something that seems to be part-competition and part-interview, they’re offering a three month paid assistantship to fashion photographer John Wright. If you’re in your final year of a photography-based course at a UK or Ireland higher education establishment, you’re eligible to enter.

You’ll need to submit a portfolio of between five and 12 images and tell the judging panel in a letter of 500 words why you’re the best person for the job. Get it right, and you’ll have a three month paid assistantship and £4,000-worth of Nikon equipment as your prize.

What are you waiting for? Hurry over to the Nikon Foundation website right now!

A Lightroom love-in?

This is what happens when you play with vibrance and saturation

In the interests of consumer empowerment, we here at Small Aperture have played around with free editing software and been pretty impressed; we’ve suffered some fairly terrible options at the lower end of paid-for software and picked up on some gems, too. But there are some options out there that cost a wee bit more, as well. So we thought that we’d put the biggest name in photo editing software through its paces and see how it does.

Yes, we’re talking about Adobe Lightroom 3. It costs £232.65. (Or $299) That’s a lot of pennies. (23,265, to be precise.) Is it honestly worth it? We decided to find out in the best way we could think of: we let loose a complete Lightroom novice and an absolute Lightroom junkie on it, with this picture that I took on my Canon 450D one afternoon at the seaside.

Yes, those are my footsies.

The only requirement was to make the picture look better. (And to tell us what they thought of the process.)

Did they manage it?

First impressions

The junkie opened up Lightroom 3 (being all accustomed to Lightroom 2) and went: ‘Cool!’. The novice opened it up and turned white. Lightroom 3 is beautifully laid out, with collapsible panels on all sides, including the five modules that act as the centre of operations across the top of the screen, but as a programme that doesn’t just edit images, but organises and stores them, and prepares them for printing and web uploading (hell, it probably runs the International Space Station, too), there’s a whole heap going on. If you’re not sure what to expect, it’s pretty overwhelming.
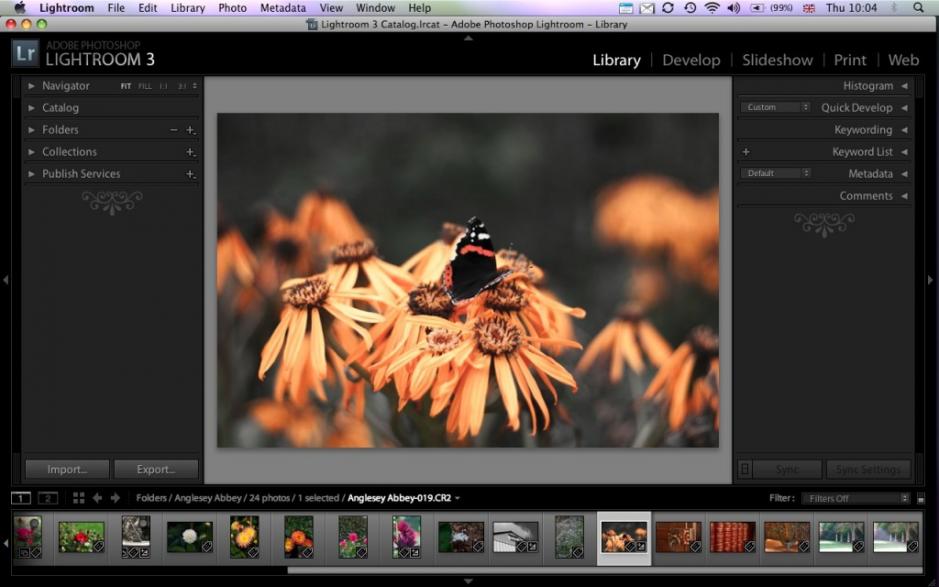
Beautifully laid out, but with so much going on, it could be overwhelming

Nerves calmed, with tea, our Intrepid Duo ploughed on.

Setting off

Importing images is straight forward. You plonk yourself in the library module, you tell it if you’re importing directly from your memory card or transfering from a hard drive, you select your images, you press ‘import’. Kaboom! There they are.
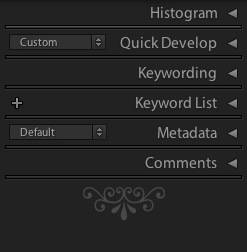
So many ways to order your photos

Next, being this swanky image organisation oojimaflip, you get to organise your images according to some gazillion different options. When you’ve found a method that you like, you can save it as a preset. Lightroom likes to let you save things that you do regularly as presets. That’s fairly handy for demon picture editors. Or you can play up to the image of the disorganised artistic type and never use the same system twice.

Whatever, this next bit is one of Lightroom’s key functions: when an image is imported, it keeps the original RAW file perfectly safe. It will let you do all manner of hideous things to your images by sending them lurid shades of red and green and adding ghastly vignettes before you can crawl back to it as a primary school kiddie would her or his teacher and ask feebly: ‘Please Miss, can I have another one?’ Awesome!

Picture successfully imported and saved, our Intrepid Duo slunk onwards to the develop module to, ehm, develop the photo.

Develop
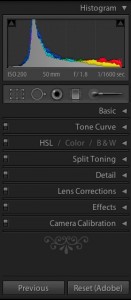
More tools than canapes at a palace tea party

When you switch between modules, the layout of the screen doesn’t change: you still have four collapsible panels around the edges and a large version of your image in the centre of the screen. Top panel are still your modules and bottom panel shows a film strip of the images in the folder you’re working on. What changes is the content of the left and right hand panels.

In the develop module, your right hand panel contains more tools than canapes at a Buckingham Palace garden party and the left hand panel shows a small version of the image and a history of the changes that you’ve made to that particular image.

You’ve also fancy buttons that allow you to compare images side-by-side, on top of each other, and cut in half and moojed together (yes, ‘moojed together’ is a technical term). You can compare two completely different images, or the same image at different stages of editing. It’s just what you need to create the perfect Batman villain.

So now you want to know what our Intrepid Duo did, I suppose, don’t you? I’m getting there. I promise. (But they didn’t create any Batman villains.)

Cropping and rotating

Obviously I’d had one beer too many at lunchtime that day and my angles were all out of kilter. Straightening things up after the event, however, was as easy as pie. (Why is pie regarded as easy? I have no idea.) It was also easy to remove the information-free grey zone in the bottom left corner.
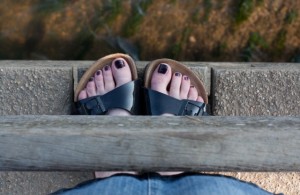
Much better.

Exposure and tweaking

Now I took this photo at about 4pm on a clear day in high summer. The sun was bright, we were near water, but I was doing a good job of shading myself. Still, the exposure needed a bit of help. Boy does Lightroom offer that in spades.
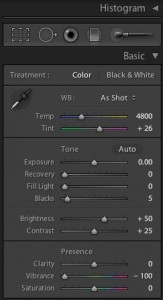
These are the basic developing tools

There’s a histogram. There’s a panel of basic functions to tinker with temperature and tint, to meddle with exposure, brightness, and contrast, and to muck about with clarity. If you want to fiddle with highlights and shadows independently of each other, there’s a tone curve. Then you can play with the hue, saturation, and luminance of eight different colours in the image.

There’s even a groovy widget which adjusts the specific colours prevalent in a given area of the photo. You might not have thought that the purples were overly dominant there, but Lightroom lets you know.

When you’re making your adjustments you can either use the slider to slide between different values, or if you’re a control freak you can type a specific value in the box next to the sliding scale. Whatever adjustment you make, the response is almost instant in the image. Marvellous.

So. What was done to these here foots of mine? For a start, my skin tone belies my Mediterranean heritage and my toes looked almost frostbitten. No problem, warm the light a touch. As I was making an excellent shadow for myself, the picture was a touch dark. Bring on the brightness, Lightroom.
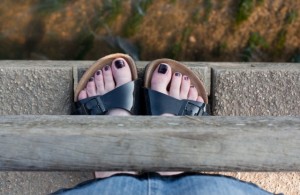
Warmer and brighter, but odd things are happening with the greens and oranges

That had an odd effect on the greens, yellows, and oranges, though. It was, however, superbly easy to correct that, using the hue, saturation, and luminance buttons.

That was about it.
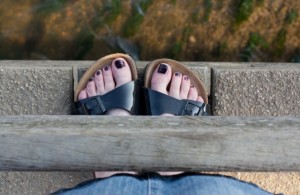
Straighter, brighter, warmer, and with no odd greens, oranges, or yellows

The verdict on exposure and tweaking? There is so much that you can do with one image, where to start? Well, at the top. Work down. Don’t like something? Go back a stage. This is what Lightroom does so well. It’s completely non-destructive and in a panel on the left it tracks every move you make. (You can sing, hum, or whistle The Police now, if you want.) Yes, you can go wrong, but there’s nothing you can’t undo.

Retouching and sharpening

The grains of sand between my toes could easily have been brushed away, but I was at the seaside, so why would we want to do that? And if the picture were sharpened any, those grains of sand would’ve looked like daggers. Not so pretty. But entirely possible. I suppose that the Intrepid Duo could’ve added some drops of blood then, but it might’ve distracted from the overall look. But that doesn’t change how responsive the the tools are, and how many different options you have for brush size and how you might want to use it.

Black and white conversion

The Intrepid Duo was able to flip back to straightened, cropped image to begin their black and white shenanigans, which started with the touch of the black and white button.

Then they began to adjust the black and white mix of the colours that made up the image. Again, there’s a groovy widget that allows you select a specific area and amend the dominant colour within it. In this case, the purple was taken out of my toes, again to stop them looking frost-bitten, and the blue was taken out of my sandal straps to increase the contrast.

Unlike the colour version, the orange and green tones didn’t need to be adjusted. Of course, the Intrepid Duo found this out by fiddling with the sliders for themselves. And when they finally decided to let it be, all they had to do was slip down the history panel and select the version of the image before they’d begun messing with orange and green.

The oranges remain unadulterated.

The verdict on black and white conversion? Lord that was easy.

Toys and stuff

Lightroom 3 comes with 50, yes really 50, presets that allow you to add vignettes and grain and mess with the tones, and make your pictures look 100 years old or as if they come from the future. But even better? The range of functions that it affords you, and being able to save your own specific processes as presets, means that making your own toys is just a matter of trial and error. Whether you want to introduce an air of sepia-toned mystery or pop-art it up, anything is possible. Or you can go read Photocritic’s guide to creating toy camera presets. Oh, and take a look at my pretty butterfly.

This is what happens when you play with vibrance and saturation

Now what?

As you’ve been working on your RAW images, all that remains is to export your final version into whichever folder you want it, or email it directly to your Mum, or upload it straight to Flickr. By the this stage, our Lightroom novice’s face was an incredible mixture of relief and pride, whilst the junkie wanted to start all over again. Yeah, I should’ve taken a photo.

The verdict?

As our novice put it: ‘Honestly, it seems as if there’s nothing that Lightroom 3 can’t do.’ That’s probably an accurate summary. We haven’t even looked at its lens correction capabilities, its split toning function, its red eye removal button, or its groovy graduated filter. And then there’re the slideshow, print, and web modules. I figured that you didn’t want to read something as long as War and Peace, so I’ll just mention that they exist.

The bottom line – is it worth £232.65? If you’re serious about taking pictures, yes. You can fiddle about with its functions until your heart is content and then revert to the original image, or any point along the way, and begin again. You can learn the exact capabilities of each and every element with absolute impunity. You can do as much or as little as you want.

Both the junkie and the novice agreed, however, that if you take pictures occasionally and don’t do that much editing, no, it’s not worth it. There are cheaper, or free, editing packages out there which will do precisely what you want them to, and not overwhelm you in the process.

Lightroom 3 isn’t for everyone, but for those who are its target users, oh it is magnificent.

This article produced in conjunction with morning coffee, lunch courtesy of Innocent, afternoon tea, and home-made carrot cake.
Always keep your eye on the ball

Tiger Woods

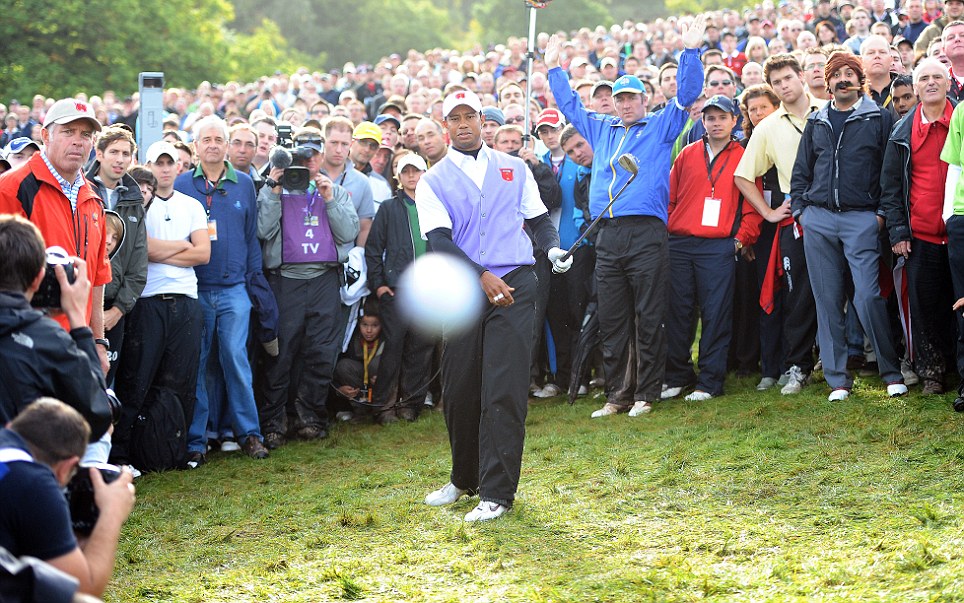
Sports photography isn’t all glamour: there’s getting frozen on a football pitch in February, withered at Wimbledon, and soaked at Sandown. Then there’s getting hit by a ball struck by Tiger Woods. It’s what happened to Mail on Sunday photographer Mark Pain yesterday.

Woods mis-struck his ball in the rough and it careened straight towards Pain and his Nikon D3S. Pain held his nerve and snapped his shot before the ball thumped into his camera, bounced off his chest, and dropped at his feet. Then he made a swift exit.

It might’ve been down to Woods’ play, but I’m not sure I would’ve hung around, either!

Thank you to Bits and Pieces for the headsup, and head to the Mail online for more.

The photo is obviously Mark Pain’s. I’m not that much of a golf buff, really. And I don’t read the Mail.

Sometimes, copyright is upheld!

larajade-dvd-300x300

Sometimes, the law does come down on the side of the photographer. The fight might’ve been bitter, bloody, and protracted but a young photographer has just reminded a porn peddler from Texas that you can’t use someone else’s image for commercial gain unless you’ve come to some sort of agreement with her or him.

Back in 2006 a 14 year old Lara Jade Coton snapped a self-portrait showing her in a black ballgown and top hat—all rather tasteful—and submitted it, and a few others, to Flickr. That’s not so unusual. How many of us have self-portraits on Flickr? A little bit more unusual, though, might be finding that your image is being used to market a pornographic DVD.

In the grand copyright scheme of things, whether or not the image was being used on a pornographic DVD is probably neither here nor there (although I am intrigued by the implications of using an image of a minor), just that the image was being used commerically without permission from the photographer or model. Doing what I’m sure anyone else would do, Coton wrote to the producers (TVX) and requested that they stop using her image. They were less that co-operative. There’s a surprise.

Would our young photographer give up because a nasty man sent her a nasty email? Of course not. Granted, it did take three years of legal wrangling but finally Coton was awarded $129,173.20 in damages. It wasn’t quite the $434,000 that she sought, but hopefully it’ll make people think twice about using people’s photographs commercially without permission.

Headsup to El Reg, with more details available here and here. And if you’re unsure on your picture rights, you can check out our quick and dirty guide.

Gallery exhibitions? I don't get 'em.

As computer screens get better, and the interactivity of photo sharing websites get better, this is becoming a less attractive way of exploring photography.

“Hey”, they’ll say, “You’re a photographer! We should go to this really great photography exhibition”. I stick on my best grin, nod with feigned enthusiasm, and go along. Over the years, I’ve grown to learn that (with a very few notable exceptions), I’ll regret that decision.

It’s not that I don’t like photography. Quite the exact opposite, in fact. I live, breathe, write and occasionally sing photography. I love looking at photographs, nothing makes me happier than seeing a friend (of which I have several thousand) achieving a new milestone in their development as a photographer, and I do a 1980s-style punch-the-air whenever I get a particularly good photo myself.

So why the disenfranchisificationated feeling about photo galleries and exhibitions?

As with all good stories, we’ll need to begin at the beginning. And that’s not why go to an exhibition, it’s why I take photos and love photography.

The things that drive me to take photos

Photos like these - holiday snaps - mean a lot to me; but I don't expect anyone else to get excited about them.

Truly, I would be the first to admit that I’m not that great a photographer. I occasionally get stuff in focus, and I guess I’ve developed an ‘eye’ over the years, but take a look at my Flickr gallery, and you’ll see that I still have a lot to learn.

The difference between myself and many other photographers is that, really, I’m a writer and technologist at heart. I take photos because it drives me to write. I learn new techniques because I’m deeply fascinated by the physics (and, as a subgenre, the optics) that are part of photography. I’m happiest when I’m exploring how to build a laser trigger for my camera, how to make my own macro lens, experimenting with studio lighting, or exploring how to photograph smoke.

So if being an inquisitive geek is what drives me to take photos, why do I want to look at other people’s photos?

I want to see photos I couldn’t have taken myself

My favourite type of photo is where I can't tell how the hell they've achieved the photo

So, as a technologist and amateur physicist and writer who has photography as a serious hobby, there’s no way I should be able to take the photos I see in galleries, right? Sadly, that’s not the case. I rather frequently see photos that are on par with – or not as good as – my own. It makes me uneasy, how big-shot photographers with big budgets and celebrity models deliver work which is, frankly, disheartening.

I suppose I’m in a strange position anyway; As a ghost writer, I write books for other photographers (there’s a different post in that, somewhere), which means that I’ve trained myself to ‘read’ photos. “Oh, in this photo they’ve used a soft light source from the top, a slight kicker from the left, and a gelled flash from the rear to highlight their hair, combined with a wind machine to give their hair a bit of motion”. I don’t even have to think anymore, stuff like that comes to me naturally.

Photos that really impress me are the ones where I can’t quite figure out what they’ve done; like this incredible portrait Gregory Heisler shot of NYC mayor Rudy Giuliani back in 2001. It’s an incredible shot that took several days worth of preparation. If you’re curious, Heisler explained how he did it in a YouTube video – a good way to spend six minutes of your life.

Gregory Crewdson. What a legend. (click to see more)

Another photographer who consistently impresses me is Gregory Crewdson – he frequently hires a full film crew to create deliciously elaborate photos; with so much attention to lighting and every detail in his photos, it’s inspirational stuff. And something I probably wouldn’t be able to recreate – certainly not with the same quality, vision, and sheer amazingness.

Anyway; in gallery-world, you often get photographers who – through hard work, dumb luck, or a delicious mélange of both – have caught someone’s eye in such a way that they have been invited to put on an exhibition.

I’m not bitter – I know my photography isn’t gallery-worthy; but the sad truth is that whenever I go look at photography exhibitions, I walk away with the impression that what I’ve just seen isn’t gallery-worthy either.

An analogy from another world

I would be hard pushed to cook something that tastes this nice; and if I could, it certainly wouldn't look this good. This way, a restaurant offers something beyond what I can do myself, and makes it worth my while. I expect the same from a gallery exhibition.

My good friend Daniela (who edits my Small Aperture site for me), points out that my take on photography is similar to her take on food. “I’m not a chef, but I’m pretty bloody damned competent in the kitchen. Not only do I have the technical skill to be able to pull off interesting feasts, but I’m blessed with a mind’s palate: I know what things will taste like in my head before I’ve even tried them,” she explains, in a way that is eerily close to my take on photography. “Not only do I know how to make ice cream, but I know what flavours will work well in the ice cream and I know what to pair with this ice cream to make the perfect dessert.”

Of course, being blessed with a gastronomical mind doesn’t come without its downsides. “Taking me out to eat is a minefield,” Daniela admits – and I can testify to the same. “I do not want to pay for food that I can make myself, and in many cases almost certainly make better than is presented to me on a plate,” she explains. “I never order risotto in a restaurant”.

With good reason. I’ve had her risotto. It’s epic.

Why gallery photos don’t stack up

So not only do I want to be looking at an exhibition of pictures that somehow inspire and intrigue me, and with which I have some emotional connection, there’s another important element that cannot be overlooked. Curation.

As computer screens get better, and the interactivity of photo sharing websites get better, this is becoming a less attractive way of exploring photography.

To all those exhibition curators out there: do it properly. I would much rather look at three very good photos that tell a short story together, than 30 so-so shots that embroider a full-length novel. I’m not the only one who thinks this: I’ve frequently seen my fellow photographer friends rip to shreds badly curated exhibitions, even if they contain individual photos containing much awesomeness.

I don’t think I’m lying if I say that I’m disappointed more often than I’m impressed by photo galleries and their exhibitions. Of course, it’s often very impressive what they are doing, but I think I may be spoiled. Between my 2,000+ Flickr contacts, Boston.com’s The Big Picture, and the hundreds of photos I come across via my 100-odd RSS feeds, I’m spoiled rotten.

Some would argue that these photographers wouldn’t be so good as they are if it hadn’t been for the great and famous photographers; the ones who invent new techniques, or perfect the old ones. That’s true, of course, but even when you turn to our great contemporary photographers, like Rankin and Liebowitz, I find that they fall short.

So what kind of photos do I want to look at?

Y’know, a while ago I started a photography course for newbies. I have to admit that I haven’t given it the attention it deserves recently, but the photos my complete n00bs have been creating have been impressive. They have been orders of magnitude less impressive (both technically and creatively) than the stuff Heisler, Liebowitz and Rankin do, of course, but that’s not the point: These are photographers I have a relationship with: I know them. I know what they are capable of, and I see them improve their photography as they progress through the course.

There’s something magical about seeing photos taken by people you know; I’m willing to forgive them for a lot of the things I’m complaining about above; much in the same way that you would tolerate sitting through your friend’s photos from on holiday, but you wouldn’t give two hoots about the vacation snaps from a complete stranger.

The lack of interactivity

The final problem I have with gallery shows is that there is no way to show your appreciation of a photo. On Flickr, I’ll favourite photos that impress me in one way or another. I’ll leave constructive criticism of pictures I feel could be improved. I’ll link to photos via my Twitter stream if they impress me extra much, to share them with the 8,000-odd people who follow me there.

Unless the photographer happens to be present (which happens only on opening night, generally), a gallery is a passive experience. “A time to reflect”, you might say, but I say bollocks to that – if a photographer has made a strange choice about framing or focus or lighting, I want to talk to them about it. I want to know whether it was done intentionally, and if so, why. I want to congratulate them on their finest works and – by means of exclusion – show them which photos I’m less impressed by. If they’re interested, I’ll even tell them why.

My 2000-odd favourites on Flickr are a pretty impressive photo collection; personal to me, full of the photos of my friends and people I admire. That's a gallery exhibit I'd go to in a heartbeat!

Don’t get me wrong; I understand that some people don’t give two flying fornicative efforts about what some random opinionated dude on the Internet has to say about their photos. Perhaps they’ve done everything in the photo exactly the way they planned; and that their slight under-exposure was intentional, to explain something or other about how society works. I totally get that. And it may work for others. But I don’t buy it anymore: my world has become too interactive to waste my time on one-way communication. It’s why I don’t watch television anymore; it’s why I rarely read paper newspapers. (The one outlier here is music and movies; I have no inclination to comment on music tracks or cinematic experiences: I suppose they’re too far removed from the bubble where I feel that my influence has any insightful meaning).

I think I’m going to give gallery shows a bit of a rest for now. I’ve been disappointed too often. Instead, I’m going to make Flickr my world-wide image gallery; it does everything I want and need from a photo-viewing experience.

And if I don’t like a photo, I can click on to the next one without feeling bad about it.

Maybe that’s the crux of the matter: Having to take physical action to walk away from (or straight past, with a sideways glance) a photograph. It feels as if you’re going out of your way to be left unimpressed by a photo in the way a quick click with a mouse doesn’t.


Do you enjoy a smattering of random photography links? Well, squire, I welcome thee to join me on Twitter -

© Kamps Consulting Ltd. This article is licenced for use on Pixiq only. Please do not reproduce wholly or in part without a license. More info.

Wordpress Amazon S3 CDN plug-in

iStock_000007298729XSmall

First of all; you kids are going to have to forgive me for a non-photography post; I’ve coded a brand new thing which I’m rather excited about, and I figured I’d share it with the world.

Basically, I had a rather unique problem: I’ve been using Donncha’s rather awesome WP Super Cache for a long time. Then, in a moment’s weakness, I switched the Photocritic blog to W3 Total Cache. Mostly because I quite fancied using their Amazon S3 cache. The problem here was that the W3 Total Cache plug-in doesn’t play nice with Total Cache. Which is fine, I thought. But I was wrong: It turns out that to get the most out of W3 Total Cache, you need oodles of memory. Within minutes of me turning off WP Super Cache and turning on W3 Total Cache, my server was on its knees, begging for mercy. Then it crashed.

And I decided to come up with a better solution.  


A bit of background

It should probably be mentioned that for the past two years, Photocritic (and Small Aperture, my Travel Blog, my company website, and a couple of other small sites) are hosted on a single server, hosted by Slicehost. They’re lots of awesome, but you basically pay by the size of RAM available to your ‘slice’ of the server. Which is a bit sucky when you run WordPress, because WP is pretty memory-hungry. For the past few years, as mentioned, I have been running WP Super Cache, along with a nasty little hack of a plug-in which would serve (most) of my image assets from Amazon S3.

My original plug-in was buggy as hell; add a link to an image, and it went haywire. A slightly malformed image tag, and it would break the page. Not very pretty.

Anyway, so I tried to install W3 Total Cache, and whilst I like its completeness and flexibility, my server simply didn’t like it. Of course, I could have tried to tune the server to the plug-in, but considering that my nasty hack of a S3 plug-in and WP Super Cache actually had better results… I figured it was time for a new idea.

What is a CDN?

Without a CDN, your server works itself into an early grave by having to serve each image to each user. Even on a relatively simple site like Photocritic, there can be 40-50 assets on a single web page. Multiply that by a thousand web pages and ten thousand visitors, and it all adds up.

CDN stands for Content Delivery Network. Basically, it’s the idea that if you have a server serving the same things over and over again, it may make more sense to get some other server to do it.

On Photocritic, for example, a page might have about 50 images on it. Your browser will first load the HTML page, then realise that it needs to fetch each of these 50 images, too. So, in effect, it does 51 requests to my server: One for the HTML, then one for each of the 50 images. This takes up a lot of bandwidth and server processing power.

With a CDN, your server only has to worry about the dynamic parts of the page: the HTML coming out of WordPress

A better idea, then, is to only serve the requests you really need to. Like the HTML; because this changes from time to time (every time someone leaves a comment or I post a new post, a lot of different pages change slightly). Images, however, change very rarely.

So, by using a CDN, what you’re doing, is serving the HTML page, and telling your browser to go fetch the images from somewhere else. In this case: the Amazon S3 service.

You could, of course, upload your images to S3 manually, but this loses you some flexibility, and makes posting new posts a pain in the arse. Also, if all your posts include direct links to S3, and you decide to stop using them (or using a different solution later), you’re buggered.

Where does caching come into all of this?

When you look at a WordPress page, a lot of things happen in the background. The server has to load in the blog settings, then the theme (that’s the design of the page). Then, it has to pull in all the comments, the categories, all the bits and pieces in the sidebar, etc.

To a webserver, that’s actually quite a lot of work: Every time you ‘render’ a page, it has to do dozens of calls to a database to put the page together. Like this:

Without caching

Of course, there’s nothing wrong with this: you have to render the page: If you don’t, nobody would be able to see anything.

The challenge is this: How often does the page actually change? I update my blog perhaps a few times per month. In addition, there are about 30 or 40 comments per day. That means that about 95% of the times somebody loads a page on the Photocritic site, it is identical to the last time somebody loaded the page. So why am I abusing my server by having to re-create the page each time somebody wants to look at a page?

Of course, I don’t have to: this is where caching comes in. WP Super Cache does this bit for me, but the way it works is interesting. The server basically skips the whole ‘page generation’ bit, and serves static HTML pages instead.

If there isn’t a cached version of a page, the user has to wait a little bit longer than usual whilst the cached version is being generated. Once it’s finished, they get the static version. The next visitor visiting the same page will get the cached page, served much faster (and with less strain on the server):

The red bit is where a cached version of a page is created.

How caching and CDN work together

Caching and CDN solve two different challenges of serving web pages:

Caching takes care of all the database requests needed to render a single HTML page. Instead of having to render each page every time someone loads the page, it gets rendered once, and then served to my users many times (until the cache ‘expires’ – I have mine set to refreshing the cached pages every hour or so – or when the page changes).

The CDN takes care of the static assets, so the server doesn’t have to serve the same image files again and again. By offloading this job to another server, my server has to deal with 80-90% fewer requests per page load.

Together, these two solutions dramatically improve the user experience of my WordPress blog, but it also means that my server can handle more traffic, responds faster to requests, and becomes cheaper.

Enter the WP Kamps Amazon S3 CDN!

So I sat down, threw away my original plug-in (which was called “S3 Hack” for an excellent reason: it was a hack, never meant for long-term use), and started afresh.

The logic in the plug-in works a little something like this:

Logic diagram for the S3 CDN plugin v0.1

Or, if you are more of a list person:

  1. It captures the entire page
  2. Finds any image tags
  3. Checks the SRC attribute of the image tag
  4. If the image referred to runs on Photocritic …
  5. … checks if the image exists on the S3 CDN cache …
  6. … and replaces the URL with the CDN version if it is found
  7. If the image isn’t found, it tries to write the file to the S3 CDN
  8. Then returns the HTML page with the relevant URLs re-written

Sounds pretty simple, yes? And it is, of course. But it works incredibly well; The image assets are served from Amazon S3, the HTML files are served from the database (or WP Super Cache, if they are cached).

Can I try it?

You’d be crazy to, because it’s an early beta version. But if you fancy it, knock yourself out.

To install it:

  • Get an Amazon AWS S3 account
  • Download WP Kamps Amazon S3 CDN Plugin
  • Open the S3-replace.php file, and edit the preferences near the top of the file
  • Upload it to your Plugins folder, then activate it via your WordPress
  • If you are using a caching solution; Clear your cache.

… And that’s it, really. Your image files will now be served from the Amazon S3 CDN solution.

Version history

v0.5.7 – Adds a database layer to avoid extraneous calls to S3 to check whether the files are there.

v0.2 – Re-packages the 0.1 release with fewer extraneous files.

v0.1 – First release of the plug-in.

FAQ

Q: How do I update an image in the CDN?

A: At the moment, you can’t. All you can do is delete the image from the CDN manually. You can also delete all the files off the CDN; it’ll re-build over time, as people are requesting your files.

Q: How can I turn it off?

A: Just disable the plug-in, and clear your cache – your files will be served from your own server again, and you can safely delete them from your S3 account.

Q: I need help…

A: At the moment, I haven’t got the capacity to offer much in the way of advice, I’m afraid. In due course, I’m hoping to be able to create proper documentation and an admin configuration screen within WordPress so you don’t have to edit your files manually.

Huge thanks go to…

… W-Shadow for his ‘How to filter whole pages in WordPress‘ article.

… S.C Chen for his PHP Simple HTML DOM framework, which is included in this plug-in

… Donovan Schönknecht for his PHP S3 library, also included as part of this plug-in.

… Matt Kane of CleVR and BeeTight fame, for pointing me in the right direction for a couple of tricky questions I had right at the beginning of starting to develop this thing

What’s still to come?

  • Admin panel to change the settings of the plugin
  • Automatic creation of buckets in S3
  • Configuration test


Do you enjoy a smattering of random photography links? Well, squire, I welcome thee to join me on Twitter -

© Kamps Consulting Ltd. This article is licenced for use on Pixiq only. Please do not reproduce wholly or in part without a license. More info.

10 ravishing rain-filled shots

Cafe culture ii

It’s raining here in London. Actually, it seems to be raining pretty solidly across Britain today. It’s creating havoc at Celtic Manor where the Ryder Cup is being hosted. However, interference with sporting events aside, rain can make for some pretty awesome photos, so I’ve been poking about the Flickr-webs to see what flashes of gorgeousness are lurking amongst it. These are they. Enjoy!

1 – Dark Rain

'Dark Rain', by kirainet

2 – It was raining and just finished

'It was raining and just finished', by lrnirjhar

3 – Maple Leaf in Rain

'Maple Leaf in Rain', by Greg from Maine

4 – Paris in the rain

'Paris in the rain', by epic steve

5 – Peyto Lake Rain Storm

'Peyto Lake Rain Storm', by HDRob

6 – Rain washed rose

'Rain washed rose', by epicnom

7 – I wish it would rain dawn

'I wish it rain dawn', by Onironauta

8 – Collecting rain drops

'Collecting rain drops', by ZaIGHaM-IslaM

9 – Rain on the window

'Rain on the window', by hausstaubmilbe

10 – It Might Rain

'It Might Rain', by A guy with a camera

All photos used in this article are used as ‘fair dealing‘. If you have strong reservations against your photos appearing on Small Aperture, please contact us, and we’ll get them taken down. Please support the artists creating these photos by clicking on the photos to take a closer look at their work!

Another day, another photo-sharing website

ibonthenet

I’m intrigued: just how many photo-sharing websites can the market bear? Today, the answer is ‘At least one more.’ Or so Olympus thinks, anyway. It has just announced details of its latest addition to the mix. It’s called [ib on the net]. Obviously Olympus’ marketing peeps were so convinced that we’d be bowled over by all the lovely functions offered by the site that a catchy name was just not that important. We’d better look at what it can do then, shouldn’t we?

The idea is that you should be able to take your photos, then upload them to the site, share them, store them, and print them in one streamlined process. So far, so good. What’s more, a group of people can upload their photos to one shared area: when you celebrate your niece’s third birthday everyone at the party can share and see their photos in one place. And a photo book can be made from everyone’s pictures, not just yours. That’s rather dandy.

Right now, it, okay, [ib on the net], offers 2GB of free storage, but it’s in beta and it is only available to people in the USA or Japan. That means I’ll continue to use other photo-sharing sites if I want to use my photos creatively. Who knows how it is going to alter. Maybe I’m just being cynical, but I can’t see it taking over the world quite yet. What do you guys think? Have Olympus hit on something here, or are there enough means to share, store, and print your pictures?

Facebook updates photos features

Picture 2

Recently, I wrote an article about Flickr reaching the five billionth photo milestone. What I didn’t mention in that article was how Facebook is seeing monthly photo uploads at 2.5 times the pace of Flickr’s annual uploads. That’s right… Facebook users upload approximately 2.5 billion photos per month. With that many photos circulating the Facebook community, it’s no wonder that the social media giant has just decided to roll out some new features regarding user photos.

Hi-Res Images

Facebook has always been a place where users can share quick snapshots of their lives, usually taken with point-and-shoot cameras or mobile devices. After all, most people don’t even own a dSLR. The standard resolution for Facebook photos is currently 720 pixels, so you can see why it’s a big deal that they’ve just upped the resolution to a whopping 2048 pixels.

Facebook's high-res option

Users will now have the option to upload images in either standard or high-res quality. But that’s not all. There will also be a “download” button located underneath each photo, allowing users to download any of these high-res images in JPG format. Before, anyone with half a brain could have just as easily right clicked and saved as, but this extra button makes it that much easier for people to download your photos.

Light Boxes

While increasing resolution to 2048 pixels already does wonders for the quality of user photos, Facebook has gone one step further and will be implementing “light boxes” as well. This means that every time you click on an image, the photo will load on top of a darkened version of the content you were looking at, giving each photograph (especially the high res ones) an elegant feel.

Tagging

Another feature that Facebook will be implementing is bulk tagging. Currently, you can tag a friend in a photo, but each image must be tagged individually. Bulk tagging is just what it sounds like. Now, you’ll be able to view a list of thumbnails of all the pictures in an album where you can tag your cousin Larry’s goofy mug in multiple pictures, all at the same time. This definitely makes tagging less of a hassle and much more efficient.

Flash Uploader

Last, but not least, Facebook will now use a Flash-based uploader when adding pictures. This should increase reliability and speed. Users with newer computers and fast internet speeds may not see much of a difference, but it should be noticeable to those with older computers and crummy connections.

How does this affect photographers?

Well, you’ve probably heard this many times over the last year or two, but Facebook isn’t quite the ideal place for photographers to set up their portfolios anyway. Their terms of service have a history of not being entirely photographer-friendly (although they have improved a bit), but allowing users to upload high-res versions of their photos sounds like trouble to me.

Of course, if you only have a small tight-knit group of friends on Facebook, then realistically you don’t have much to worry about. Personally, I feel safe in saying that my friends don’t quite have an interest in “stealing” my pictures so they can sell or misuse them in any way whatsoever.

But like any other online community, a photographer always takes a risk simply by uploading his or her work, whether it be Facebook or Flickr. There’s always going to be that slight chance, and the only way to prevent it is to not put any of your work online at all. Strong arguments for either side can be made, and I’m sure this topic will be up for some heated debate. It will definitely be interesting to see how this plays out over the next few weeks as Facebook rolls out its new features to the rest of the planet.

(via Inside Facebook)

DropMocks: Photo-sharing in its simplest form

Minimalist photo-sharing. Room enough in an already crowdedmarket?

I just came across a new photo-sharing site, and it’s so easy to use it makes navigating Facebook feel like learning quantum physics. There are no titles, no captions, no text at all. Just images. And it’s free. So, what’s this addition to the plethora of photo-sharing sites already out there?

It’s called DropMocks and it’s just as it sounds. You drag and drop your images from your computer right into the browser’s window to create a minimalistic photo gallery. You don’t even need to create an account, unless you want to keep track of your “mocks.” And if you do want to create one, it’s as simple as logging in with your Gmail address. Once you’re done dropping in your photos, you’ll be given a URL to copy and share with your friends.

The site’s uploader currently supports only Firefox and Google Chrome browsers. However, your gallery can be viewed by friends using any browser at all. And since it was created using HTML5, DropMocks is completely mobile friendly.

“Bleh, just another photo-sharing site,” you say? Not so quickly, my friend. What makes DropMocks different from all the others is its simple minimalistic structure. It literally took me 30 seconds to make my own gallery of 15 photos. Yes, you’re not able to add a description of the picture or view stats about how many times it was seen. But that’s not the point here.

Minimalist photo-sharing. Room enough in an already crowdedmarket?

You’ve all heard the phrase, ‘a picture is worth a thousand words.’ Well that’s what DropMocks is going for. Your images should speak for themselves, and nothing looks better than a crisp clean photo on a plain white background.

If you want to title every single picture and describe where and how you shot it, then Flickr or Smugmug or even Facebook is for you. But if you just got home from a trip to Greece and you want to show off your photos in a beautiful art-gallery style, what better way than to spend five short minutes uploading your pics and posting a link or emailing it to your friends and family?

However, keep in mind that this is not a replacement, nor should it be, for photo-sharing giants like Flickr. And while its minimalistic structure is its main appeal to photographers such as myself, I’m interested to see if DropMocks’ features will increase along with its popularity. Too many features and it becomes lost amongst all the other photo-sharing sites.

In the meantime, feel free to take a peek at my sample DropMocks gallery, or make your own and post the link in the comments section below so we can see yours.

From found photographs to found cameras

ifoundyourcamera

Maybe you’ve been there before. You’re at a pub with some friends on a Saturday night. You’ve got your digital point-and-shoot camera in your pocket or bag, and as the beer starts to flow easier with each pint, you start snapping pictures like a twelve year old girl at a Justin Bieber concert.

But unlike the twelve year old, you’re completely obliterated. A few hours and eight tequila shots later, you stumble out onto the streets, leaving something behind on your barstool. It’s not that any of those 127 pictures you took that night are worth a damn, but still… you lost your camera and some memories of you and your friends in a drunken stupor. (Well, I guess they’re not really memories if you don’t remember them. Evidence, perhaps.)

In the past, you’d suck it up and deal with it. What else could you do but go and buy another camera? Well now, my friends, there’s hope. Two years ago, a Canadian guy, Matt Prepost, started a blog with the intention of reuniting lost cameras with their hopeless owners.

Finders of lost cameras can go to www.ifoundyourcamera.net and send in four or more photos taken from the memory card. Prepost will then upload the pictures along with details of where the camera was found in the hopes that its owner will visit the site and claim the camera.

Since its creation, the site has over 400 posts for lost cameras and has seen almost five million visitors. Cameras have been found and reported from California to Italy to Indonesia, and while only a few dozen have been claimed to this point, the site has potential to help reunite hundreds of camera owners with their long-lost photos.

Being a victim myself, I love the concept behind this site. However, my camera was stolen in Barcelona rather than being misplaced in a neighbourhood bar, so it’s highly improbable that the thief will be sending in my photos of a Cruzcampo-laden Carnival trip to Cádiz anytime soon. Jeez, come to think about it, do I even want to see those pictures, anyway?

Memory cards from space!

Samsung

Ever wondered how durable an SD card is? Could you drop it in the sea? How about hit it with a hammer? Spatter it with paint? I don’t fancy doing any of those things to my memory cards, but Samsung has come up with a fairly novel way to test its SD cards’ durability, and you fancy getting involved, you have the opportunity to, too.

100 SD cards are going to be attached to paper planes and then dropped from a meteorological balloon, 30,000 metres above the ground. No, Samsung doesn’t need help folding the paper planes; what it needs help with is the content of the SD cards.

Want to see one of your pictures (or a film, or a message) sent 30,000 above sea-level and come back to earth on the wings of a paper plane? Then pay a visit to the project website. You can upload your snippets of gorgeousness there.

Launch day is in mid-October, and takes place at a secret location in Cambridgeshire. How very James Bond.

If you’re lucky enough to retrieve one of the planes, and they might get as far as Siberia, there are picture instructions telling you how to test the SD card to see if it survived, and where to re-upload the images to prove that it did.

For a good giggle, there’s the promotional video, too. Take a look:

Found photographs

01_137_prephotoshop

No, I haven’t found a stash of mysterious photographs in the attic of the Small Aperture Mansion. (Although, it is altogether possible there are heaps of photos up there. I should take a look.) I suppose it was more a question of, if I were to find a suitcase bulging with prints of no known provenance, what exactly would I do with them? I got thinking about this when I used a Polaroid print quite randomly as a bookmark. (My usual bookmark of choice is a train ticket.)

You see, I follow a blog called Forgotten Bookmarks. The guy who runs it owns a secondhand bookshop and he documents the postcards, the recipes, the newspaper clippings, the receipts, and all the odd things that turn up amongst his stock. Unsurprisingly, the largest category of forgotten bookmarks is photographs. And some of them can be very sweet indeed. Go take a peek.

But you can probably follow my train of thought.

So, what to do with these hypothetical found photos of mine? There are quite a few websites out there devoted to cataloguing found photographs. Let’s start with a big hitter. Flickr has not one, but two found photo pools: Found Photographs and The Museum of Found Photographs. How much information you get with each picture depends on who submits it, but it’s a fun way to while away some time!

Look at me was started by Frederic Bonn and Zoe Deleu when they found a few photos lying in a Paris street in 1998. From those few pictures, there are now 634. It hasn’t been updated in yonks, but it isn’t exactly as if things have gone out of date on it.

Time Tales was a project started by Astrid van Loo, a photographer, and Dick Dijkman, a webdesigner. I love the design on this site. It’s arranged according to the suspected decade of the photos, and whatever information that can be gathered from the picture is displayed, but nothing that amounts to speculation. You can even send a small selection of the images as e-cards.

The picture that started it for Lost Photo Gallery

The Lost Photo Gallery all started when a guy found a passport photo in the street. And then another. And then another. The site has grown from just passport photos, but it still reminds me of the film Amelie.

There are other takes on the found photo ideal out there: some guy has catalogued his finds from filesharing at Found Photos, and someone tried to set up a forum to help learn more about found photos at Lost-and-Found-Photos. That seems quite dead, though. Somehow, though, letting these pictures just be seems okay, too.

If you’ve ten minutes to spare, go for a browse and let yourself wonder who these people were and the kinds of lives that they lived. (But be careful, because some of the pictures aren’t always entirely safe for work.)

Monumental Misconceptions

Fellow Travellers

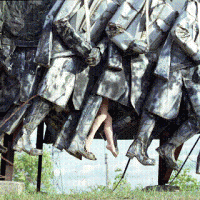
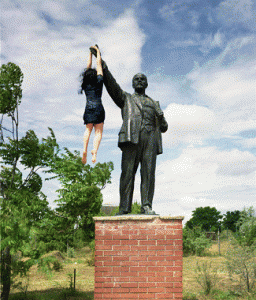
If you fancy taking a look at an exhibition with a slightly quirky spin on communist-era statues and monuments from Budapest, then The Gallery Soho has just what you’re looking for.

Monumental Misconceptions is a series of photos by Liane Lang, who spent a month photographing the forgotten monuments in Hungary’s capital city. But she did it with a twist. Her photos feature props and life-size models, that hope to make you see the monuments a bit differently.

Many of Budapest’s monuments were whisked out of sight following the fall of communism, and are found in the Memento Sculpture Park. The exhibition features some of these, but also statues from the Kerepeszi cemetery and the Nepstadion.

It’s all a bit irreverent, and I rather like the look of it.

Grand Genstures (Lenin), by Liane Lang

Monumental Misconceptions runs from 27 September to 3 October 2010, at The Gallery Soho, 125 Charing Cross Road, London, WC2H 0EW.

Lensbaby gets adaptive

Picture 2

You might think that we’d planned our 10 titillating tilt-shifts to co-incide with Lensbaby’s most recent announcement, but I can promise you that we didn’t. It’s just a happy coincidence that if you’re so inspired to have a go at tilt-shift photography with your Micro Four Thirds camera or your Sony α NEX camera, you can do so with Lensbaby’s Tilt Transformer and Composer.

The Tilt Transformer will allow you to attach any Nikon mount lens onto your Micro Four Thirds or Sony α NEX camera. Whether you want to have a go with a prime, a macro, or a fisheye lens, the Tilt Transformer will be your friend.

The Lensbaby Tilt Transformer for all your Nikon glass

If you don’t happen to have a box of Nikon glass lying around ready to attach to the adapter, you can attach the Composer to the Tilt Transformer and play around producing tilt-shift pictures until your heart is content.

The Lensbaby Composer + Tilt Transformer

The Tilt Transformer is available for $250 from Lensbaby or Amazon US, whilst the Composer and Tilt Transformer together costs $350, also from Lensbaby or Amazon US.

10 titillating tilt-shifts

Me on the Southbank

Tilt-shift photography used to be the preserve of architectural photography. But not so much any more, and looking at these glorious examples, that can only be a good thing. If you feel as if you want to play that bit more with your viewer’s perspective, you can always use a tilt-shift to fake a miniature, too. If you’re not blessed with a tilt-shift lens, you can always manage it with editing software. But meanwhile, take a look at our ten of the best tilt-shifts.

1 – You can tell

'You can tell', by B Tal (Brian Talbot)

2 – Real models

'Real models', by kennymatic (Kenny Louie)

3 – Classy Chassis Car Show

'Classy Chassis Car Show' by baldheretic (Jay Lee)

4 – Miniature Airport

'Miniature Airport', by {Away until inspiration comes} (Stav)

5 – Fishing boats

'Fishing boats', by SantiMB

6 – Little game

'Little game', by Pattagon (Nicolas)

7 – Toy Boats

'Toy Boats', by moonstar909

8 – Miniature All Blacks

'Miniature All Blacks', by Pattagon (Nicolas)

9 – Lensbaby Macro

'Lensbaby Macro', by Jari Kaariainen

10 – Ricardo

'Ricardo', by lpm (Catherine Currie)

All photos used in this article are used as ‘fair dealing‘. If you have strong reservations against your photos appearing on Small Aperture, please contact us, and we’ll get them taken down. Please support the artists creating these photos by clicking on the photos to take a closer look at their work!

200 megapixels? You'd better believe it

Camera_Hasselblad_taking-photograhy_black

Oh L-rdy! The clever people at Hasselblad have been thinking up clever ways to capture images using a 200 megapixel monster. Yeah, I had to read it several times before it sank in.

It relies on using a 50 megapixel sensor that takes six images and then calibrates them. Doing it this way, Hasselblad reckons that it’ll be more accurate than a single image from a 200 megapixel sensor.

Hasselblad are marketing this to museums and studios that shoot lots of lovely luxury products that mere mortals can’t afford. I’m imagining diamonds the size of golf balls and cars that travel at the speed of light.

They’ve a little more testing to go, but the plan is to insert the 200 megapixel mode into the HD4-50MS in early 2011. The camera will still be able to shoot in plain old boring 50 megapixel mode, too. And if you already own an HD4-50MS, you’ll be able to send it back to factory for an upgrade. For a fee, of course.

No, they’ve not released any prices at all.

Digital Foci aims itself at the European market

photobook

How do you like your pictures stored? Small and neat? Easily viewable? Well, Digital Foci, a digital photography accessories company, recently announced the expansion of three of its leading products into the European market in 2011. They’ve three offerings, which they hope will cover the various needs of anyone who takes photos. Let’s have a closer look.

Picture Porter 35

The Picture Porter 35 is a portable photo manager that comes in 250GB and 500GB capacities. Marketed as a portable hard drive for use during vacations or on photo shoots, this 5.4 inch storage device features a memory card reader with a 1GB per 90 seconds transfer rate and a 3.5 inch color LCD screen to view your photos on. It also supports RAW images as well as various music and video formats.

While it may have two features that most portable drives do not (LCD screen and memory card reader), the availability of countless other drives with twice the capacity (1TB) at one third of the price ($170) **cough** Western Digital **cough** makes me wonder if those features are really needed. If it does float your boat, though, expect to pay somewhere around $399 for a 250GB one and $499 for 500GB. (There aren’t any European prices yet.)

Photo Safe II

The Photo Safe, at $159 or $219

Okay, so the Picture Porter 35 may be a little pricey for what you get. Well then, the Photo Safe II is your solution. Also available in 250GB ($159) and 500GB ($219) capacities, the Photo Safe II can be seen as the Picture Porter’s little brother with a length of only 4.6 inches. It also supports most memory card types and transfers 1GB in 3.5 minutes. But again, with many other competitors offering more storage capacity for cheaper, price is something to consider here.

Photo Book

Can the iPad do this better?

One of Digital Foci’s hottest sellers in the U.S. for 2009, the Photo Book is a digital portfolio album for photographers to showcase their photos. The Photo Book comes with 4GB of memory, available in two different versions: a “Wedding” version (Pearl White) or a “Professional” version (Black). All for $189.

The device is ideal for wedding photographers (or other professionals) to display their portfolios to potential clients, or for non-professionals to simply show off their vacation pics to friends and family. While the Photo Book may be suitable for such purposes, the success of Apple’s iPad combined with the future release of upcoming touch tablets may make photographers think twice before buying this glorified digital frame. For just a few hundred more dollars, you could buy an iPad with no ugly buttons and a beautiful 10-inch touch display, not to mention the bajillion other things (video, music, apps, email, time-traveling) it can do.

What do you think then? It seems as if you’ve got to be able to offer something really special to be able to crack this market.

The bright horizon of medium format

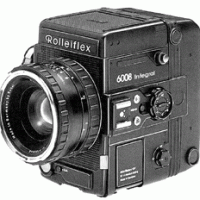
Rollei 6006

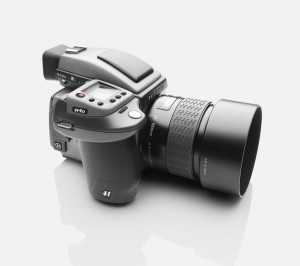
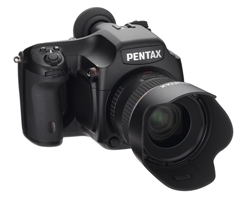
We’ve seen two entry-level medium format cameras released onto the market this week: the Pentax 645D and the Hasselblad H4D-31. Even at entry-level, we’re looking at £10,000 for the Pentax with a 55mm lens and €9995 + VAT (somewhere around £8,500) for the Hasselblad with an 80mm lens.

Do I need to remind you to breathe now? Glass of water? Tissue for your eyes? Okay. No, that’s not exactly cheap when you’re just dipping your toes in the water, but if you look at it in context of stepping up from 35mm, it isn’t quite so bad. But maybe you’re wondering what medium format is, and why it’s so special?

Are you sitting comfortably? Then I’ll begin.

Film

Hasselblad's entry-level medium format digital camera, the H4D-31

Way back when, in the days of dragons and film photography, there were lots of different types of film and film sizes. I could go into all the numbers, but you might die of boredom before I’d finished, and that’s not appealing, for me or for you. Film photography might’ve faded from most people’s consciousness now, but it hasn’t for quite a few photographers, including the medium format aficionados. Many of the old film sizes are no longer produced, but medium format is. It’s 120 or 220 film. It’s 6cm deep.

That means the film is almost twice as wide as film used in 35mm cameras. And this is critical: bigger film means more detail. If you’re looking to shoot high quality landscape shots, or make super-enormous enlargements of your pictures, the extra information afforded to you by the larger film size of the medium format is essential. For serious editorial work, medium format is where it’s at. In spades. (Or millimetres.)

If you want to think about this in terms of digital, the Pentax 645D has a 40 megapixel sensor; the Hasselblad H4D-31 (every time I type that I think it’s a new strain of avian influenza) a 31 megapixel sensor.

Medium format cameras comprise four essential elements: the body, the back, the viewfinder, and the lens. They’re all interchangeable. They’re the camera equivalent of Mr Potato Head.

Body

The body, unsurprisingly, is the HQ of your picture-taking. (The potato of your Mr Potato Head, if you’re keen on maintaining that analogy.) Add the relevant bits and pieces and you’re ready to go. There is, however, a slight quirk with medium format cameras: they’ll produce different image sizes depending on the camera type.

Pentax's 645D

The image will always be 6cm deep, because that’s the depth of the film, but the width will vary. It might be 4.5cm, or 6cm, or 7cm. The Pentax 645 produces images 6cm × 4.5cm. You might, however, have a 6 × 6 camera, whose images will be square. If you don’t want to fuss with portrait or landscape orientation, this is mighty useful.

Naturally, you’ll get more pictures out of your roll of film if your camera takes images 4.5cm wide (15 or 16 images from a roll of 120), as opposed to 7cm wide (10 images from a roll of 120). Use 220 film and you’ll double your number of shots.

Camera back

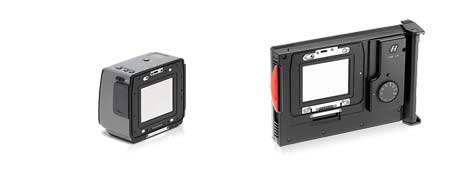
Continuing with the interchangeable theme, the camera back can be swapped for another one. This probably doesn’t seem quite so important until you know that the film is loaded into the camera back. Change the back and you can change the film. Black and white can switch to colour, which can change to a Polaroid back if you want an instant print, and then back again to the colour film. If you don’t fancy having to rotate your camera to move from portrait to landscape (unless you’re using a 6 × 6 camera when the image is square anyway), you can buy rotating backs, too.

Hasselblad interchangeable backs

Viewfinder

The viewfinder on a medium format camera can be either eye-level, through the clever use of a prism, or waist-level. With waist-level, you get to look down onto your image with both eyes. Auto-focusing is beginning to slip into the medium format world, but otherwise you’ll use your viewfinder in conjunction with a focusing screen. Mostly, it’ll be a matte screen, but as with all things medium-format they can be changed for different purposes.

Lenses

Pentax's standard 67 lens, the SMC 105mm, f/2.4

Finally, you have lenses. I suppose for a last reference to Mr Potato Head, these would have to be the eyes. Just as with 35mm photography, you can change from a wide-angle lens to a telephoto lens, or go arty with a fish eye. And just as with 35mm photography, you should go for the best glass that you can afford. Lenses tend to span a 40-500mm range, but your focal lengths will be different in medium format than in 35mm. You’ll need to remember that. But it’s the sort of thing that you’ll learn, just as you do with 35mm.

Finally

So that’s medium format in a nutshell, with its interchangeability and astonishing picture quality. If medium format digital cameras do become more affordable, which is entirely possible, how long do you think it’ll be before they are a serious consideration for high-end amateur photographers?