Feature Articles

Time-lapses aren't just for videos

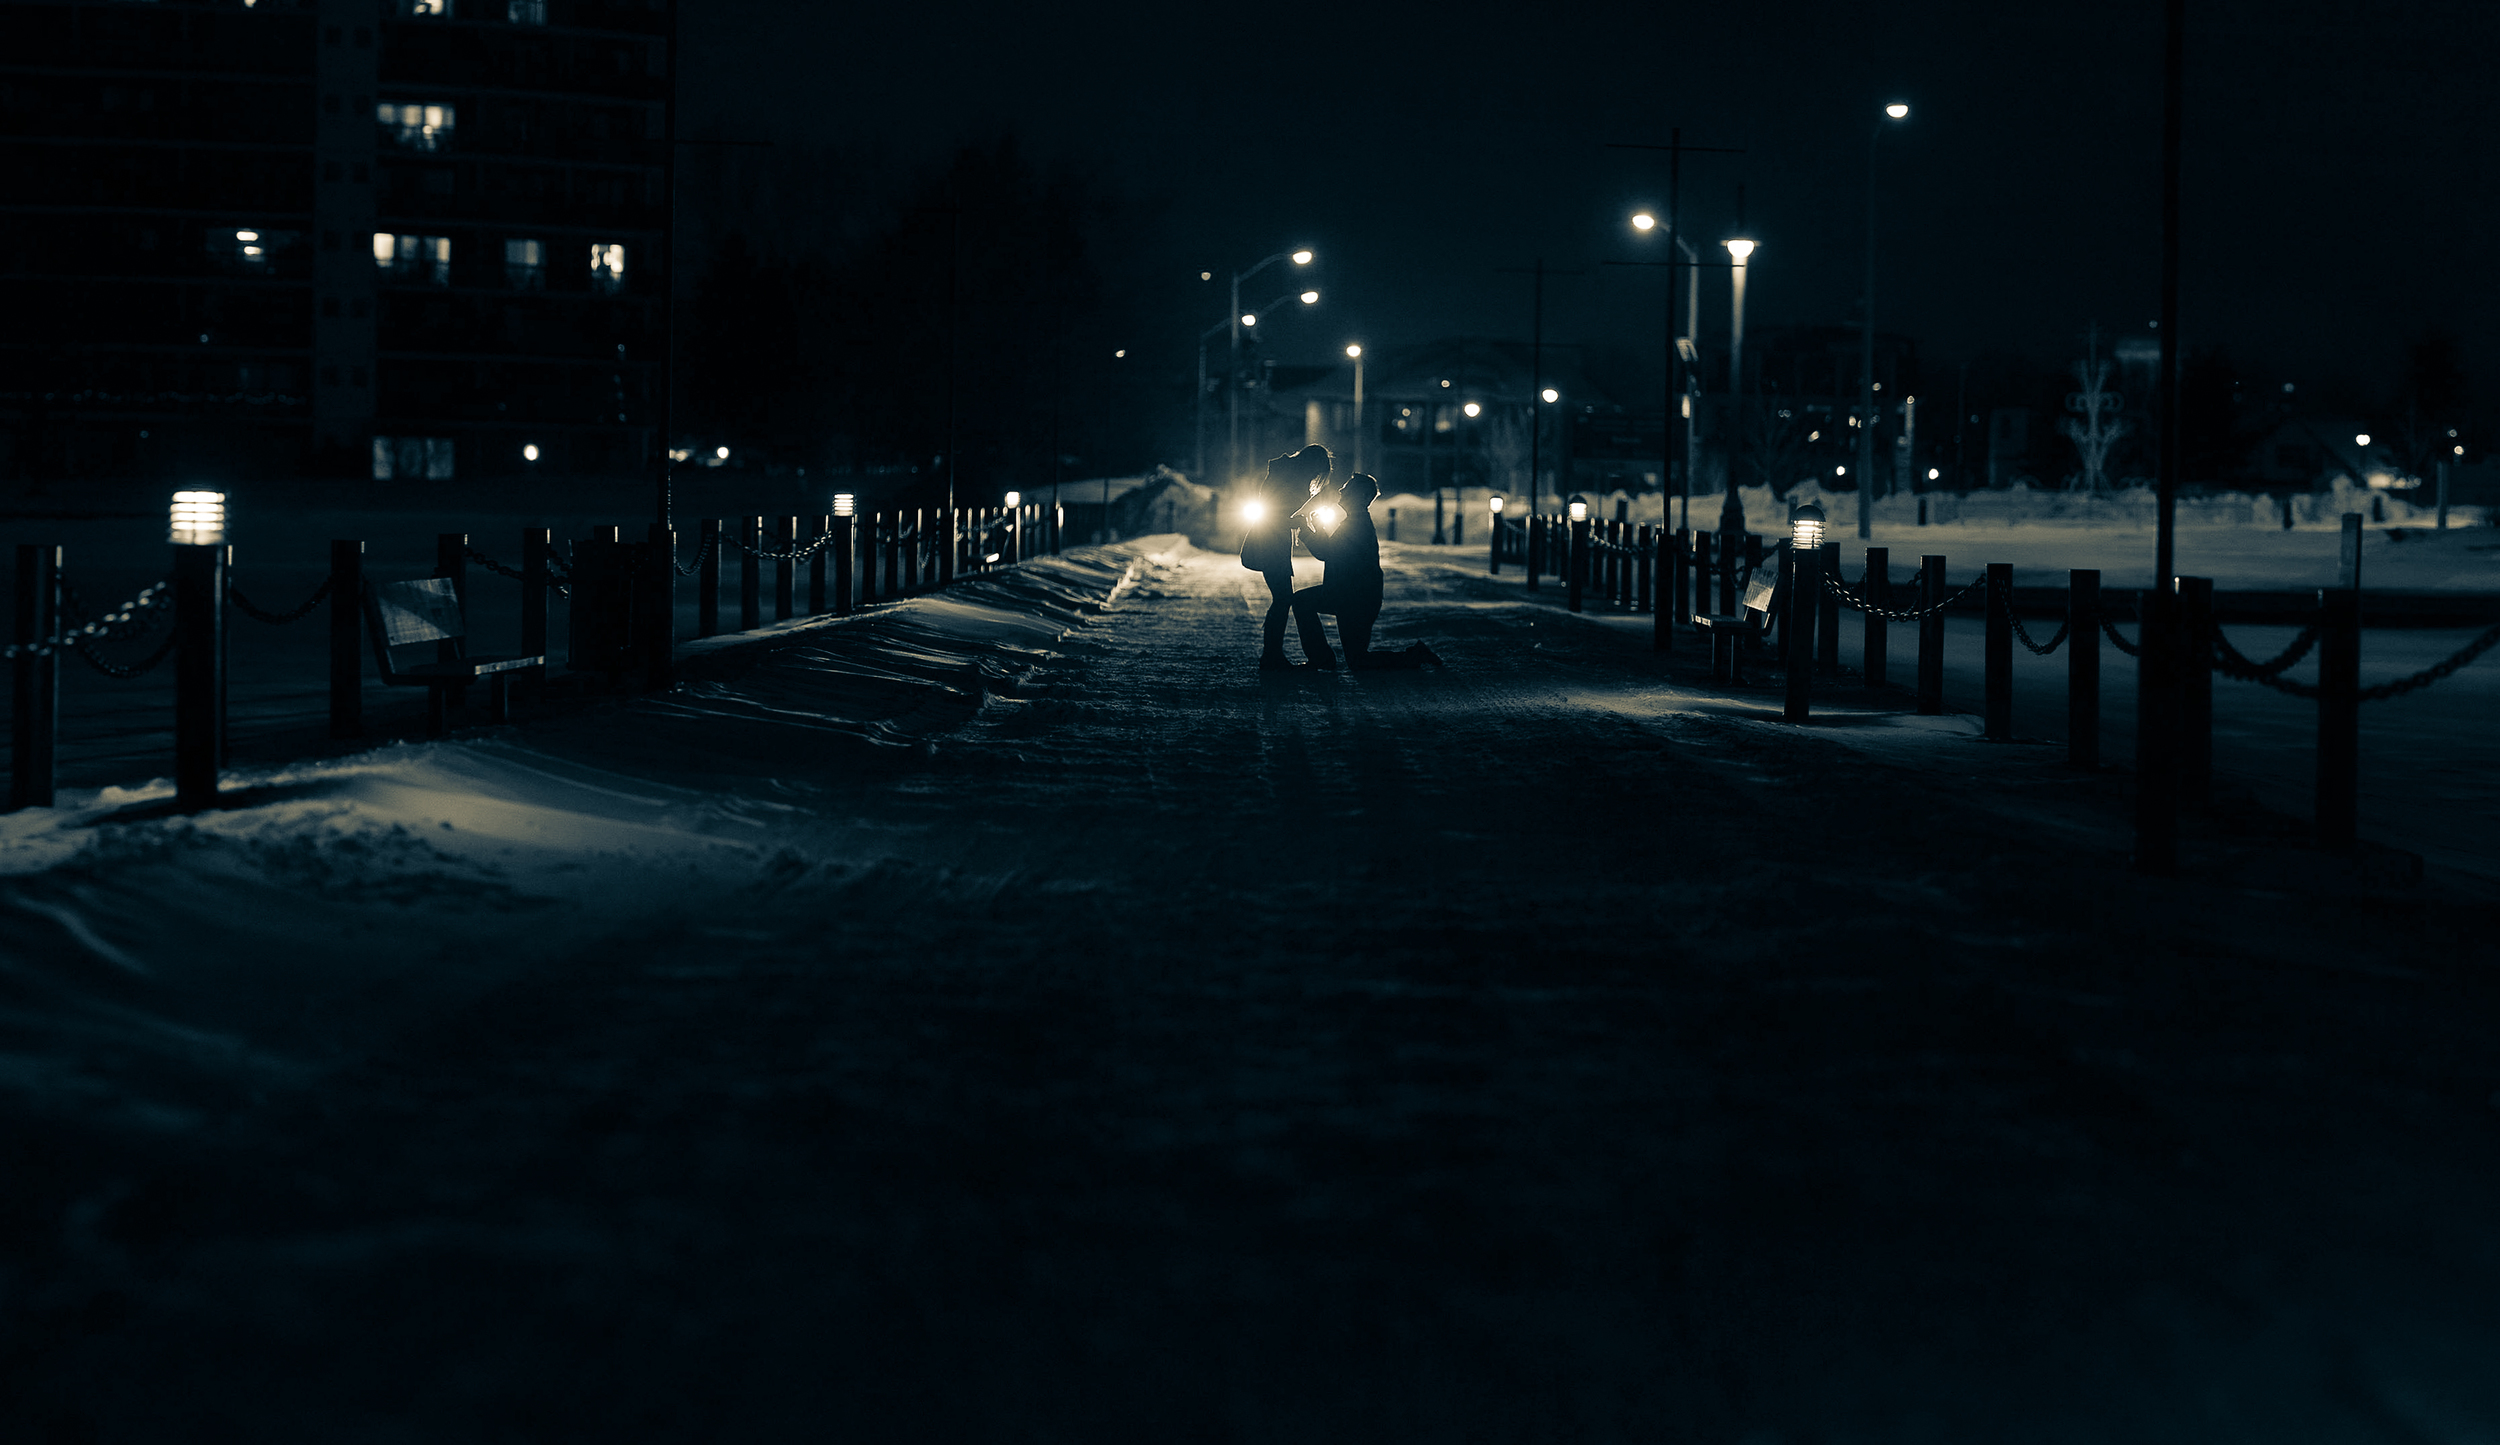
If you were under the impression that time-lapse sequences are the preserve of condensing the observation of periods of slow change into something that can be watched in a few minutes, photographer Mike Bons might encourage you to think again. He used the time-lapse technique to capture the precise moment that he proposed marriage to his girlfriend Erin: a single moment of immense change. Given that Erin said yes, I suppose we should call her Mike's fiancée now!

Mike succeeded in setting up the proposal and shoot with only a marginal amount of deception. Being a photographer, Erin and Mike don't tend to have very many photos of them together: someone is always behind the camera. By suggesting a photoshoot of the two of them together, he had every opportunity to capture the moment without giving away the game and getting some photos of them together. By creating a time-lapse of the proposal, he wouldn't need to worry about getting his timing right, either. Cunning!

Having bought the ring and settled on St Valentine's Day as D-Day, it was time to do the deed at Meyer’s Pier, in Belleville, Ontario, with their car's headlights backlighting the scene.

Mike set up his Canon 6D with a 70-200mm lens set at 175mm, manually focused on the point they'd be standing, and an exposure of 1/80 second, ƒ/3.2, ISO 3200. He set his time-lapse device to record one photo every second, and then it was a case of getting Erin out of the car, where she was keeping warm, and getting down on one knee.

The next step was all in Erin's hands!

After she'd said yes, and they'd got all the photos they wanted, I rather hope that they spent a romantic evening together before he embarked on his post-processing.

To create the final image, Mike selected his favourite shot from the time-lapse sequence and stitched it together with some panorama shots that he'd taken when he was setting up. This was to ensure that he achieved the field-of-view that he wanted along with the depth-of-field that he wanted from his settings of 175mm and ƒ/3.2.

Tah-daa! One life-changing instant captured by time-lapse. And many felicitations to Mike and Erin.

Oh, and seeing as Mike is a photographer, you might want to check out his website for his other photos that don't necessarily involve proposing to his girlfriend.

(Headsup to Triggertrap)

ExpoExpress: guerilla photo exhibiting

With so many photos being taken every day, and only a fraction of those making onto Facebook or Flickr or 500px, and even fewer of those really being looked at, how can we give our images a better chance of being seen? Especially by people who don't necessarily hang around the usual photo-sharing sites. It was a question that was puzzling Sydney-based photographer Manuel Caminero. He also wanted to make better use of an 18-hour lay-over in Dubai when he'd already seen most of the sites. (I'd take an abra over the creek into old Dubai to explore the backstreets and pick up some street food. Always worthwhile.)

# ExpoExpress from Manuel Caminero on Vimeo.

His solution? A sort of guerilla photo exhibition. He printed out a selection of his Australian lifestyle images and stuck them up (temporarily) in a public place in Dubai. Then he waited and watched. To his surprise, there was a generally positive reaction to his little project. People would stop and take a look, and when he had a word with them, they liked it. So he did it again. And again. And again.

And he reckons that you should give it a go, too. He calls it ExpoExpress: Print off a compelling series of images, find a place to pin them up in public, and then observe people's reactions to your work.

Just make sure that you don't litter. Or menace. Or cause any kind of obstruction.

Elbows in, people!

The picture-taking world appears to have been struck by an unfortunate bodily malfunction pandemic that is having an unnecessarily detrimental impact on the quality of photos the globe over. The malfunction affects camera users indiscriminately, with dSLR and CoSyCa owners, smartphoneographers, and compact camera users all under threat of its effects. It manifests itself as an inability for the camera user to hold her or his arms tight into the body when taking a photo, and instead standing with elbows projecting from the body, perpendicular to the torso. These unfortunately afflicted photographers resemble chickens attempting to flap their miserably clipped wings. Symptoms of this malfunction present themselves as camera-shake and unsalvageably blurry images, brought about by the inability to hold the camera steady. It leads to the records of hundreds, thousands of precious moments being consigned to the digital dustbin, notably those involving candles and birthday cakes, because the subjects are unclear, fuzzy, or even in double. Consequently, the emotional impact of the condition is thought to be quite distressing. If caught early, the condition is entirely treatable, but without speedy rectification there is no hope for affected photos.

The impact on photos taken by smartphoneographers is regarded as especially severe, as the reduced size and weight of these devices makes them inherently more difficult to stabilise.

Treatment involves a very simple modification of the body when holding a camera in preparation for taking a photo: the elbows need to be tucked into the abdomen and the arms held close to the torso. This enables the photo-taker to hold the camera with greater security and thereby minimise the chances of a photo obscured by blur and shake. In combination with other techniques, such as holding ones breath and taking a firm stance or leaning against something secure, positive results are anticipated.

Should photo-takers find it especially difficult to modify their stances, or should conditions be suggestive of camera-shake, it is recommended that a tripod or other stabilisation device is employed.

It is hoped that a general information campaign encouraging photo-takers to move their elbows down and in will see an overall improvement in the quality of photos taken and a reduction in people mimicking poultry.

Top tips for terrific travel photos

Seeing as Daniela is currently gallivanting somewhere in Thailand, we thought it presented us with the perfect opportunity to give you our travel photography tips. We've accumulated them from thousands of miles on the road through tens of countries. They might be useful for someone other than ourselves.

1. Be prepared

Like every good Boy Scout and Girl Guide, you need to be well prepared, before you go and when you're away. As contrary as it might sound, even if you favour spontaneous, moment-to-moment travel, a bit of planning will make sure that you get the pictures you deserve. You need to be ready for anything.

Buying supplies at the souq in Tangiers, before taking the train to Fes

Being prepared comes in three parts.

  1. First: Have an idea of what you want to see, do, and experience before you arrive. It doesn't have to be a minute-by-schedule, a wish-list is sufficient. It will help to ensure you see as much as you can and still have the chance to unwind and prevent being overwhelmed and accomplishing next to nothing.
  2. If you know roughly what you're planning on doing, it'll help when you pack your kit. Why take with lenses that you probably won't use at the expense of those you will? Trust me, I schlepped four lenses around the world and used only two of them.
  3. Finally: when you're out and about with your camera, be ready. Remember to re-set your ISO and shutter speed after a night shoot. Have you camera to hand on a bus or train, not in the luggage compartment. And have a smartphone or compact camera with you when you pop out for a bottle of water. You never know what you might see!

2. Tell the story

Every photo tells a story, and the photos from your travels should tell the story of your trip. That means it isn't just about capturing the monuments and the famous views, but about recording the little things that matter, that make a difference, that bring a trip to life.

Bar decorations in Bali, before I got sick

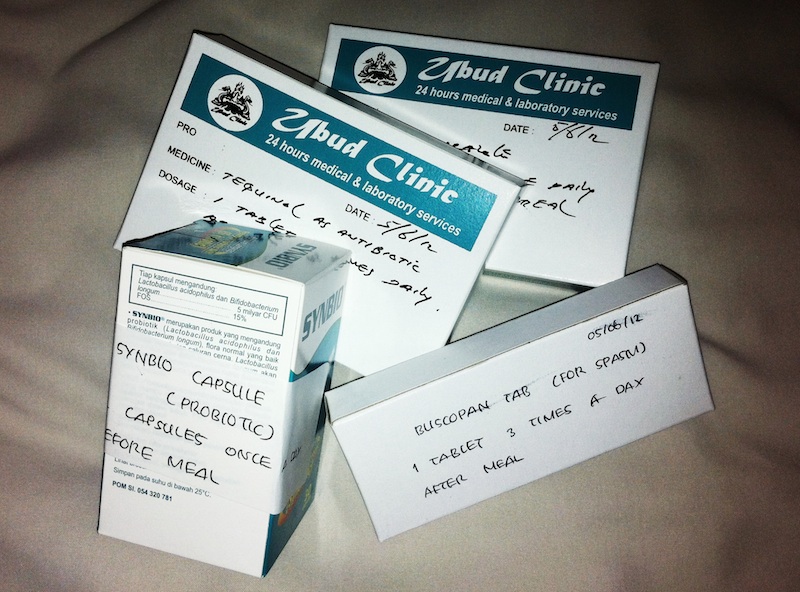
When you look at your travel photos you want to be transported back to the hustle and bustle of the souq in Dubai; your friends and family who weren't there need to sense the crush, the smell, the heat. My photos from Bali include stone lions guarding temples, the bottles of petrol you see for sale by the side of the road, and the pile of medicine I was prescribed when I fell ill. My time there is charted in pictures, big to small.

Sick. Very sick, in Bali

3. Get off the beaten track

I'm a huge advocate of eating in local restaurants and taking the bus to the isolated villages half way up the mountain. It all adds to the experience. But I mean something more when it comes to photos. When you're looking to photograph famous monuments and well-known vistas, look for a fresh approach, an unusual angle, a different feel.

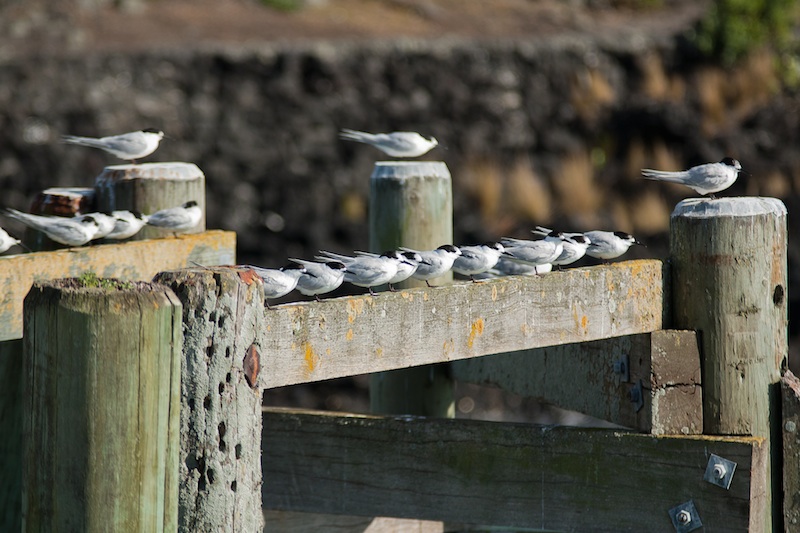
Birds in a row, Rangitoto harbour

4. Take good care

When I first used a mandolin (one to prep vegetables, not the musical instrument) I was advised that carrots are cheaper than fingers. I've a similar approach to taking photos. I'm worth more than my kit; and my safety is worth more than a photo. This means that I don't wander blithely into insalubrious parts of town flashing my camera and I don't ignore the signs telling me that landslips are likely owing to recent heavy rain.

There was a certain element of risk in getting this photo, but it wasn't off-limits

I also make a point of regularly rotating my memory cards, so that if my kit does succumb to theft or failure, I won't have lost all my photos. And if I travel with my laptop, I backup my photos to a hard drive, and if possible a cloud drive, at the end of every day.

The key thing is, your photos are worth more than your kit and you're worth more than both of those.

5. Know 'the rules'

Yes, we would like you to know the rules of photography and we would like you to know when to break them. But that's not quite the point here. We mean the local rules, customs, and mores. Can you take photos of people? Are camera allowed at religious sites? Are certain places out-of-bounds at particular times of the day? Make sure that you know what you can and cannot do; you don't want to offend anyone where you're a guest and you don't want to get into trouble. However far these customs and protocols might seem from your life, they still need to be respected.

A nod to your camera and a smile can establish if photos are permitted

6. Set your alarm

Sunrise and sunset might present you with the best lighting opportunities for your photos, with sizzling stone, luscious landscapes, and perfect portraits, but early in the morning will show you a different side to where you're staying. And you'll escape the tourist crowds, too.

Sun coming up, Bay of Islands

7. Remember to put down your camera

Travel is about a whole lot more than your photos. It's a wealth of experiences and encounters. When you're constantly holding a camera to your face, it means that you can miss out on people, whether your family or anyone new. Remember to put down your camera from time to time, and just enjoy.

Of course, this is just the beginning, the basic principles. Haje covers travel photography in far more depth and detail in his gorgeous Focus on the Fundamentals: Travel book!

Postcards: A Martin Parr video exclusive

Only in England, an exhibition of work by two of Britain's most respected documentary photographers, Tony Ray-Jones and Martin Parr, has been running at London's Media Space since September last year. As the exhibition draws closer to the end of its six month run, Media Space has released some exclusive video footage of Martin Parr exploring a file of Ray-Jones' collected seaside emphemera. It's a sweet insight into the interests of Ray-Jones, and Parr's excitement at unveiling a little more about him.

If you'd like to see Only in England, you've until 16 March to do so. Tickets cost £8, or £5 for concessions and can be booked online. Media Space is a part of the Science Museum.

Only in England will run at the National Media Museum, Bradford, from 28 March to 29 June 2014.

Giving your pictures a toy camera makeover

In the interests of knowing how it was done and not wishing to rely on filters or presets (or on dodgy film development practices) I had a go at converting one of my self-portraits into a toy-camera looky-likey. I doubt that it's a process I'll do too often, but for the record and because I'm sure other people might be intrigued, here's how I went about it. Before you start playing with the tonal curves and adding vignettes to your photos to make them look as if they stepped out of 1976 and were bathed in the wrong chemicals, it’s useful to know what to look for in a toy camera-esque image.

  1. Exposure: the light meters in toy cameras tend to be on the inaccurate side of calibrated, leading to badly exposed images
  2. Light leaks: sealing on toy cameras is virtually non-existent, presenting you with huge streaks of light smeared across your photos
  3. Aberrations: Cheap plastic-y lenses mean distortions and vignetting
  4. Cross-processed look: processing film in the wrong chemicals will give images odd colour casts

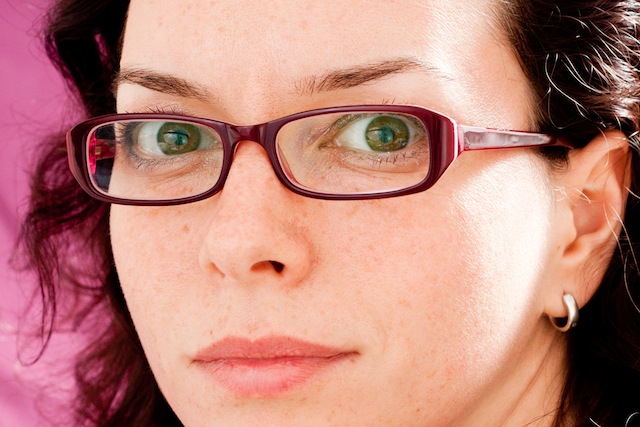
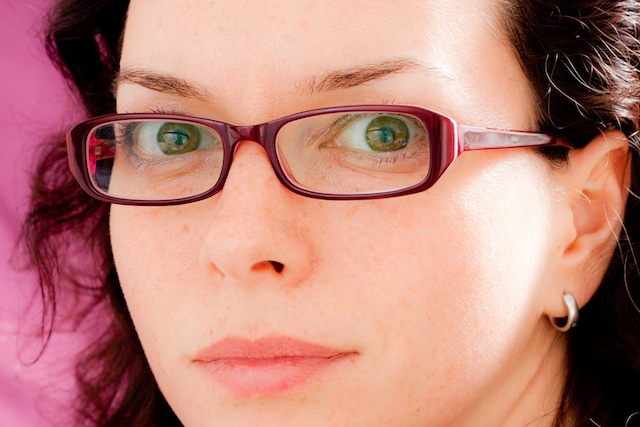
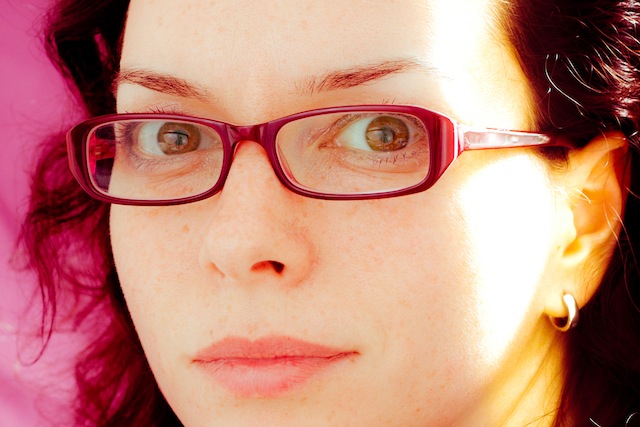
This is my recipe for a toy-camera flavoured photo. It's fairly subtle because I'd rather not feel as if my eyes are being assaulted by a sweet shop, but you can of course ramp up the numbers to get the effect that you want. We'll start with a studio shot of me. It was part of a series I took when I was getting accustomed to wearing glasses.

1. Exposure

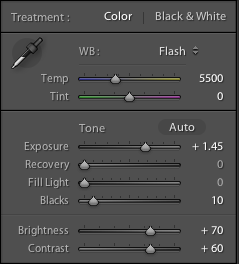
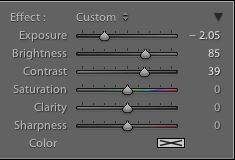
Go over the top with the exposure My first move is to increase the exposure, add some depth to the blacks, and then go overboard with the brightness and contrast. It'll look like a cartoon at this stage, but it's a base on which to build. My exact settings, for the record

2. Clarity

I pushed the clarity slider to -45 By nudging the clarity slider to the left it helps to recreate the soft mushiness of a cheap plastic lens.

3. Light leak

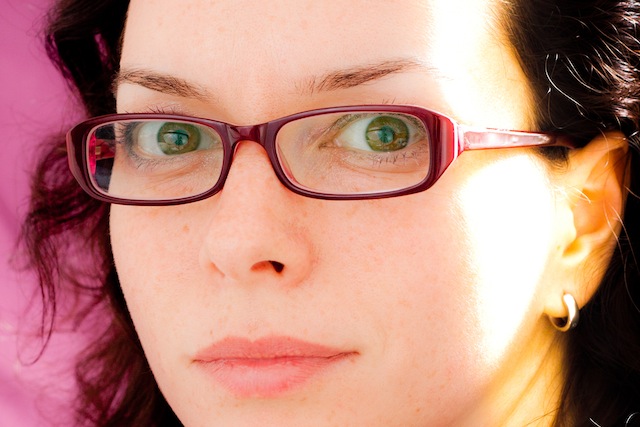
One light leak. Feel free to choose your own position. Use a pair of graduated filters to add a light leak. I placed one to the left of my ear and another right with roughly opposite settings. This produced a yellow-y smear. Settings for one graduated filter

4. Split toning

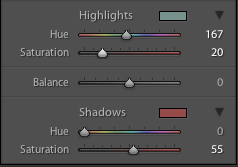
If you want, you can spend hours messing with the split toning sliders to achieve wildly varying looks that could all pass for cross-processing. It'll be a case of finding what you prefer, and placing more emphasis on the reds and purples or the greens and yellows.

My chosen split tone look

I tried this image with a yellow-y green look initially, but swapped it for a more pinky-red version. You can play around a great deal with split toning

5. Vignette

Without knocking myself over the head with a plastic picture-taking-device, I add a touch of vignette, too.

6. Grain

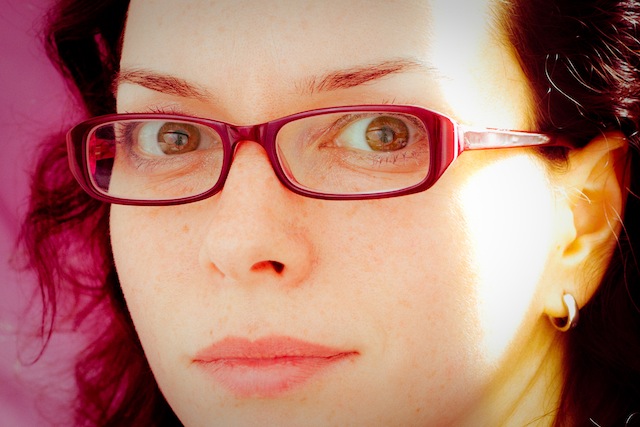
Finally, add a hint of grain to help recreate the film feel of a toy camera. Tah-dah!

Et voila – from studious studio self-portrait to tricksy toy camera creation.

Quick and dirty infrared photography

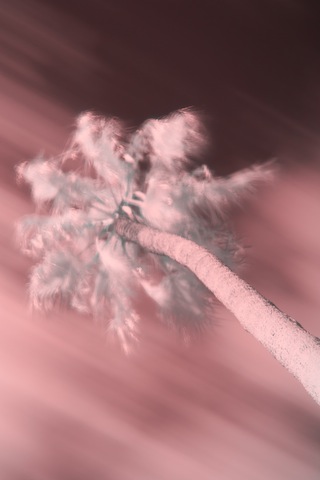
We're accustomed to taking photos with what is somewhat uninspiringly referred to as 'visible light', or the part of the spectrum whose wavelengths measure roughly 400 nanometres (violet) to 750 nanometres (deep red). However, there's an awful lot more to light than just the wavelengths we're able to discern with the naked eye, and it's possible to take photos using that 'invisible light'. In particular we can make use of infrared light (IR), which picks up at 750 nanometres, where visible light drops off, and stretching to approximately 20,0000 nanometres. Lots of people think that IR photography is the preserve of specialist infrared adapted cameras, with 'normal' cameras being insensitive to IR light owing to the 'hot mirror' that sits just before the sensor. However, these hot mirrors aren't 100% effective, and with the help of an IR pass filter, you can capture images made with infrared light.

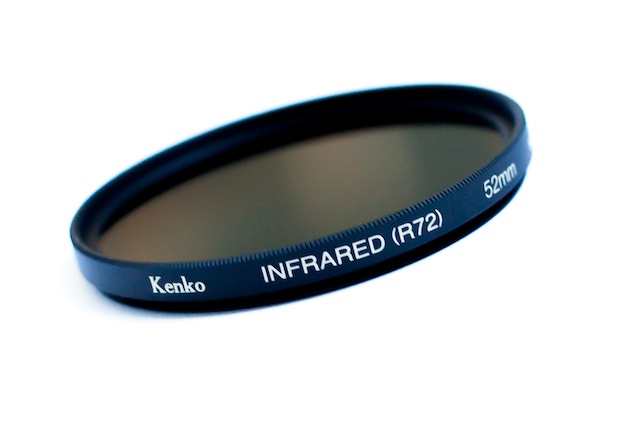
The most common filter is probably the Hoya R72, which is easy to pick up in a camera shop or over the Intergoogles. It won't allow you to capture IR waves at more than 1,300 nanometres, but that should be enough to start. You can always invest in an IR-adapted camera if you find that it really floats your boat.

R72 filter

Got your IR pass filter? Want to give it a shot? Off we go!

IR photography will present you with several hurdles: focusing, exposure, and post-processing. Overcoming all of them is more a case of trial-and-error than hard-and-fast rules and to be fair, that's half of the fun!

1. Choosing a scene

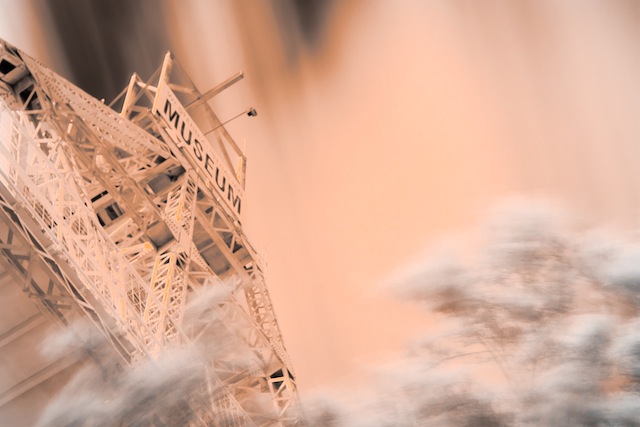
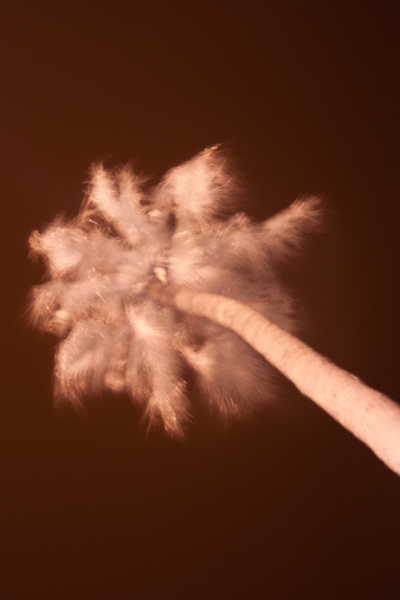
Okay, so you can pretty much photograph anything in IR, provided that there's some light around. However, the most stunning IR images tend to involve foliage, which comes out as bright white, and blue skies or water, which look deeply intense. But that's all after a bit of fiddling. More on that in a moment.

Achieved by adjusting the red hue and orange luminance sliders

Whatever you choose to photograph, it's not going to be a quick process, so you need to be somewhere that won't put you in people's way or get you into mischief. And it needs to be suitable for a tripod, too.

2. Focusing

The difficulty that you’ll encounter with focusing comes as a result of the IR filter; it blocks out the majority of visible light passing through the lens, leaving you with a dark viewfinder. You don’t have anything to work with when you’re focusing your lens. This means that you have to put your camera into manual focus and set up your shot before placing the IR filter over your lens.

Setting up your shot and then placing the filter over your lens is a bit of a faff, but seeing as you’ll be using a tripod anyway (more on that in a moment), it shouldn’t be too infuriating.

3. Exposure

As for exposure, you’re going to need to use a slow shutter speed, probably between ten and 30 seconds, to allow enough IR light to reach the sensor to expose it sufficiently. This is where your tripod comes in, obviously, as you’ll never manage to hold your camera steady for that length of time. Long exposures also have a tendency to noisiness, so use as low an ISO as you can manage, too.

4. False colour

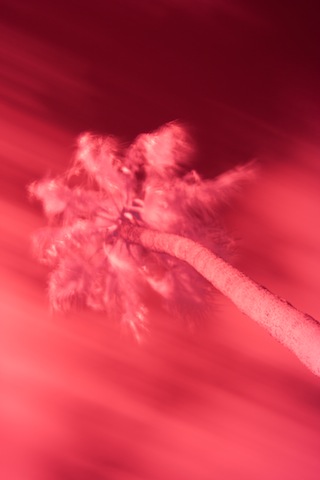
Don’t be surprised if your infrared photos emerge from your camera with strong red or magenta casts; this is known as false colour. It’s normal and it’s a simple fix in Photoshop to produce a 'traditional' looking infrared photo. If there is such a thing. It involves shifting the white balance to 2000 Kelvin and then flipping the levels in the blue and red channels. In short: open the blue channel and slide 'Red' to 100% and 'Blue' to 0%; in the red channel, 'Blue' needs to be at 100% and 'Red' at 0%. You might want to adjust the contrast and brightness, but that's the basics.

IR images come out with strong 'false colour' casts

5. You don't have to use Photoshop

After playing with the white balance However, there's a lot of fun to be had by simply playing around with other editing packages to produce ethereal-looking images. With something like Lightroom you might want to try:

  • Fiddling with the white balance and tint sliders to produce subtle pink or flaming orange images, and everything in between
  • Playing with the hue and luminance sliders to alter the colour mix of the photo
  • Converting to black and white and using the black and white mix sliders to adjust the look of the image

Really, there's no right or wrong and the range of impact that you can have with an infrared image is enormous. It's a lot of fun.

6. Hotspots

Some lenses are prone to producing ‘hot spots’, or patches of much brighter exposure that are usually, and most inconveniently, in the centre of the image. There’s very little that you can do about this in camera except to try a different lens. Prime lenses seem to be less prone to hot spots, but there are no guarantees, and using a smaller aperture will reduce its size. It's possible to try to correct it in post-processing, too.

What are you waiting for?

Orange and red saturation adjustments

Visualising studio lighting

Once you feel you’ve started to get the knack of pointing your camera at things and clicking the button, it’s time to start taking control of all the lighting in the scene. But, as it turns out, that’s bloody tricky.

I keep having to explain how to ‘visualise’ different types of lighting to people, and it turns out that it’s rather difficult – not because what I’m doing is particularly advanced, but because sometimes, it’s just tricky to make the connection between what is happening in a photo, lighting-wise, and how the lights are set up.

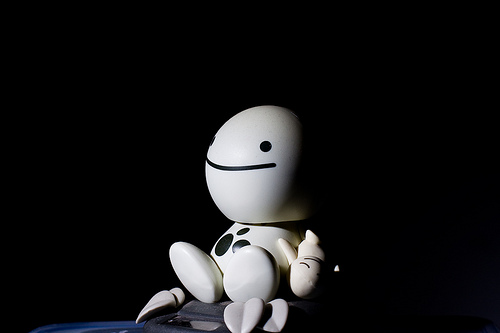
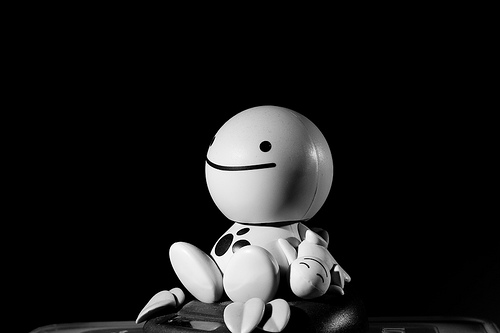
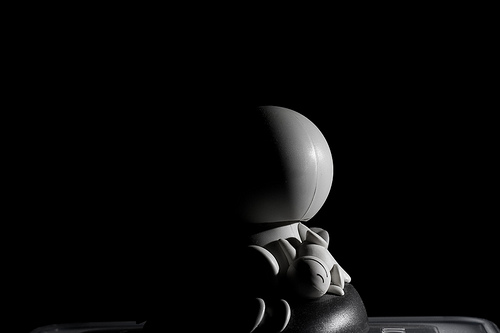
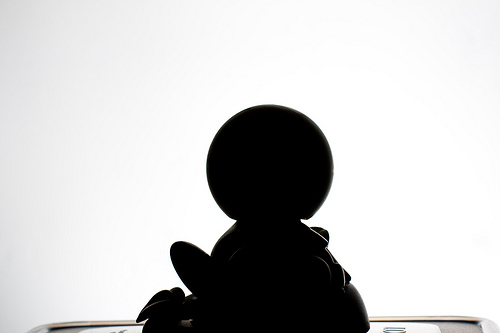
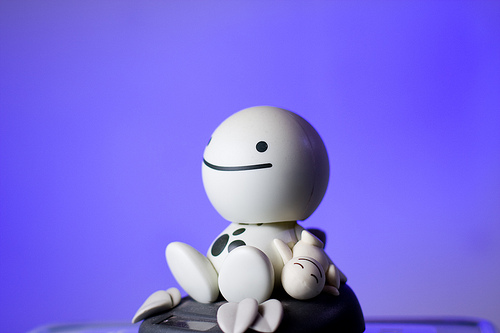
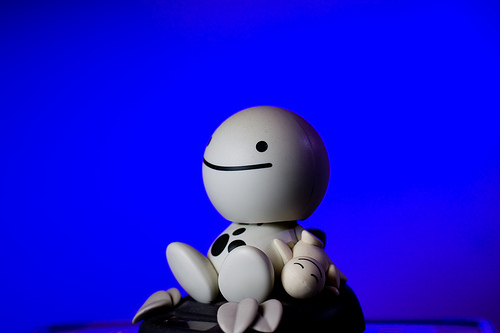
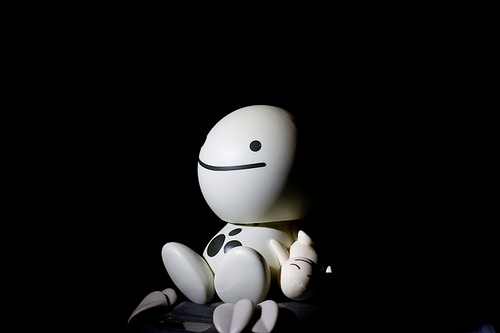
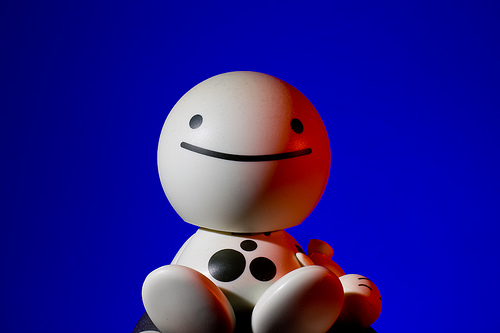
I’ve put together a collection of examples which I hope will help. For these photos, I’ve used a figurine with a nearly round head – this will be very useful to determine where the light is coming from; but remember that all of this is as valid with more complicated shapes, including people.

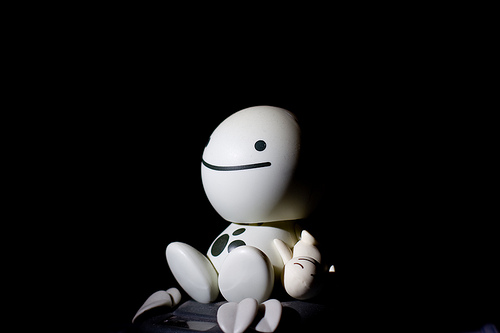
This picture of HappyHead is part of a series of photos designed to explain some basics of studio lighting.

If you’re curious, this is the equipment I’m using throughout this post (and when I’m taking photos in general, for that matter).

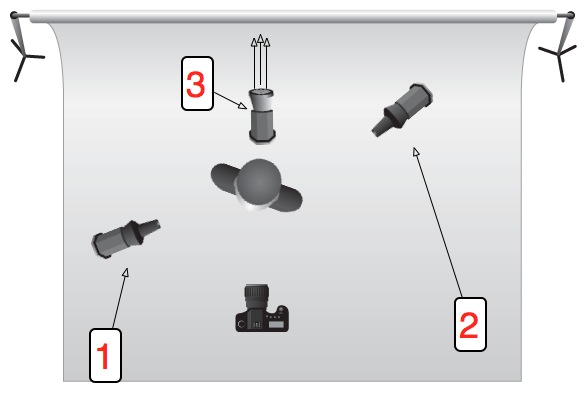
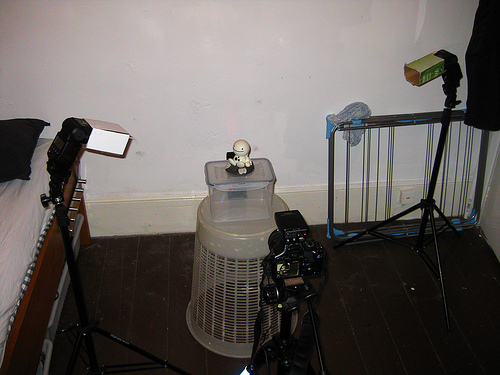
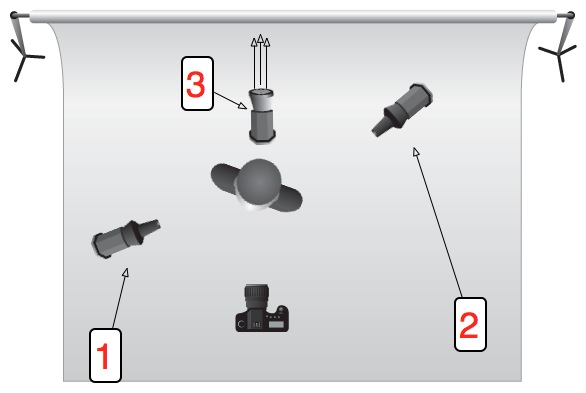
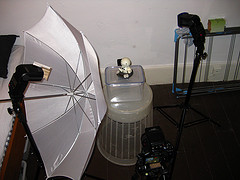
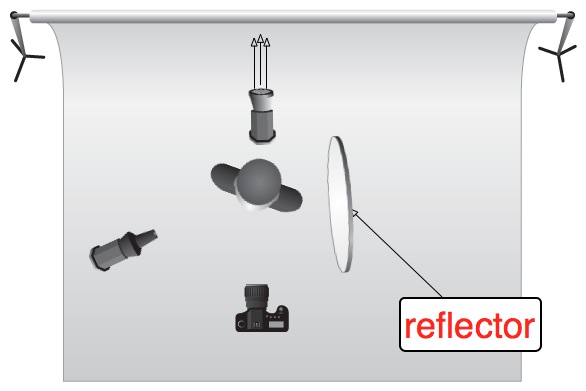
For most of the photos, the lighting set-up is like this:

Lighting setup, ItL

Check out the Flickr page for a detailed breakdown of everything you see in this photo.

Or, for additional clarity:

illu_lighting_setup.jpg

A couple of basics

Introduction to Lighting - 1 Picture 1 – Lit by a single 580EX II flash from top left (flash 1 on the schematic) at 1/32 power output.

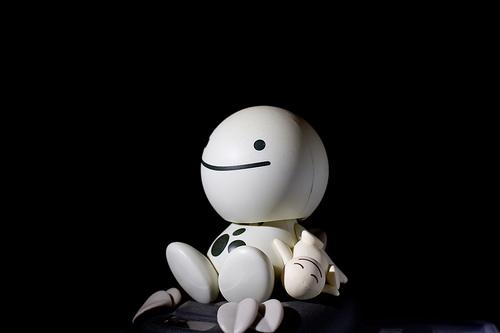
Introduction to Lighting - 2 Picture 2 – Same as Picture 1, but with an additional flash from the right (flash 2 on the schematic), slightly behind HappyHead, at 1/64 power, to lift the shadow a little.

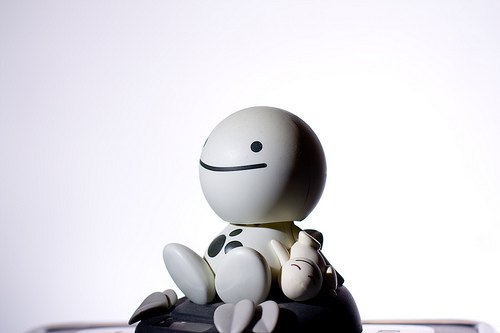
Introduction to Lighting - 3 Picture 3 – Same as Picture 2, but with an additional flash at full blast on the background (flash 3 on the schematic). Note the light fall-off to the right, due to the flash being too close to the wall, and not aimed correctly.

Introduction to Lighting - 4 Picture 4 – Shows just the flash to the right (flash 2 on the schematic), slightly behind HappyHead.

Introduction to Lighting - 5 Picture 5 – Shows just the flash behind HappyHead (flash 3 on the schematic), used to blast the background.

Troubleshooting lighting.

The observant among you will have figured out that Picture 1 + Picture 4 + Picture 5 = Picture 3. As a general rule, you can often just switch on one flash at a time to figure out which flash gives what kind of light – but only when they are in manual mode, obviously: In E-TTL mode, the flashes will attempt to compensate for the missing flashes.

So what is all of this good for?

istock_000006420114small.jpg

When you’ve perfected this lighting setup with a figurine, it’s time to replace the doll with a real, live person. Take a close look at this photo – the lighting setup is exactly the same as that we used for HappyHead!

Gels add a touch of colour

gel.jpg

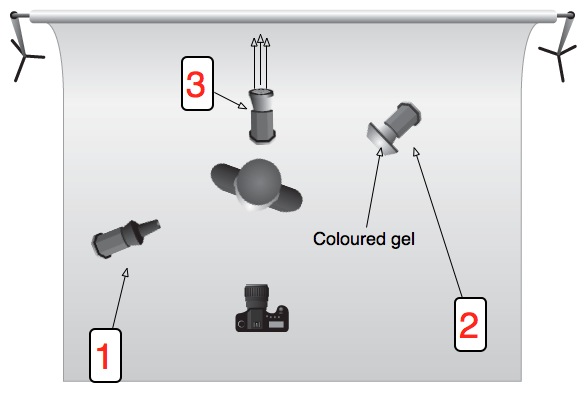
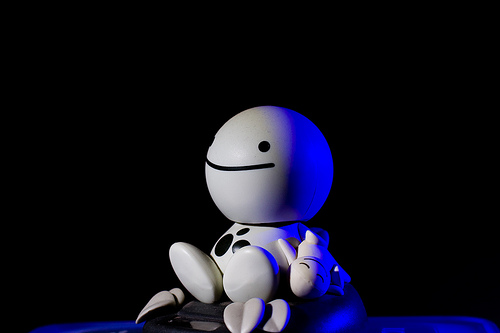
Introduction to Lighting - 6 Picture 6 – introduces the use of coloured gels. This is basically Picture 1 plus the same set-up as picture 2. However, the gelled flash has a much higher power output (1/32) to help overcome the light loss from the blue gels

Umbrellas or softboxes make the light softer

brolly.jpg

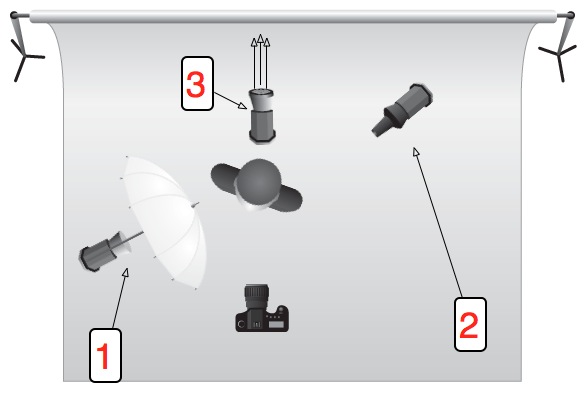
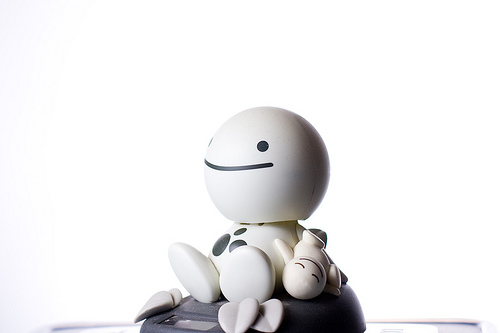
Introduction to Lighting - 7 Picture 7 – This uses the same flash setup as we’ve had so far, but with an umbrella on the left-hand flash to make the light softer. Notice how much gentler the light fall-off (i.e. how much less harsh the shadow is) is in this photo compared to the ones before in this series

Preventing spill-light

Introduction to Lighting - 8 Picture 8 – Same as picture 7, but I have turned the right-side flash to the background, with the blue gels on it. Note how the blue in the background looks quite washed out. This is because the umbrella is great at spreading the light, but it also throws a lot of light onto the background, which causes the blue light to be ‘contaminated’ with white light

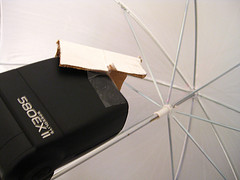
Introduction to Lighting - 9 Picture 9 – Same as picture 8, but here, I have added a piece of cardboard to the flash on the left, to ensure less of the light hits the left side of the umbrella:

Lighting setup, ItL w/ umbrella A simple barndoor

That, in turn, that means that less light is diffused onto the background, so now the blue flash can do its job better. Note that the flash output in Pic 8 and Pic 9 is identical – the only thing that changes is a tiny bit of cardboard. Incredible, eh?

Don’t forget about reflectors

Introduction to Lighting - 10 Picture 10 – Okay, back to the original (this is a different picture than pic 1, but uses essentially the same settings, so should look very similar). See how dark the right side of HappyFace’s head is? In Picture 2, I fixed it by adding a flash, but you can be more economical with your flashes

reflector.jpg

Introduction to Lighting - 11 Picture 11 – is exactly the same photo as Picture 10, except I’m holding a reflector (that’s a posh word for ‘a piece of A4 paper’) just out of the frame on the right side of the image. The light from the flash is reflected off the paper and back onto HappyFace, causing it to look much less dramatic.

From night to day with the flick of a switch

Introduction to Lighting - 12 Picture 12 – is quite similar to Picture 1, but has been set up to contrast with picture 13… Also note how the light has been moved further towards the camera (i.e. further to the front of HappyFace). This is so you can tell the edge of the head better – instead of getting the effect like in picture 7, where you can barely tell where the side of his head ends and the wall begins, here you get a clearer definition of his head.

Introduction to Lighting - 13 Picture 13 – The only difference between picture 12 and 13 is that in Picture 13, I have turned the flash lighting up the background off. Two completely different looks at the flick of a switch. It’s bloody magic, I’m telling you

Time to show off

Introduction to Lighting - 14 Picture 14 – is just showing off, really, and combines a whole series of lessons: The background is beautifully lit with a 420EX, the right side of HappyHead’s face is lit with the familar strobe, but with a red gel on it.

Iin retrospect, I wish I had umbrella’ed that strobe, because it’d have gotten rid of that bright red specular highlight just at the edge of HappyHead’s mouth.

Good luck!

This is only a very quick’n'dirty introduction to lighting, but it seems as if most people who e-mail me are actually struggling at this level – I’ll pick up with a more advanced lesson in a couple of months, I think.


Originally posted on 26 May 2011, but definitely worth dusting off and dragging out of the archives.

Emergency smartphone support: a piece of string!

It's a truth universally acknowledged that the steadier you can keep your camera, the better your photos will be. Keeping your smartphone steady can be a bit tricky because it's small and light. Sure there are smartphone specialist supports, but there has to be a cheaper, lighter way that's in-keeping with the pocket-sized nature of smartphone photography, no? I'm not entirely sure why I decided that I needed to modify an emergency string tripod for use with a smartphone, but obviously I was channeling MacGyver somewhere, so I gave it a go. If you've never used an emergency string tripod, it's a loop of string secured to your camera to help keep it steady. You might've heard of it as a chainpod.

For my proof-of-concept smartphone stringpod, I used baling twine. It's not the ideal material because it's too coarse and too slippery against the phone's casing; however, we have an abundance of it and I just needed to prove my idea. A thinner string with a less shiny finish, like kitchen string, would be better.

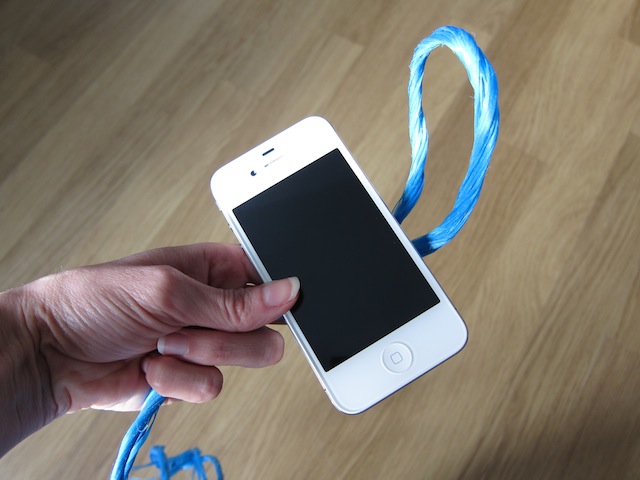
Take a length of string that's at least double your height and tie together the ends to form a loop.

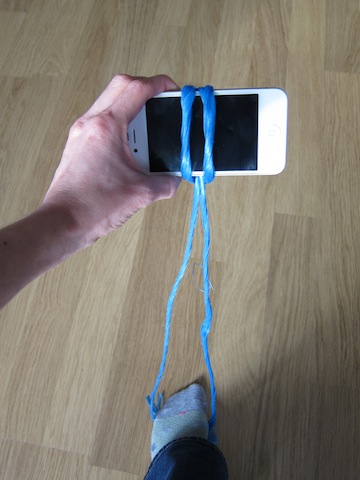
Take a loop of string and secure it around your smartphone in girth hitch

Use the loop to secure a girth hitch around your smartphone. Girth hitch: the technical name for a simple knot made with a loop. You can see better distructions here.

You should now have your string looped around your smartphone, and the rest of the loop hanging down from it.

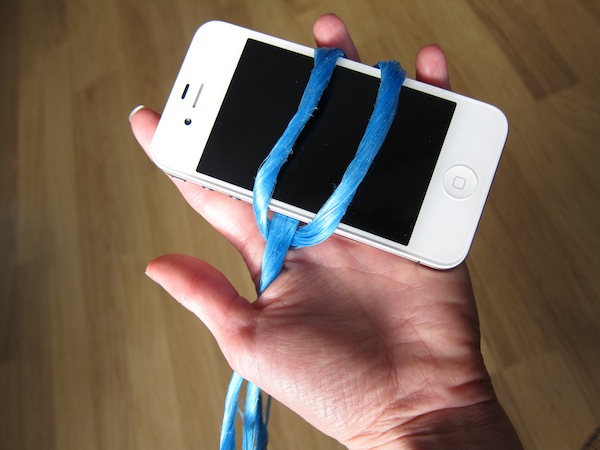
Smartphone held in a loop

Place your foot (or feet) through the loop and pull your smartphone to taughten the string.

Stabilise your smartphone using your feet to taughten the string

That should stabilise your smartphone on the vertical axis, meaning that you can concentrate on horizontal stability. You should have a better chance of taking wobble-less landscapes and shake-free selfies now.

If you need to shorten the loop, just put a twist in it and secure it with your feet on the twist. Also: don't forget to keep your elbows in when you're taking a photo, no flapping around like chicken, thank you!

How's that for a camera stabilisation device that costs pennies and fits in your pocket?

Translating the mode wheel

If you look at the top of your SLR camera, you’ll probably find a little round dial, which has a whole load of different settings on them. Some of them are automatic settings (like the green square), some of them are ‘creative automatic’ settings (like the little runner), and others are the modes that let you do the heavy lifting yourself (P, Tv, Av and M).

This little dial is called your mode wheel, and it’s your mortal enemy, the destroyer of creativity, and the root of all evil in the world including, but not limited to, wars, swine flu, and stepping in chewing gum with a new pair of shoes.

In this article, I’m going to show you the error of your ways (if you’ve been using it), or I’ll show you what each of the settings means, what it does, and how to recreate the effect by using the manual shooting modes instead.  

Why do they upset you so much?

Good question. The creative automatic modes make me angry because they take important decisions out of your hands, but that’s not the worst of it: People who are using the creative automatic modes might, in the short term, be able to take photographs of a technical quality beyond what they would normally be able to, but if you resign yourself to letting your camera do the work and make the creative decisions for you, the problem is that you don’t understand the underlying theory behind what you are doing, and despite getting better results, you’re not becoming a better photographer.

Imagine, say, that you had an oven that would automatically detect what you put in the oven, then calculate how big it is, what you’re trying to do with it, and select the right temperature and time, before beeping at you when your Sunday roast / cake is finished or your socks are dry. (What? You don’t dry your socks in the oven? Hmm, just me, then.) Either way, the result would be perfect every time, but where’s the satisfaction in not knowing what your oven did to bake this cake? And more importantly, what if you want to take creative liberties – say, you might prefer your cookies a little bit American-style; gooey inside – or you might want to make them crispier, for example…

The purpose of this article, then, is to ensure that if you want gooey or crispy photographs, you know how much heat you need to turn on, for how long, and if your cookie tray needs to go in the top or the bottom of the oven.

Okay, enough of the dodgy similes already, let’s have it!

modewheel-whole

Right, in the picture above, starting from the top, going counter-clockwise, the modes are:

Suppress Flash

Into the warmth

Why this is even a mode to itself I have no idea – depending on why you want to shoot without a flash, the easiest thing to do is to use Program mode (but also see Tv and Av, below), which means that the flash will only come on if you tell it to.

If you’re in a low-light situation, pick a higher ISO speed – this will create a bit more digital noise in your photo, but it means that you reduce the need for using a flash. If possible, select a bigger aperture so your shutter speed becomes lower.

Remember the general rule that you can hand-hold a camera at a shutter speed which is the same as the focal length of your lens: So if you’re shooting at 300mm, you should use 1/300 second shutter time or faster. If you’re using a sexy little 50mm prime lens, you can hand-hold at 1/50th of a second. Zooms are the same: if you’re using a 17-35mm zoom, you can hand-hold at about 1/10th of a second at full wide angle, and about 1/30th of a second at full zoom.

Of course, it’s possible to bend these rules, but if you adjust your ISO speed and shutter time to stick with them, you generally get a good, blur-free exposure without having to resort to using your flash gun.

Night-time portraiture

Electric light Afro

Night-time portraiture is the only of these settings which actually has any merit, in my opinion – not because it’s that difficult to do, but until someone has explained to you how you can get good night-time portraits, it can be a little bit counter-intuitive.

Imagine you’re in Paris with a loved one, and you want to take a photo of them, at night, with the Eiffel Tower in the background. You take a photo with a flash, and you can’t see the tower. You take a photo without a flash, and you can see the tower just fine, but your friend, who naturally is unable to stand still for more than a microsecond at the time, is all blurry and hazy. What to do?

Actually, Av is your friend: In Programme and Tv modes, the flash and shutter time will combine to try to expose your foreground correctly. In Aperture-priority, however, your camera will measure the light that is available to you, and then fire the flash to ‘fill in’ the foreground.

What, in effect, is happening, is that your camera is taking a ‘normal’ photo – exposed for the background – but then also uses the flash to expose the foreground correctly.

For further control (you might decide, for example, that the full 3-second exposure to get the ‘right’ exposure for the background isn’t necessary, and that the background looks OK after only a second, or fraction of a second), you can use full manual mode. On most D-SLR cameras and some external flashguns, you can also set the flash output manually, or adjusting it up or down. This differs from camera to camera (on the Canon, you’re looking for Flash Exposure Compensation, or F-EV), so check in your manual.

Top Tip: For creative effect, try to take a photo in AV mode, but move the camera or use the zoom while you’re taking the photo. Because of the flash your foreground will be static, but you get a hugely dramatic and awesome swirling, moving streaks effect because of the lights in the background.

Sports

Skate-zo-phrenia-104.jpg

Sports mode is a complete fraud: Use Tv mode, set to a fast shutter time (‘fast’ in this case depends on the sport you’re trying to capture. For snooker, fast isn’t very fast, and 1/60 of a second should do, but for horse racing, you need a much faster shutter time), and see what your camera comes up with.

If the pictures are too dark, it’s because your camera needs to use an aperture which is bigger than your lens can do (say, it’s using ƒ/5.6 but needs ƒ/2.8 to do the correct exposure). This is signified by a blinking aperture in your viewfinder, and can be solved by either using a lens with a larger maximum aperture, setting a higher ISO speed, or using a flash gun (although, say, darts players don’t really like it when flashes are going off in their face when they’re trying to throw A HUNNNNDRED AND EEEEEIGHTYYYYYYYY).

Macro

Coloured Paper (Macro)

I know a couple of things about macro photography, and I genuinely can’t see a single good reason for that Macro mode being on a SLR camera. For a compact camera, sure: It puts the lens into a ‘focus close to the camera instead of in the far distance’ mode, which means that it’s not wasting its time trying to focus far away. On a SLR, if you’re savvy enough to have bought a macro lens, you probably will be fine with Programme mode, and if you haven’t got a macro lens, then you’re basically out of luck (unless you build your own, of course, but that’s a different article altogether).

To replicate this mode in the real world, use programme or Manual mode, use a macro lens, and snap away.

Landscape

Freedom in Black and White

Landscapes, glorious landscapes. Set your lens to manual focus, and turn it to the little ∞ (infinity) symbol. Note that it IS possible to focus past infinity – that’s because when you’re working with infrared photography, the light is refracted slightly differently, and you may actually need to focus past what is ‘infinity’ for daylight.

Anyway, your lens at infinity, set your mode dial to Av, and select a large-ish aperture. f/8 or f/11 is a good starting point.

Select as low an ISO mode you can get away with (bearing in mind the rule about hand-holding your camera, above, or just go ahead and use a tripod), and bob’s your uncle.

If you want to get advanced, and you need a very deep depth of field – say, for example – you want a person in the foreground, but you also want the background in focus – read up on ‘Hyperfocal distance’ and prepare to be amazed.

Portraiture

Shaken, Not Stirred

I can’t believe they created a separate thing for portraiture – do a search on Flickr for portraiture, and see what comes up. How can they possibly assume that one single mode fits all styles of portraiture?

Anywhoo – for getting good portraits, start with a reasonably long lens (130mm or so is perfect), stand back a little, use a large-ish aperture (ƒ/4 or so) to throw the background out of focus, and start from there.

Full automatic

This mode will select whether you use a flash or not, your ISO speed, your shutter speed and your aperture for you. It reduces your nice, expensive dSLR camera to nothing more than a big point-and-shoot. If I ever catch you (yes, you, I’m looking at you) with your camera set to the fully automatic mode, I’m afraid I’m going to have to ban you from visiting this site ever again.

Go on, live a little, flick your mode dial one notch, and enter the world of Program mode. The camera still does most of the thinking for you, but at least you are controlling it, rather than the other way around.

P – Program mode

Is one step up from automatic mode – and I confess to using it on occasion: The photographer selects everything except the aperture and shutter time, which the camera calculates for you. If it comes up with a combination of the two you don’t like, use your index finger wheel to change them – turn one way and you’ll see the aperture get smaller and the shutter speeds get faster – and vice-versa for turning it the other way, obviously. Use EV compensation to over- or under-expose your images a little, etc.

Program mode is great if you just want to get the right exposure, and you’re concentrating on just getting the photo, without worrying too much about depth of field etc. I know quite a few news photographers (!) who decided that manual mode was too finicky for them, and are shooting in programme mode most of the time. If it’s good enough for the national press, it’s good enough for me.

Tv – Shutter-speed priority AE mode

In Tv-mode, you dial in a shutter speed (say, 1/200 second), and the camera will attempt to get the ‘correct’ exposure by using the aperture to compensate for varying lighting situations.

… Interestingly, I very rarely use Tv mode, but that’s mostly because if I find myself in a situation where I want to actually control the shutter speed directly, I’m already shooting in fully manual.

One situation where it might be handy is if you’re shooting sports – say, rally racing – where you know you want a fast shutter speed, but the light can change quickly. The other situation I can think of is if you’re panning (i.e. a bicyclist comes flying past you, and you want to get them in focus while the background is out of focus), and you need a slightly slower shutter speed.

One thing to be aware of is that most lenses have a far more limited aperture range than your camera has a shutter time range. Think about it: your camera can do from several minute exposures to a fraction of a second, while your lens will only usefully span a much lower range. If you’re shooting in Tv, keep an eye on which apertures your camera is selecting for you, because if it’s getting too big, some of your photos might come out over-exposed

Av – Aperture priority AE mode

Av mode is the opposite of Tv mode, above: You select the aperture, and the camera calculates the right shutter time. Generally, I shoot either in Av or in fully manual, because for most of my photography, the depth of field (i.e. how much of the photo is in focus) is more important to me than whether the motion is frozen or not.

You get a deep depth of field by selecting a small aperture (ƒ/22, ƒ/32), or a shallow depth of field by selecting a big aperture (ƒ/1.8, ƒ/2.8).

When shooting in Av mode, still keep an eye on your shutter times – if they are very fast without you needing them to be, you may be able to use a slower ISO (switching from ISO 400 to ISO 200), which gives images with less noise. If they’re very slow, your photos might be coming out blurry, and you may want to ramp up the ISO or use a slightly larger aperture.

M – Manual

Go on. Try it for a week. You’ll love it. This is photography at its most control-freakishly delicious.

A-DEP: Automatic depth of field

...Is just plain weird. The idea is that you focus on the point that is furthest away, then on the point that is closest to you, and the camera will then focus and select the aperture you need for you. Basically, it’s using the Hyperfocal Distance (mentioned above, under landscapes), but in an automatic way which is actually more complicated to wrap your head around than just doing it yourself in the first place.

I think I can honestly say that I’ve never, ever used A-DEP before in my life, and that I don’t think I ever will. Give me manual exposure and a bit of guesswork any day of the week :-)

Go forth! Prosper!

So, in summary, what I would love for you to do is to reduce your photography to only four of the modes above: P, Tv, Av, M. if you’re feeling particularly hardcore, limit yourself to Av and M only.

And if you are a truly epic photographer with skillz beyond my wildest dreams, set your camera to M and pry the button off altogether. Chuck it away. You’ve graduated. Nothing’s gonna stop you now!


Originally published back in the mists of August 2012, but it bears repeating.

What is zoom?

Z is for zoom. We couldn't finish off our alphabetical meander through photography's fundamentals anywhere else, could we? I've had a few people ask me, over the years, what's the difference between zoom and telephoto, and indeed is there one. Yes, yes there is a difference.

The simple explanation

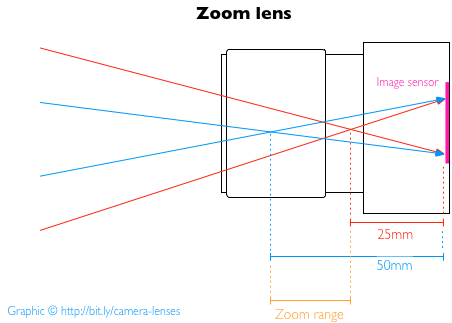
Simply put, a zoom lens is one that benefits from variable focal lengths. For example, the 18-55mm kit lens that comes with an entry level dSLR is a zoom lens. At its widest point it has an 18mm focal length; at its narrowest, it has a 55mm focal length, and you can shift it to any focal length between the two. This means it spans from wide-angle to 'normal' focal lengths, giving it a fair degree of flexibility and making it useful as a first lens.

focal_zoom_v2.png

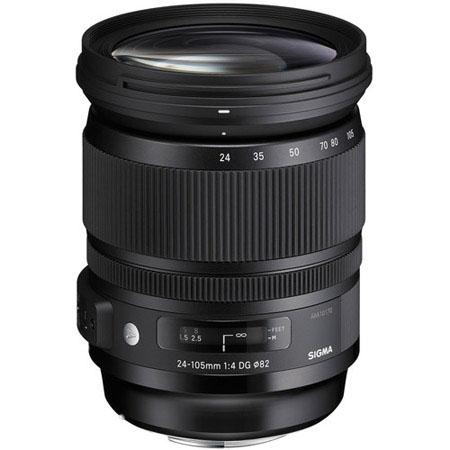
Telephoto lenses can be zoom lenses, too, for example a 70-200mm lens. Or you can have wide-angle zoom lens, for example a 17-35mm lens. Then there are zoom lenses with focal length ranges that stretch from wide-angle to telephoto, for example 24-105mm.

Sigma's 24-105mm ƒ/4.0

Whether the focal length range is wide-angle, telephoto, or spans the two is irrelevant; it's the fact that the lens covers a range of focal lengths that makes it a zoom. If you want to put it another way: a zoom lens is the opposite of a prime lens, which has a fixed focal length.

Advantages and disadvantages

The obvious advantage of a zoom lens is that it offers you flexibility. Being able to zip from 70mm right in to 200mm with the twist of the wrist is very handy, so is having wide-angle and telephoto capability in one place. And of course they let you mess around with zoom-bursting, which is always good fun.

Christmas is coming

However, that flexibility comes at a cost. The moving parts required to give zoom lenses their zoom can compromise their sharpness, give them more noticable aberrations, and limit their apertures. Whereas you'll readily find prime lenses with fast apertures, zoom lenses tend to be a bit slower and they often have variable maximum apertures.

The 18-55mm kit lens that we spoke earlier won't have a fixed maximum aperture across its focal range. Instead, it will have a maximum aperture of ƒ/3.5 at 18mm and at 55mm its maximum aperture will be ƒ/5.6. That's a bit of a difference to a 50mm prime lens that has a maximum aperture of ƒ1.4, isn't it? (There are zoom lenses with constant maximum apertures, a 70-200mm ƒ/2.8, for example, but they're much more costly than variable aperture zooms.)

Finally, the more moving parts that you have, the higher the chances of something breaking. That's not limited to photographic lenses, but just about anything that you can build. In this case, however, zoom lenses are more susceptible to damage or failure than prime lenses are.

And what about digital zoom?

So far, we've talked about optical zoom, or a change in focal length that is achieved by moving parts and adjustments to lens elements within the lens body. Some cameras, however, don't have optical zoom capability and instead rely on digital zoom to bring you closer to your subject. Digital zoom is standard in smartphone cameras, but you'll often find it in compact cameras as an augmentation to their optical zoom capabilities.

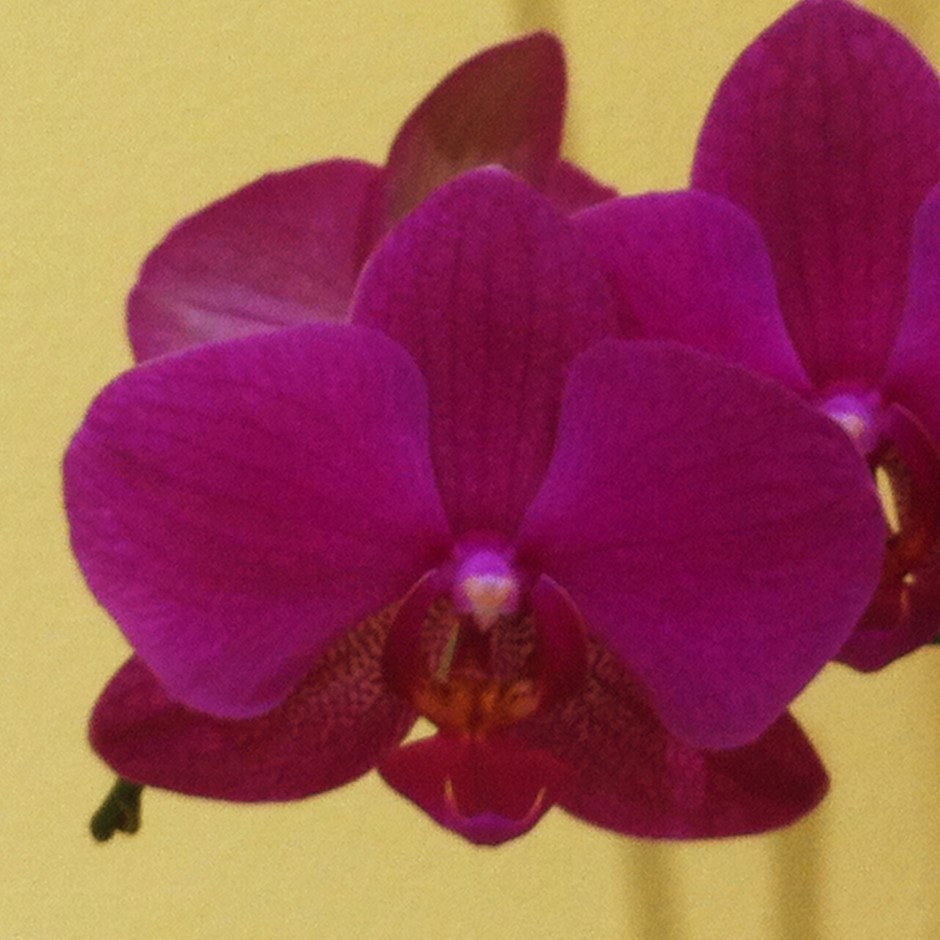
One orchid with digital zoom. Best avoided.

Digital zoom isn't really anything other than cropping: the centre of the frame is enlarged and the edges are trimmed away. As a consequence, images that are digitally zoomed are of lower quality than full resolution photos. If at all possible, avoid using digital zoom; it won't do your photos many favours.

TL;DR

  • A zoom lens is a lens with a variable focal length
  • Zoom lenses can be wide-angle, telephoto, or span the range
  • The advantage of a zoom lens is its flexibility, but disadvantages can include lower image quality and slower apertures
  • Digital zoom isn't really zoom at all, but a form of cropping. It's best avoided.

White balance << Photography Fundamentals >> Aperture

If you want to read a much more detailed explanation of lenses, do have a look at Haje's extensive Everything about camera lenses article.

The Photocritic 10 book gift guide for last minute shopping

It's the night before the night before Christmas. Super-organised types will have all of their gifts wrapped and sitting beneath the tree; the presents will look resplendent and the givers will be looking relaxed. The less-organised types will be wondering what on earth they can possibly buy in the next 24 hours to make people ot think that they left it to very last minute. Or last day. A book is the obvious solution. It shows thought and you can run into Waterstones and buy one tomorrow. Depending on the type of photographer for whom you're buying, here are ten of the best photography books out there right now. We're shameless, we've included some of our own books in this list. But they're not all ours. Promise.

Introduction

For the new camera-owner

This one is first on the list, because if someone is getting a new camera for the holidays, this is where they'll want to start. The Ilex Introduction to Photography, by Haje Jan Kamps


Surreal Screen Shot

For the dreamer

Or, how to recreate what's in your head, in a photograph. Surreal Photography: Creating the Impossible, by Daniela Bowker


Fashion Photography 101

For the fashionista

If anyone loves fashion and wants to get a foot on the fashion photography ladder, Lara Jade's book is the stepping-off point. Fashion Photography 101, by Lara Jade


Light and lighting Screen Shot

For the lightning rod

Photography is all about light; whether it's natural or artificial you need to be able to read it and manipulate it. Photo School: Light & Lighting, by Catherine Quinn


Rules Screen Shot

For the maverick

Rules are meant to be broken. The Rules of Photography and When to Break Them, by Haje Jan Kamps


Screen Shot 2013-12-23 at 18.30.06

For the selfie-fanatic

We could have put Haje's Shooting Yourself here, but we reckoned that you'd have it already! Creative Portrait Photography, by Natalie Dybisz


Screen Shot 2013-12-23 at 18.18.02

For the street photographer

Street photography. Anyone can do it... but there's an art to getting it right. The New Street Photographer’s Manifesto, by Tanya Nagar


Screen Shot 2013-12-23 at 18.29.31

For the tinkerer

From making your own clamps to having a go at free-lensing Creative Photography: 52 More Weekend Projects, by Chris Gatcum


Screen Shot 2013-12-23 at 18.30.55

For the vista-lover

Landscapes, they're harder than they look 101 Top Tips for Digital Landscape Photography, by Carl Heilman II


Screen Shot 2013-12-23 at 18.19.51

For the wanderer

Travel photography should leave you recalling the sights, sounds, and scents of your trips with every look, or letting your viewers feel as if they were right there with you. Here's your guide Focus on Travel Photography, by Haje Jan Kamps

These are just a few ideas. Get yourself down to a bookshop for even more ideas!

Christmas is coming: zoom bursting!

The twinkling lights and glittering decorations of our Christmas tree are always far too good a photographic opportunity to pass up. Last year they were my testing ground for a Pentax X-5 that I had to review. This year, I decided to play around with zoom bursting, to make it appear as if the lights are bursting out of the image. While the abstract motion effect of a zoom burst might look as if it's a pain to achieve, it actually isn't that hard. You definitely need a zoom lens on your camera and preferably a tripod; then you just need a bit of patience to get it right.

Compose your frame and focus on your subject. It's actually one occasion when centre-focusing really does work and doesn't leave your composition feeling flat and dull. But of course, it's whatever works for your photo. You'll probably find it easiest to zoom in as close as you can and then lock your focus or set it manually.

In order to achieve the motion effect you'll need a slow shutter speed, so that you have sufficient time to turn the zoom ring on your lens. If you're not confident using full manual control, do flick your camera into Shutter Priority (S or Tv) mode. For this series of photos I experimented with exposure times ranging from one-and-half seconds to ten seconds. The optimal speed seemed to be five seconds, but of course it is going to to vary depending on your subject.

Christmas is coming

I kept the aperture fairly small and the ISO relatively low. Being a long exposure shot, there was a strong possibility that it would come out over-exposed if I adhered precisely to the camera's meter, so I under-exposed by a stop-and-half. If I'd been shooting in Shutter Priority mode, I would have achieved the same effect by applying exposure compensation.

When you're ready, depress your shutter button, or use a remote release to help avoid camera shake, and then steadily zoom out throughout the course of the exposure. If you'd like to ensure a little more definition for your subject, don't begin to move the zoom ring immediately, but let it rest for about a quarter of the exposure time and then start to move it.

In most cases, you will probably want to zoom out to give the impression of the subject bursting forth from the image. I also played around with zooming in and rather liked the effect. It's all going to depend on what works for your photo.

Once you have the basics down, it'll be a case of playing around to see what looks best. Have fun!

A bundle of gift ideas for smartphone photographers

If you're stuck for a gift idea for someone who's permanently attached to their mobile phone, addicted to Instagram, and knows the precise order of Snapseed's editing functions, here are a few ideas that might fit the bill. Depending on where you are in the world, most of these can just about be ordered in time for Christmas, if you're quick.

Get up close with a macro lens

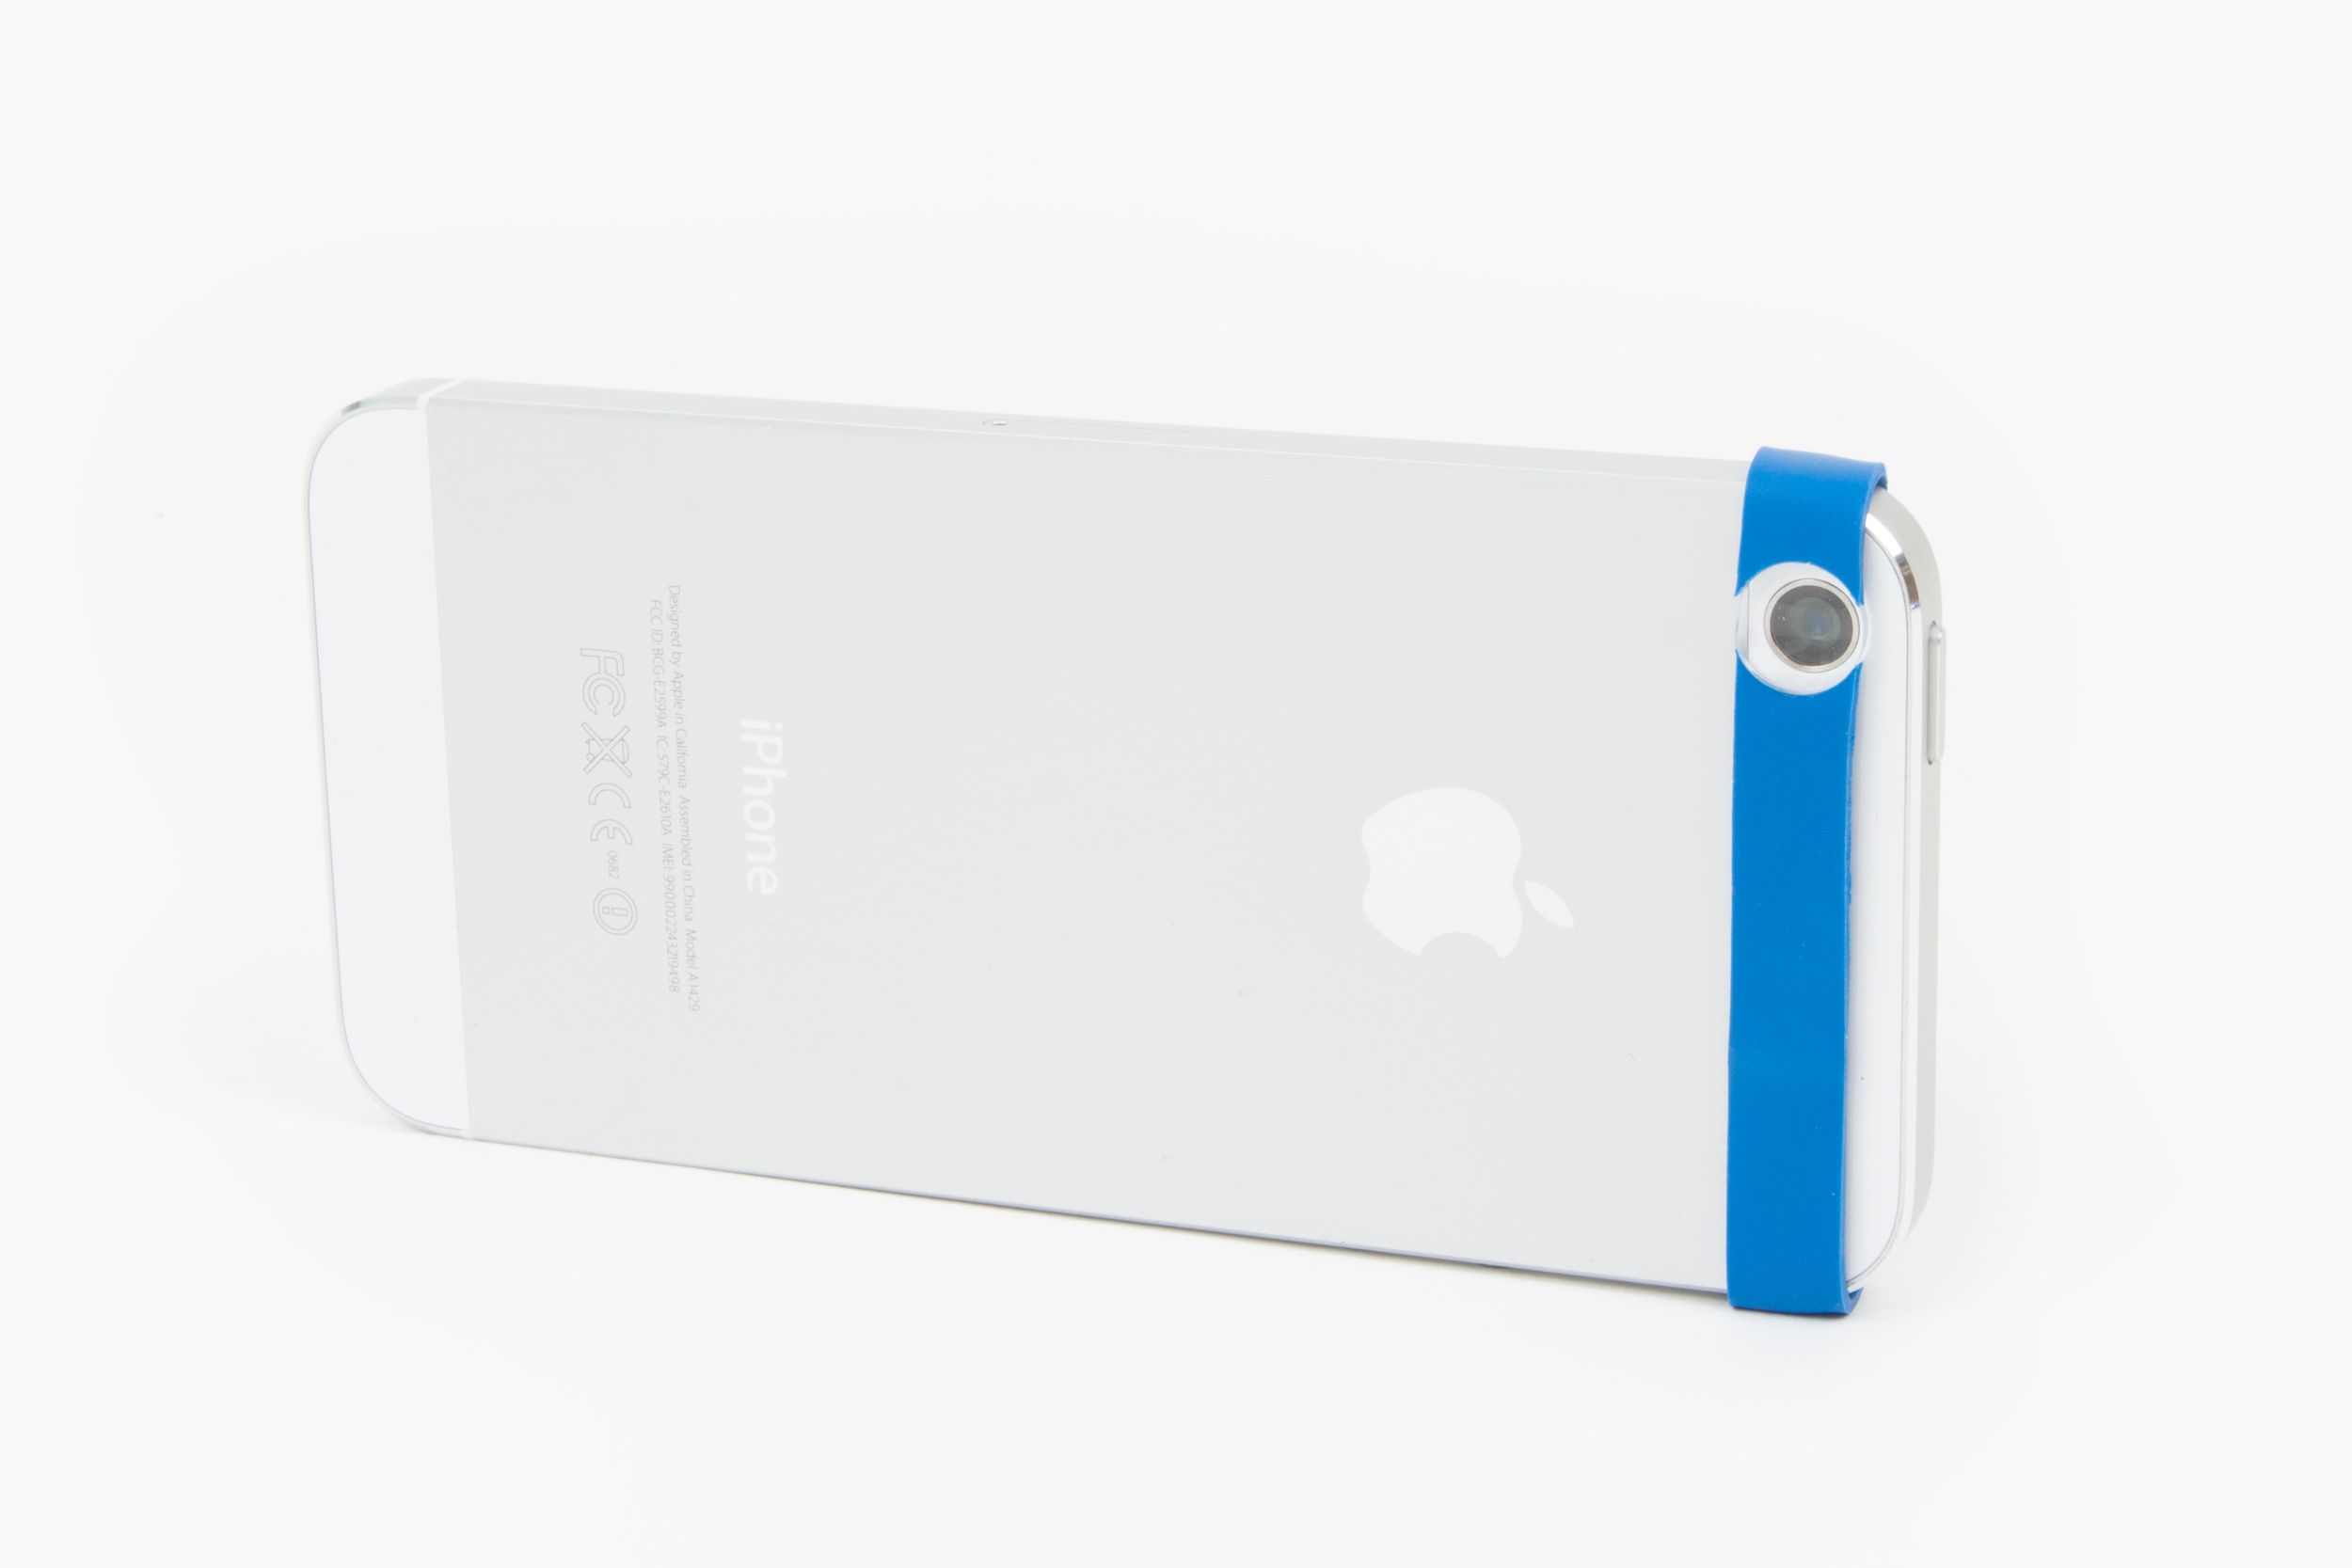
I've been messing about with my Easy Macro lens band over the past few days. It's low-tech but a lot of fun. At $15 a go, they're inexpensive and they're compatible with a vast range of different phones, too.

Buy the Easy Macro Cell Lens Band at the Photojojo Store!

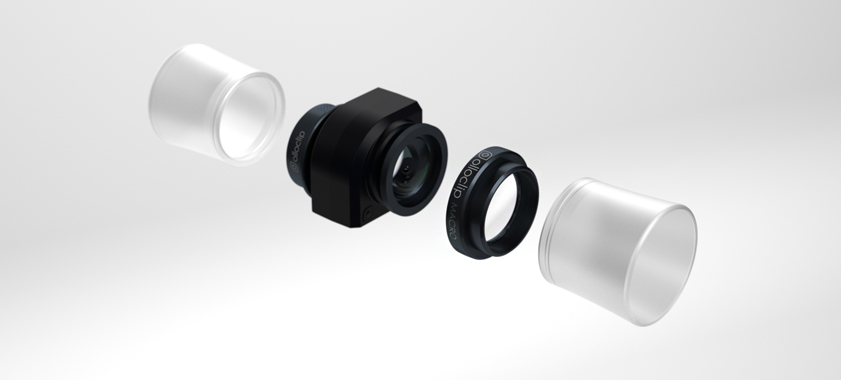
Should you have a little more to spend and want to give your recipient a lot more control, Olloclip has launched a 3-in-1 macro lens kit, that offers three different magnification factors and baby lens hoods. This will cost you $70, though.

Two magnification factors one side, and one on the other

Ditch digital zoom with a telephoto lens

Digital zoom sucks. And wide-angle lenses are very unflattering for portraiture. What you need is a telephoto attachment.

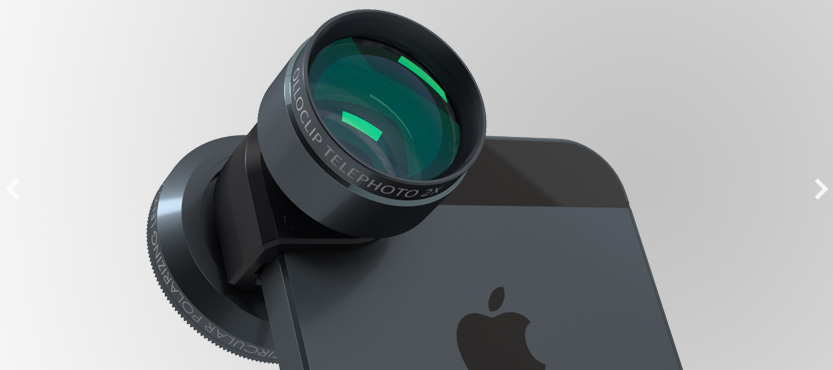
Get closer with Olloclip's telephoto attachment

Photojojo offers a $20 telephoto lens that's compatible for iPhone or Android devices. If you'd prefer to splash out a bit more on an iPhoneographer, Olloclip has a $100 telephoto lens that comes with a circular polarising lens on its other end.

Send camera shake packing

Camera shake: it's a horrid business that has ruined many a potential masterpiece. It's particularly noticeable when you're shooting with a small device, much like a mobile phone. Thankfully there are a good few options out there to help keep you on the straight and level.

Bend up, bend down, bend it all around with a Tiltpod

I love my Tiltpod, which is a bargan-tastic at $15 for an iPhone 4/4s version or $30 for a 5/5s version; however, Joby—the guys behind the ubiquitous Gorillapod—make Griptights, which can be pared with Lollipods for far more flexible smartphoneography.

Let there be light

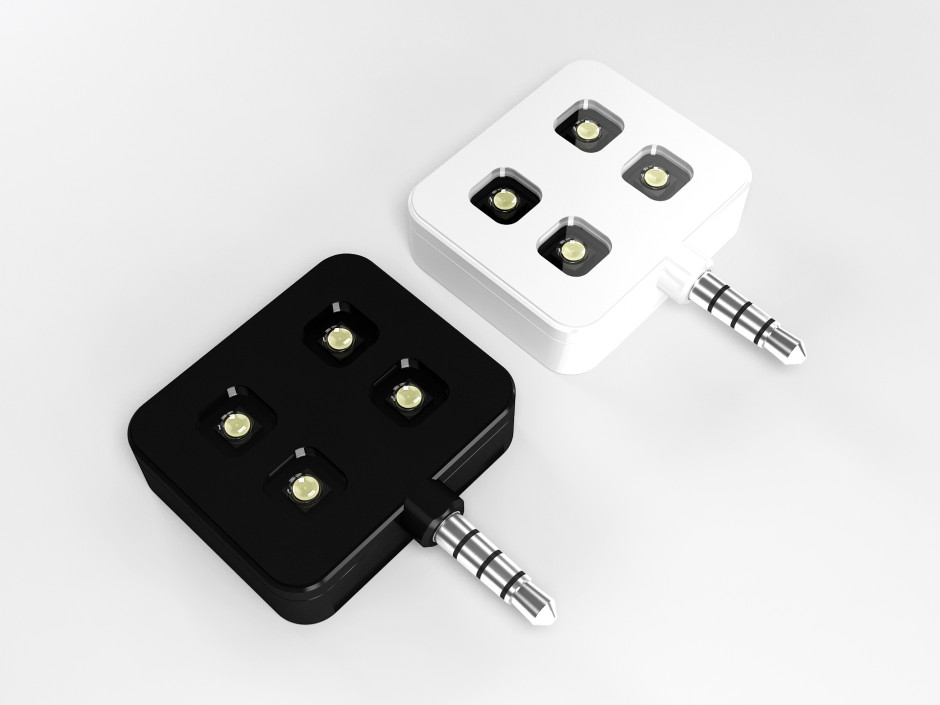
The iblazr in black or white

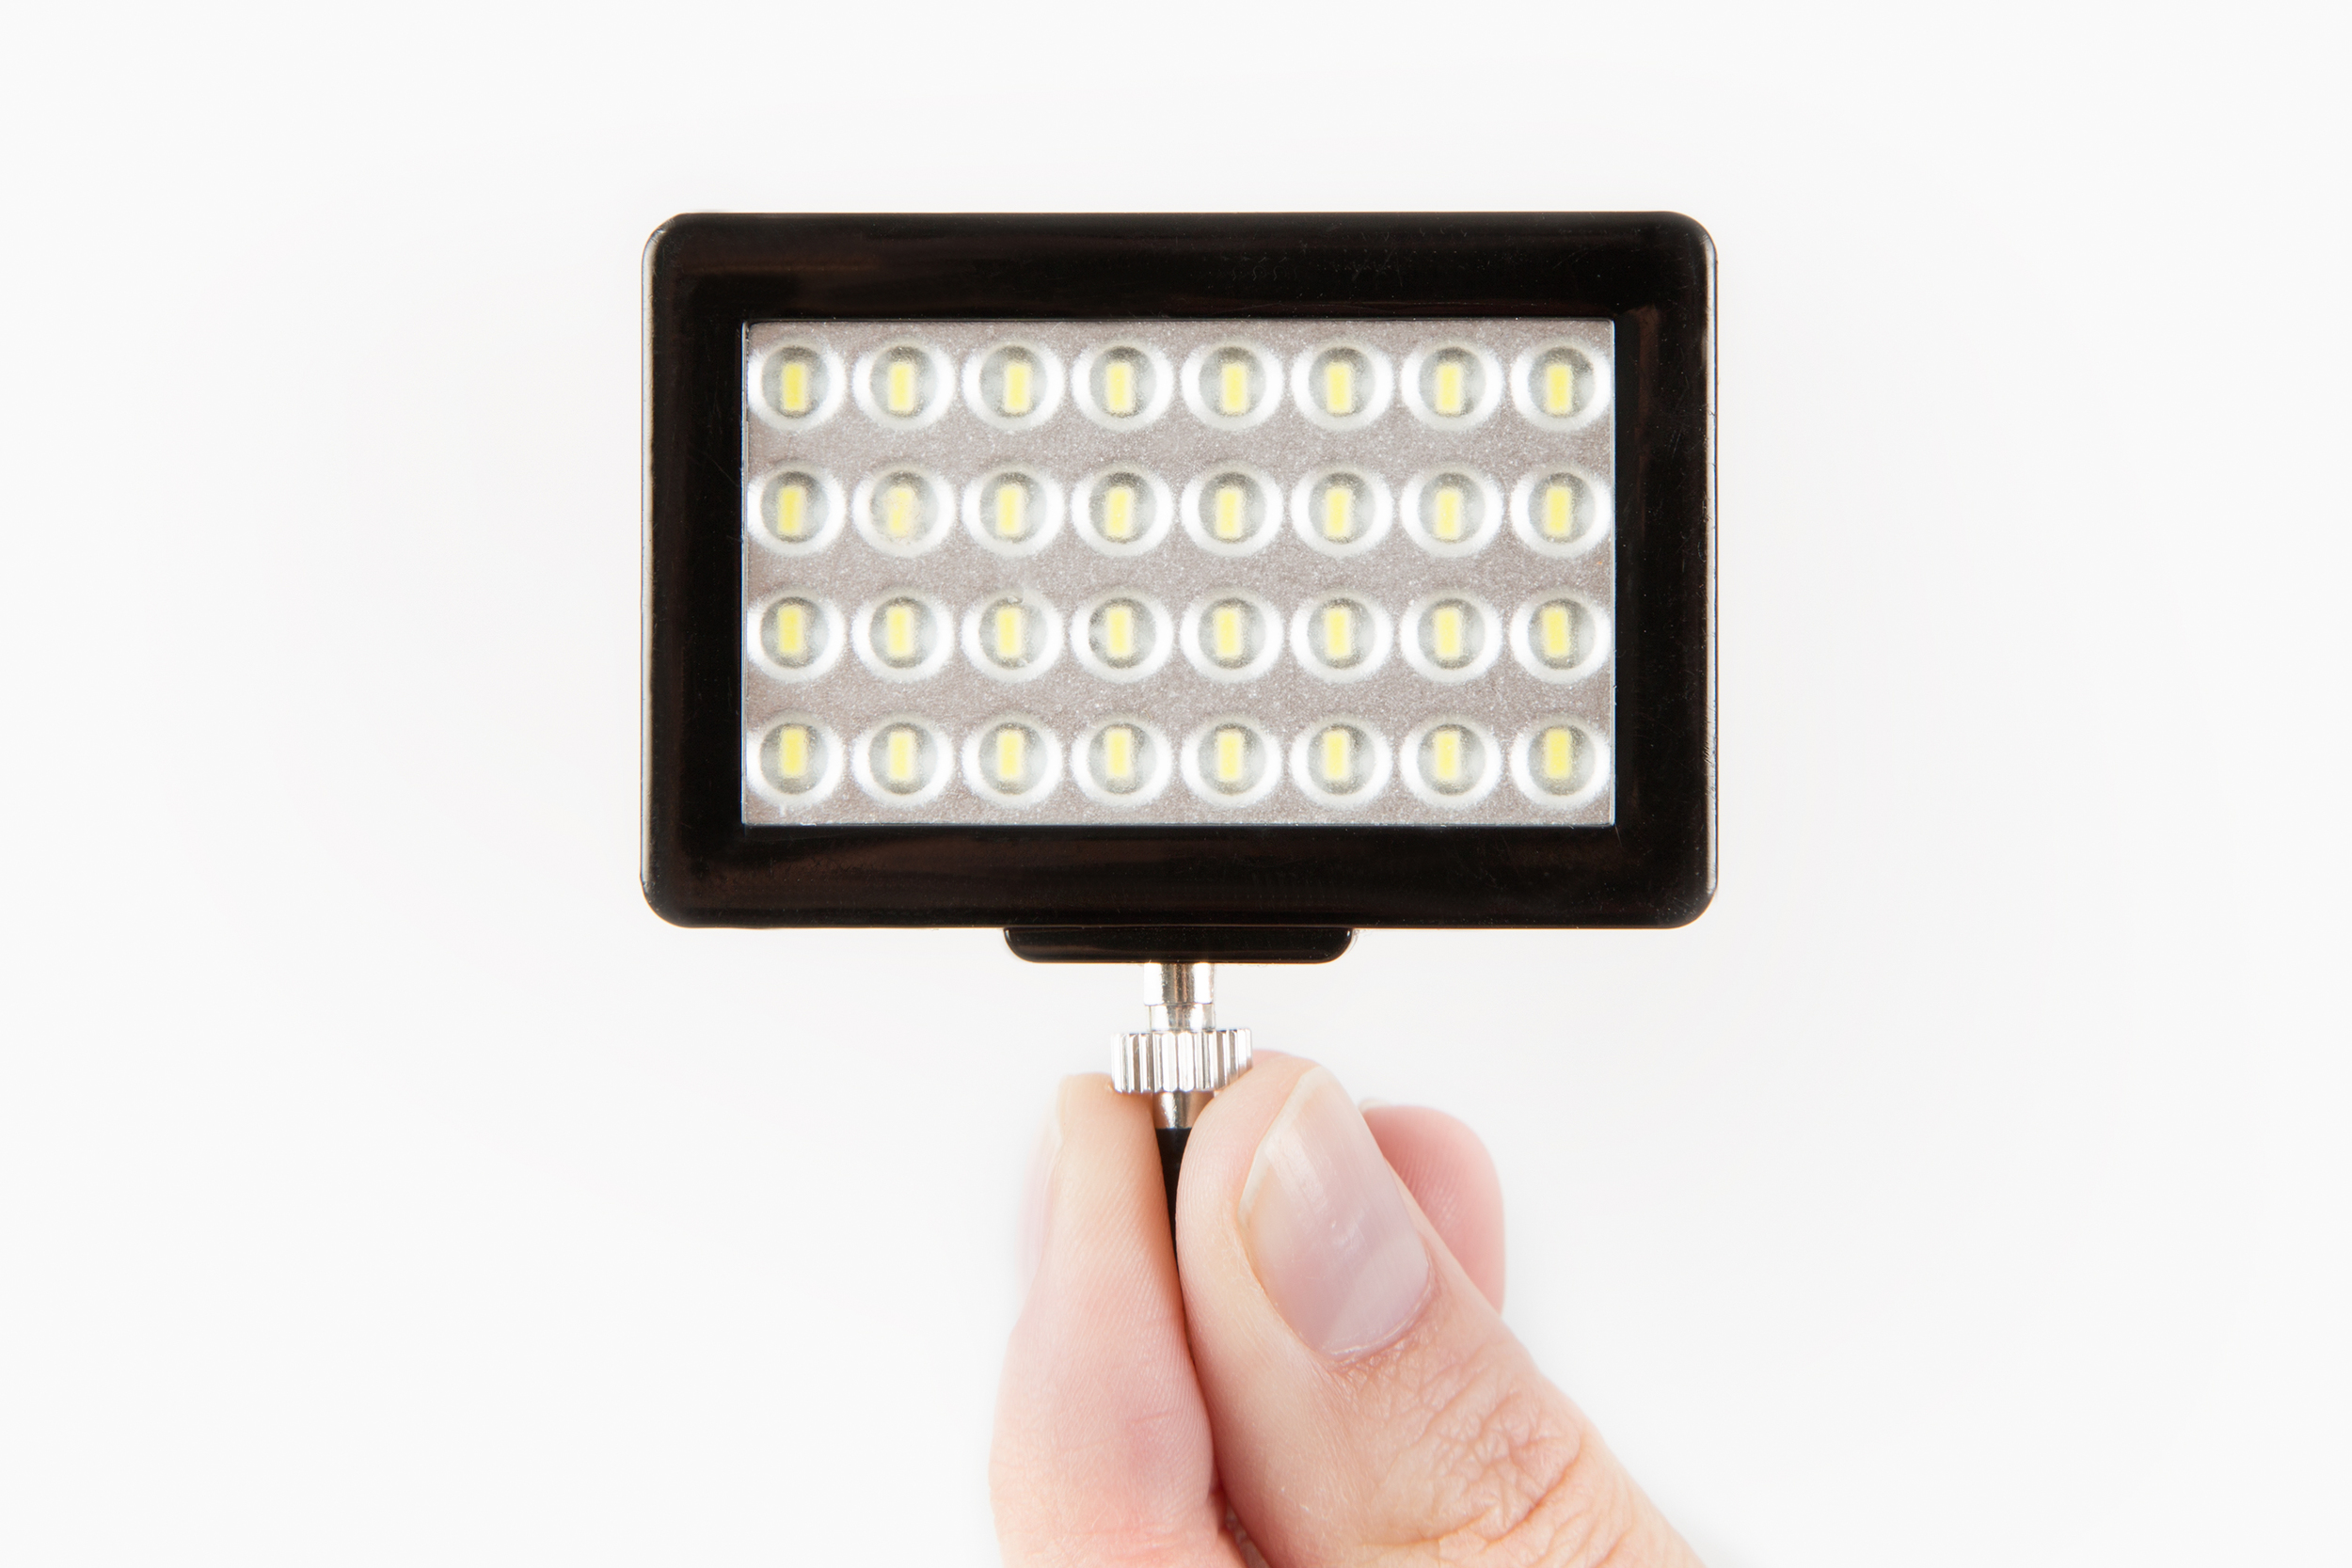
Flashes on smartphones aren't very forgiving: they're harsh, they're close to the lens, and they're not at all flexible. So how about some pocket-sized external light? Photojojo has its Pocket Spotlight for $30, or you can pre-order a super-stylish iblazr, which should ship sometime in February, for $50.

Buy the Pocket Spotlight at the Photojojo Store!

Prints and such

Print options for mobile images and Instagram shots are everywhere. Everywhere! But is it something that you'd think to do for yourself? Well, maybe, or maybe not. So being presented with a gift card so that you can choose your own pictures for printing is a great excuse.

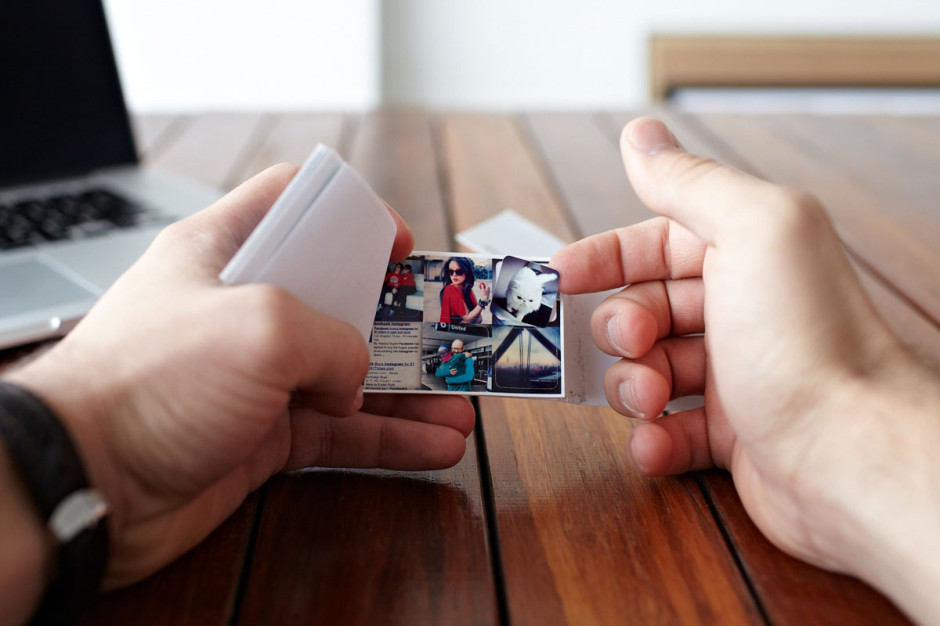
Stickers from Prinstagram

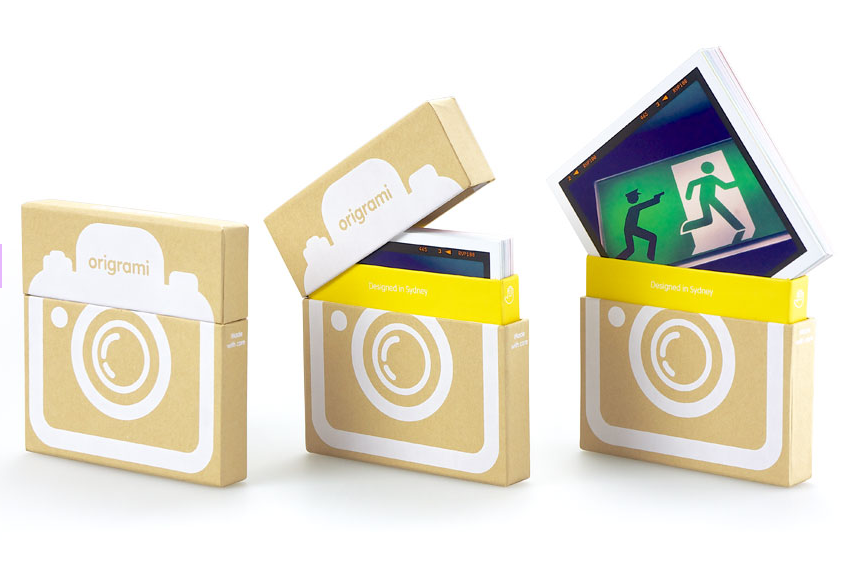
Origrami (with the extra 'r') lets you select gift cards for its fabulously packaged range of prints, shipped anywhere in the world. Or there's Prinstagram, that has a huge range of products that includes mini-books, stickers, and posters.

All-round gorgeousness from Origrami

Doing it better

Smartphone photography is marvellously easy: open the camera app, point, shoot. But you can always do it better and there are some terrific books out there to help you. Start with Stephanie Calabrese Roberts' The Art of iPhoneography or Android Photography by Jolie O'Dell.

Don your photos

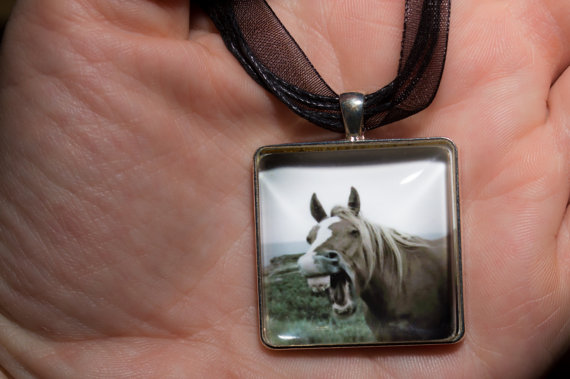
Wear your photos with Wearagram

Wearagrams are custom-made pendants featuring your own images. They're set in silver pendants strung from organza ribbon, covered with a glass cabochon and produced by Etsy-maker 80sgirlart. They can be shipped world-wide and cost about £14.

So, those are just for smartphone photography. There must be something that catches the eye?

How to clean your dSLR sensor

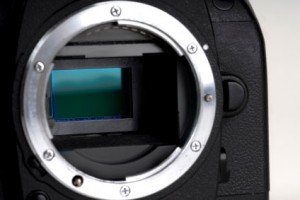
One of the students in the Photocritic Photography School asked us how to deal with a dirty sensor not long ago. Many cameras clean their sensors with a bit of vibration each time that you switch them on or off. That's fine for dust, but it isn't so effective if for dirty splotches. Thankfully, there are ways of dealing with those, too! sensorcleaning-2

So you have spent thousands on your camera and you’re wondering how to clean it? Well it’s a good question to ask; a dirty sensor will impact every single one of your images, as it is – quite literally – the focal point of all the camera’s technology. That’s right, your hard earned dollars reduced to the mercy of the elements. Scary thought eh? Despair thee not, young padawan, help is at hand…

Your goal is to remove dust (and possibly moisture) off the sensor. You want to do this as carefully and easily as you can. There are myriad people who are delighted to take your money off you to help you do this, so let’s start by picking some of the best:

Sensor Swab

Sensor Swab‘ is the preferred method and for a very good reason; it’s a mighty fine product which is recommended by quite a few of the camera manufacturers to boot. Sensor Swab is a wet solution which is applied to the sensor by a, well, swab.

For around $45 you can get yourself a kit and that will remove both wet and dry dust. It is 99.9% effective when done properly and even offers a guarantee in case of damage to the sensor – which is handy, because replacing a damaged sensor is filthy expensive. The downside is that it can’t be shipped by air and is illegal in some countries (due to containing methanol). If you’ve got a decent camera shop nearby, however, they probably stock some – go talk to your friendly neighbourhood lenspeddler to find out.

Brush

Here is the old fashion method. Offering multiple uses and a straight forward method the brush definitely has some advantages. Brushes generally use a method that utilizes static allowing the brush fibers to remove stubborn dust. A brush is also very transportable.

Down sides include the fact that the brush cannot be cleaned and can’t remove wet dust or moisture. A standard brush will cost about $25 while the ‘Brush Off‘ brand (which is more effective) will set you back about $50.

Blower

Using an air blower – like the Giottos Air Rocket – is what your manual will recommend, the reason for this is there is no contact required with the sensor, which reduces the risk of anything going wrong. Unfortunately the downside is that the blower is not that effective, and doesn’t actually remove the dust from the inside of your camera; it merely shuffles it about a bit. In addition, it will struggle to remove dust with a static charge and anything with moisture.

Despite its downsides, using an air blower is often the easiest thing to do when you’re in the field – it’s easy to transport, relatively cheap, and gets rid of the worst dust in a quick and capable way.

Time for a spring clean!

sensor-1 Every once and again, you need to clean your sensor properly; depends on how much you use your camera, but for me, it’s approximately every 2-3 months or so, a process which involves several of the products above. Here’s how to do it:

Charge the Battery – If your battery dies at any point this can be very bad news and step 2 explains why.

Open Shutter – This is different for all cameras but most have a ‘sensor cleaning mode’ which will open the shutter and move the mirror aside so you can access the sensor for cleaning. If the battery dies during this phase will close and possible take the swab with it which will probably cause damage to the inside of your camera.

Blow out excess dust – Look for a dust free environment and begin blowing, this removes the big particles of dust. Never use compressed air in a ‘spray can’ for this (it leaves a residue) – get one of the bellow-style blowers like the Giottos Air Rocket described earlier in this article. This is extremely important because if this isn’t done at a later stage you can be dragging particles around with the swab, causing scratches and more problems than you had before. (NOTE: Some people will suggest using a foot pump because your hands are free, DO NOT DO THIS. Reason being a foot pump has too much power and sits on the floor drawing in dust and dirt)

Take a look – Use a small torch/flashlight (the little single-LED torches are great for this) to spot exactly where there are dust particles on your sensor

Swab – Use as little swabbing liquid as you can while swabbing and apply with the pressure of the pen. Use one side of the swab for the liquid solution, and the other to wipe when complete – whatever you do, don’t touch the swab itself.

Do some test shots – the easiest way to do this is to take a photo of a blue sky or similar even, bright surface, and look at your image at 100% magnification on your computer. If you still see problems, it’s back to point 1 for a second try.

Now comes the trickiest bit; going back out there and taking shots so awesome that they’re worthy of your freshly cleaned imaging sensor. Good luck and have fun!

Ten top tips for fantastic food photography

Today, 14 November 2013, is International Food Photography Day. I'm not sure that I really need any type of excuse to take photos of many things at all, especially food, but it's definitely a good excuse to brush up on the necessary skills.

Photographing food so that it looks good enough to eat isn't necessarily as intuitive as you think it might be. But, it also isn't that hard, either. Ten simple tips later, and you should have some fabulous food photos.

1. Choose your food carefully

It doesn't matter how tasty your lentil soup actually is, because it is a muddy yellow-brown colour and has a bog-like consistency, it is never going to look as appealing as a strawberry-topped, floaty-light sponge cake.

Stick to foods that are visually appealing - bright, glossy, and with interesting textures - unless you really have to photograph the aubergine paté. If that's the case, try to introduce some contrasting colours, say a garnish, and use an interesting setting, like unusually shaped crockery, to help you out.

2. Use natural lighting

Flashes do horrible things to food, like give them ugly shiny patches. Where you can, photograph food close to a window with plenty of sunlight. Of course, that's not always going to be practical - midnight sun is a bit hard to come by unless you happen to be around either of the poles in high summer - so if you do have to resort to a flash, try to bounce it off a wall or use a diffuser to soften the effect.

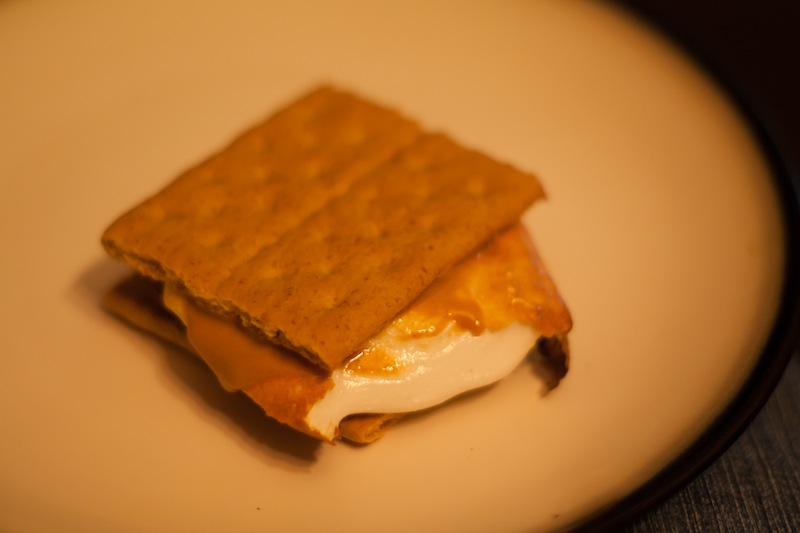
The ISO was through the roof, but it meant that I didn't need to use flash for this fire-lit smore

3. It's all about the angles

Experiment with as many different angles as you can manage: from below, from above, from the side and slightly down, side-ways on. Snap, snap, snap!

4. Consider your depth-of-field

If you're shooting from a lower angle, looking over or across your food, you'll probably find that a shallower depth-of-field is preferable. You'll want a ratio of food-in-focus to background blur that lets the subject stand out.

Think about your angles and your depth of field

On the other hand, if you're taking overhead shots, a smaller aperture will be your friend so that everything looks crisp.

5. Get your white balance right

Blue-tinged cream or a green cast on meat is going to look just grim, so get your white balance right for your lighting conditions. (Unless of course the photos are for an article on food poisoning, then maybe you do want everything to look off.)

6. Get close. No, that's not close enough. Closer still.

Food photography is about making things lush and tempting. Get in as close as you can so that when you look at the photograph, you feel as if you can practically reach through it and sneak a cherry from the top of the trifle, and smell the zest from the lemons.

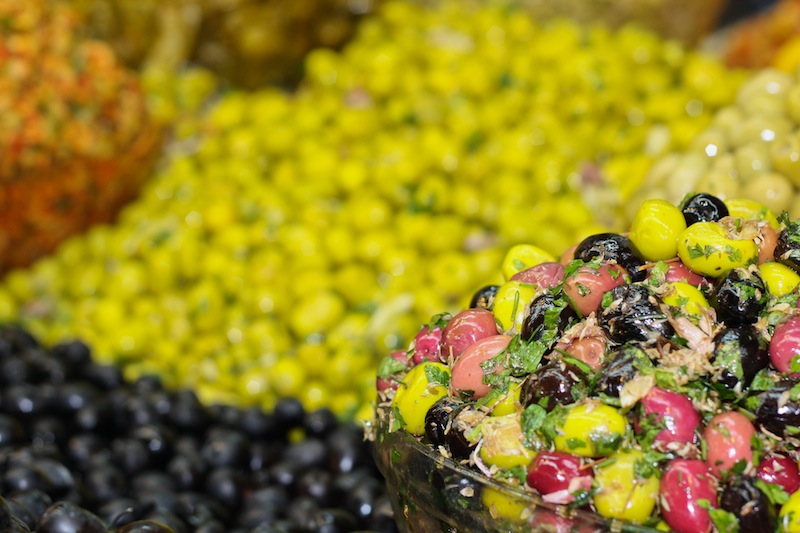
Nothing but olives

7. De-clutter

You don't want anything ugly or distracting in the photo; you want the food to shine. Okay, so this is a given for just about any type of photography, but it's easy for salt and pepper cruets to sneak into a shot when they shouldn't be there, or for a puddle of spilled orange juice to seep across the background. A quick bit of repositioning can do wonders.

8. Make sure the crockery and cutlery is clean

No, you don't want smears of sauce smattering the brim of the plate or thumbprints on the knife.

9. Do you want to style it?

If you're photographing your meal in a restaurant, then it is already going to have been styled. The presentation will be perfect and the crockery will work with the table setting. But if you're doing it at home, then it's worth thinking about the crockery you use, whether or not you need or want a table cloth, and just where you shoot.

Crown Derby china is not going to do very much to show off your seared scallops and for heaven's sake, a boudoir with red velvet curtains is not the ideal setting for a Toy Story birthday cake. But wouldn't that work a treat for red velvet cupcakes?

10. It's not just about the finished product

There's a whole heap of work that goes into preparing something as beautiful as a wedding cake and a whole heap of enjoyment that goes into eating it, so documenting that is just as rewarding as photographing the finished product.

It's not just about the finished product

When I - for my sins - baked my cousin's wedding cake, I photographed the entire process, starting with the ingredients assembled on the kitchen counter and ending with the last crumbs left on the cake stand. It made a great photobook gift for the happy couple, too.

What are you waiting for? Muster your baking pans and set up your tripod!

What is white balance?

You may have spotted the lightbulb, cloud, electricity and woodshed symbols on your camera's screen or menus. You may have also ignored them as being yet another degree of complexity that you don't need to know about. Alternatively, you may have seen people on the Internet earnestly discussing colour temperature and swearing by all sorts of essential products that will guarantee perfect results, if you re-mortgage your house this one last time. And ignored it as another expense that you can probably do without.

Well that thing you're ignoring is one of the most powerful ways of making your photos convey the scene you wanted to capture: white balance.

All a question of balance

WB.jpgThe idea behind white balance is very simple: it's a way to correct all the colours in your image to take account of the light they were shot with. This is because not all light sources (bulbs, fluorescent strip lamps, conveniently nearby stars), produce light equally across the whole of the visible spectrum.

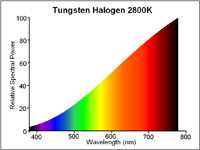
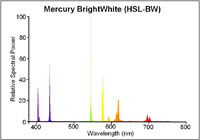
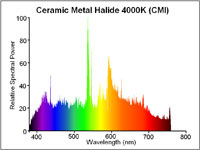
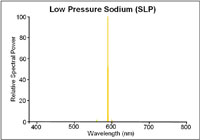
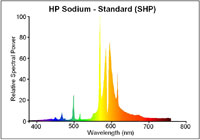
Midday sunlight pretty much does, but conventional tungsten-filament light bulbs don't – they mainly produce light down at the red and yellow end of the spectrum. This is why all you get rather muddy orange photos if you take pictures indoors without a flash. Fluorescent strip lights, street lights and camera flashes also produce limited ranges of colours.

The visual spectrum

WB2.jpg

Although this scale is only approximate, it gives an idea of how colors relate to one another. The visual spectrum are the colours that your eyes are sensitive to. Idealised midday sun will shine roughly equally across this whole range. Other light sources will only emit some of these frequencies, or will be biased towards one end of the spectrum.

Your eyes are good at compensating for this — amazingly good, in fact — but your camera isn't.

How it works

Although the maths behind it is pretty fiendish, the way cameras deal with white balance isn't too hard to understand. Your camera measures the amount of red, green and blue light that have been reflected onto its sensor. If the light source you're using isn't producing much at the blue end of the spectrum, then the blue bits of your sensor will receive much less light than they would in daylight. The green will be a bit muted and the red end of things will be quite happy.

Changing the white balance simply tells the camera to expect disproportionately low levels of blue light and makes sure it bears this in mind when deciding what colours things should be.

What do I do about it?

There are several ways of making sure you get the white balance right. The first is to choose one of your camera's presets that is designed for the type of light you're working with. Choosing the light bulb setting when you're working under conventional light bulbs should give a pretty good result, for instance. It won't be perfect, though, because light bulbs aren't all exactly the same, and one fresh out of the packet will produce whiter light than one that has been hanging around for a couple of years, so you may find that none of the presets give you the right result. Morning or afternoon sun won't match the ‘sunshine' setting, and particularly light or heavy cloud cover won't match the ‘cloudy' setting, so camera presets have to be averages and best-guesses.

A much better way of getting the right result is to set the white balance based on the actual light you're shooting under. Most cameras have the ability to set a manual white balance. This usually involves shooting a picture of a white (or, better still, neutral grey), object under the lighting that you're working under. This teaches it how to balance the levels of the red, green and blue information that it's recording. You must remember to do this every time the lighting conditions change, though.

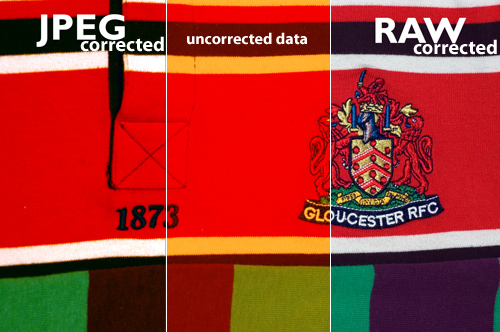
The final way of getting the white balance right is to correct it later. Without wanting to get dragged into a debate about file formats (I can be as geeky and techie as the next man, often more so, but life really is too short), the best way of correcting the white balance after you've taken your shot is to save the RAW data coming from the sensor. Although some software will try to adjust the white balance of jpeg images, the results are simply not as good because there's a risk that the data the software needs to work with is exactly the data that's been thrown away in order to make the file so lovely and small.

jpgvsraw.jpg

Let's look at this with an example — This raw and a jpeg files above are intentionally exposed with completely the incorrect white balance (see the middle bit). The raw was very easily corrected to give a realistic impression of colour. However, in spite of a great deal of tweaking, the same rendering of colour could not be pulled back out of the JPEG file. Note especially the areas in the intersecting area between the red and white: The RAW file renders this perfectly, while the JPEG file is obviously struggling.

However, if your camera doesn't let you save the raw data, don't worry, you can usually tweak the white balance a little bit before the quality suffers too much. As with every other aspect of photography, the best thing you can do is get the shot as perfect as possible when you press the shutter button. If you set a manual white balance before you take the shot, it will minimise or eliminate the need to correct later.

Buy buy buy

There are a variety of products available that can help you get your white balance right. They fall into two main categories: neutral cards and diffusers. Neutral grey cards can either be used as a known-neutral object for setting a manual white balance value, or can be slipped into the photo and used as a reference, when fiddling around on the computer later. Diffusers slip onto the front of the lens so that, when pointed at a light source, they spread the light out across the sensor and allow a manual white balance to be set.

That's it. No magic involved at all. They don't really add functionality, they just let you use your camera's built-in functions better.

What to do instead

Some people try to use the translucent plastic lids from various snacks as improvised diffusers. This can work, so long as the lid is neutral in colour. But most people find that they get good results using a piece of photocopier paper. You know, the white stuff. It's not always perfectly white and it can be a bit hard to get hold of half way up a mountain, but for most situations, it works very well. It won't guarantee that the bride's dress appears EXACTLY the right shade of off-white, but it'll make sure that your team's rugby shirts are recognisably cherry and white. Which is what's important.

WB4.jpg

For reasons that aren't entirely obvious, that icon just up there is a common symbol for manual white balance. Perhaps it is supposed to be a gray card? Only icon designers will ever know.

WB3.jpg

Although this scale is only approximate, it gives an idea of how the presets relate to one another, with the ‘tungsten' lightbulb correcting for very orange light and the ‘shade' setting compensating for very blue light.

No right answer

All the way through this article, I've talked about getting the white balance ‘right'. Well, just like the eternal question ‘which camera should I buy,' there is no definitive right answer. That's because, up until now, I've been talking about how to get white (and, as a result, colours), to appear as it would do under bright sunlight. However, there are lots of situations in which you don't want your photo to look like it was taken in midday sun.

Sunrises, for instance. Or sunsets. If you're going to spend three hours sitting in a cold field, waiting for the sun to rise or set and give you the perfect light, I wouldn't recommend that you then try to correct for the thing that made the light so good: the fact that it doesn't look like midday sun. So don't try to set a manual white balance and make sure the camera isn't trying to automatically correct the colour. So try using the ‘sunny' preset value, this will ensure the image shows just how different from midday sunshine the scene looked (which is presumably why you're taking it).

You may find, however, that this gives a more extreme orange or blue tinge than you expected. This is because your brain is very good at compensating for different colour temperature and still judging what colours should look like. That's why photos taken in orange-ish light come out astonishingly orange. So I'm afraid you still have to play around on the computer if you really want to convey the scene as you remember it or to tell the story you want to. Because, hell, this is photography, not a science.

How does White Balance relate to Colour Temperature?

In this section, we're getting geek-a-licious, and going into depth to find out why white balance is important, how it works, what colour temperature is, etc. If you're new to all of this, you can happily skip this, and know that the first half of this article probably made you a much better photographer. If you're a hard-core photographer, geek, or perhaps even both, however, you'll want to read the rest of this… Because geeks get all the hot chicks.

Depending on which camera and software you use, you may have found white balance described in terms of colour temperatures, using a scale marked K. Although it may seem like an odd way of describing the characteristics of light sources, there is actually a good reason for it.

The idea of colour temperatures comes from a simplified model used by physicists to show how energy is given off objects when they are heated. Think about how hot steel becomes red hot, then white hot: that's essentially what they're going on about.

Who is this Kelvin bloke, anyway?

lordkelvin.jpgColour temperature is measured in Kelvin (named after a rather clever physicist who was made Lord Kelvin in recognition of his work and, like all good Victorian scientists, had an excellent beard), which is pretty much the same as Celsius, but starts counting at absolute zero (-273 degrees C), rather than the freezing point of water. Its relationship to colour is actually the work of Max Planck who, being more recent German scientist, had a moustache, rather than a beard.

Basically, the idea is that as an object gets hotter, it gives off shorter, more energetic, wavelengths of light. So when it's relatively cool (a mere 1500K – 1773 degrees C), it gives off most of its energy at the red end of the spectrum and could be described as red hot. By 5500K, it will give off all frequencies in the visible spectrum equally – it will be white hot. As it gets hotter still, its output will increase and it will produce less red light, lots of blue and even some UV light, beyond the limits of human vision. You can think of it as the crest of a wave, rolling through the visible spectrum from red to violet as the temperature increases, if that helps.

halogen.jpg

A traditional lightbulb (‘tungsten light') has a low colour temperature, it produces most of its light at the red end of the spectrum. Boosting the levels of blue and reducing the levels of red will compensate for this.

d65.jpg

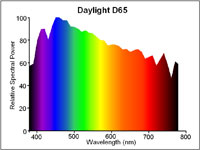
6500K (also known as D65) is the standard for midday sunshine. The entire visible spectrum is lit with roughly equal amounts of all colours and a neutral object would reflect red, green and blue equally. Many cameras use 5500K as their daylight setting because the sun in the morning and afternoon is cooler than D65.

It's worth noting that, rather helpfully, red and orange-tinged light relates to a colder temperature than blue-tinged light, which occurs at high temperatures. So be careful when you start talking about making pictures look warmer, because you could mean two completely contradictory things by saying it.

What does this mean for my camera?

Your camera measures light in RGB, which is a colour space which takes light measurements at three points along the visible spectrum, red at one end, green in the middle and blue near the other end.

As we have seen, under candlelight, there are far more red photons bouncing around than blue photons, so you have to tell your camera to adjust the levels of red, green and blue in relation to one another, so that they compensate for the low temperature of the light. More precisely, colour temperature actually adjusts the relationship between red and blue, with very little need to mess about with the green.

A different light

Now think about a situation in which your subject is sitting in mixed lighting. Take a picture of a person sitting under artificial light, but with daylight coming in from the window. Try to correct for the daylight and the artificial light goes orange, correct for the artificial light and the daylight goes blue. Unfortunately, there's nothing white balance can do about this. Even the most expensive white balance correction tool won't help, the best it will offer is an average of the light sources, depending on how you use it. The best thing to do is close the curtains or add some flash to ensure you have control over the dominant light source.

But that's not quite the end of the story, because there's more to white balance than just colour temperature. Colour temperature is based on the behaviour of heating an idealised material, which is a good approximation for light sources that generate light by heating things (lightbulbs, candles, the sun). The key property they share is producing light all the way across the visible spectrum; they are just biased towards one or other end.

This is not true of all light sources however and, consequently, not all light sources can be adequately described with a colour temperature. Fluorescent strip lights, for example don't work by being heated*, so don't behave like the idealised material and only produce light at certain wavelengths along the spectrum.

mercurybright.jpg

Even a modern, bright white fluorescent strip light will only emit light at very specific points along the spectrum. Note the large green spike. Correction for this peak requires more than a simple colour temperature, red/blue adjustment.

ceramichalide.jpg

Exotic light sources (such as ceramic metal halide arc lights) produce an even output across the whole spectrum, making them excellent for judging colour. The pronounced green spike is still present.

The same is true of street lamps. In fact, the low pressure sodium vapour street lights used by many countries to light motorways only produce light at two wavelengths along the spectrum, both of which are orangey-yellow. If you were to shoot a photo under these lights, no matter how you tweaked the white balance settings, you would never get the colours right because the only thing that your camera could tell you about the objects is how well they reflect orange. A black and orange image, rather than black and white.

slp.jpg

Low pressure sodium lights only emit light at two very specific wavelengths. It is impossible to interpret any colours under such a light.

shp.jpg

High pressure sodium lights tend to be used in town. They're still predominantly orange but produce enough other wavelengths to allow colour recognition.

That's an extreme example, though. Usually, the problem is just that there are gaps, here and there, in the light's emission spectrum. The way that your camera or software deals for this is to boost or reduce the level of green. This adjustment of the green, in relation to the red and blue you adjusted with the colour temperature, attempts to compensate for a peak or an absence in the middle of the spectrum. It can't work miracles, of course and, as we've seen with the low-pressure sodium lamp example, it can't create information about colours that weren't being lit in the first place, but in most cases, correct use of white balance will get your whites brilliant white. Though not at 303K (30 degrees C).

Footnotes

All diagrams with kind permission of lamptech.co.uk

*) Extra geekery: fluorescent light strips work by electrically exciting mercury until it emits UV light, which is then absorbed by a coating on the bulb that then re-emits the energy as a lower-energy, visible light photon in a process known as fluorescence. Well, you did ask…
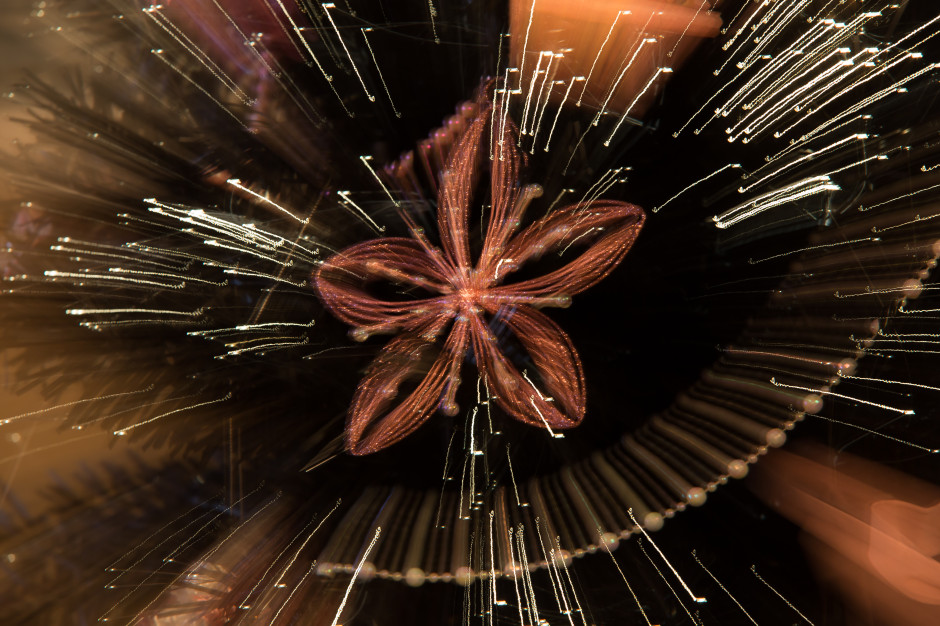
This article was written by my good friend Rich. In his everyday life he's an engineer and a journalist, but after work hours, he becomes the uber-geek and highly talented photographer I know best :)

Vibration and camera shake << Photography Fundamentals >> Zoom

Considering the square crop

I've never been a particular fan of the square crop; I have no good reason for my disfavour, but it doesn't stop me from recognising that it does have its place in the canon of crop. And that's not just its historical position, but its artistic one, too. Consequently I do use it from time-to-time, and I've spotted an increase in the frequency that I at least try it out on my photos. That doesn't mean to say I'll use it, but it's worthy of closer consideration. If you're accustomed to the rectangular frame, you'll notice almost immediately that the compositional rules with which you are so familiar don't seem to apply any longer. The frame is different and you must think differently, too.

Dynamic shift

Primarily, the tension within the frame has shifted. What makes a picture 'work' and what holds the eye to the frame has changed. With a rectangular crop, the eye has a tendency to move across the image until it finds its focal point; with a square crop the eye moves around the image. This shift in the dynamic, from fluid to static, presents you with a great setting for capturing the serene. Striking still lives with plain backgrounds and posed portraits work a treat in a square frame.

Lily square

Centred subjects

Centred subjects have a tendency to look flat and dull in a rectangular frame, but that circular eye motion that we make with square-cropped images means that they don't lose their impact.

Centre placement works because the eye moves around the frame

Symmetrical images

Following on from the centred subject comes the symmetrical subject. When you place a symmetrical subject within a square frame, it is bounded and the symmetry emphasised.

Okay, so it isn't perfectly symmetrical, but I was in a moving car (being driven, not driving) when I took it

Evenly balanced images

Splitting the frame and balancing your subject across it: black against white, calm against active, rough against smooth, will work to the benefit of a square crop. There's nothing wrong with splitting your frame horizontally or vertically, but diagonal divides work brilliantly, too.

Buzzzzzzzz

The point is, of course, to use whichever crop works best with your vision and your image. Don't feel that square crops carry the mark of the Instagram devil and that a rectangular frame is somehow symbolic of photographic purity. Try it; you never know, you might like it.

What can you do about vibration and camera shake?

Nice picture... shame about the blur. There are times when you expect to see some blur in a photo: panning shots, long exposures, and even in some short exposure photos when the subject is moving really fast (think the wheels on a Formula 1 car). But most of the time, we're looking for sharp photos without any evidence of fuzziness. In this photography fundamentals session, we're looking at vibration and camera shake, and how best to avoid it. Unfortunately, it's easy for the photography deities to conspire against us so that we end up with not-quite-sharp images. Often it's because our subjects move—about which there's little that you can do, especially if you're photographing children or animals—but frequently it's down to camera shake rather than motion blur. We might get the wobbles, we might need to use a slightly longer exposure to ensure that there's enough light on the subject and that means we can't hold the camera quite as still as it needs to be, or we might be using a lens that has a high magnification factor, in which case the slightest movement can show up as camera shake.

If you're not sure if a photo is exhibiting signs of camera shake or if you've just screwed up your focus, take a look at the nature of the blur. A plain old badly focused image will probably have at least one area in focus, but it won't be the right area. The blur will likely be quite smooth, too. A camera shaken photo, on the other hand, will be blurry all over, and the blur is probably sharp and jagged. You might have a double-exposure-like effect, with everything appearing twice in the frame. However it manifests itself, it isn't ideal.

Don't try shoot hand-held at 1/10 second. It's not a great result.

Camera and lens manufacturers have made it easier for us to capture tack-sharp photos with the introduction of stablisation technology. You'll often hear manufacturers claiming that their vibration reduction or image stabilisation mechanisms can offer however many stops advantage, or let you shoot with a slower aperture or shutter speed than you could manage only hand-held without noticing any camera shake. Still, there's nothing like going back to basics and doing everything that you can to produce a blur-free photo.

First of all, you can take the technical approach and reconsider your exposure. If you can, use a faster shutter speed and compensate for it using a faster aperture and a faster ISO. If you're concerned about noise, remember that a smidge of noise is better than a blurry photo.

Second, brace yourself. If you're hand-holding your camera, keep your elbows in, against your chest. Don't stand there trying to stop traffic with your arms out at 90° to your body. If I had a penny for every person I'd told to keep their elbows in, I'd be a few pounds to the better by now. If you're using a long lens, make sure that you have one hand on the camera and the other supporting the lens. The combination of a long lens' weight and its magnification factor makes it a camera shake party.

Without a tripod to hand, I propped my camera on a wall

Third, breathe right. Seriously. Inhaling or exhaling at the wrong moment can cause camera shake. Try not to inhale or exhale at the same time as you depress the shutter button. And while you're at it, depress the shutter button gently.

Four, use a stabilisation device. It doesn't matter if it's a tripod, a monopod, a brick wall, or a string tripod: get your camera stable. And trust me, the length of time for which you're capable of holding your camera steady is much shorter than you think it is.

Strobe, phone, or point-and-shoot

Five, use a remote shutter release. We've already noted that breathing at the wrong moment and an over-zealous trigger-finger can lead to camera shake. If you're in a very sensitive situation, for example you're using a macro lens, using a remote shutter release eliminates your need to touch the camera and with it the inherent threat from your lungs and muscles.

That should help to keep your photos sharp.

Time-lapse << Photography Fundamentals >> White balance

Photographing Fireworks: How to get the perfect firework photos

Oh my, it’s nearly That Time Of Year again: burning effigies, sparklers, terrified dogs, and jacket potatoes with charred skins and raw middles. Guy Fawkes' Night is 5 November, so perhaps it’s a good idea to brush up on the ol' fireworks skills in preparation for displays this weekend and next, yes? Indeed…

Rock on… 

Many a budding shutterbug has attempted unsuccessfully to photograph fireworks by merely pointing their film camera to the sky and shooting, resulting dark useless prints. With the advent of digital photography, photographing fireworks has become easy, just by following some basic steps…

fworks2.jpg

  1. Find a location away from the crowd and power lines. An elevated location on a hillside works well. You might want to scout out your perch beforehand: Especially on big fireworks nights (such as July 4th in the US, November 5th in the UK, and new year's eve in most of the world), a lot of the prime photography spots will be taken hours before the fireworks, so plan ahead!
  2. Set the shutter speed to 1 second or longer. Don’t be afraid of underexposing your photos, though. You won’t.
  3. Use a low ISO - you want as little digital noise as possible.
  4. Use a tripod. If you can’t find a tripod use a nice steady base.
  5. Turn off the flash. This might seem like common sense, but remember you are photographing lights, so you don’t need to add more light yourself.
  6. Shoot in RAW. You need as much exposure latitude as you can get, in order to be able to do any adjustments you need to do in post-production.

Point your camera toward the sky and shoot. A key to getting a good shot is anticipating when the firework will explode. Initially you will have many hit and miss shots. As the show goes along, you will be able to perfect your timing, and getting better shots as you're learning!

Case study

screen_shot_2011_11_04_at_123826.jpg

This fantastic photo is called Fireworks over Zürich, and is (cc) Tambako the Jaguar on Flickr

To get a shot like this, you'll need to use all the above tips, and you'll probably need to shoot in fully manual (although, interestingly, this shot was taken in Aperture priority).

Take a load of test exposures to see what works best; expose for the fireworks (so, use your histogram to determine how your exposures are working out) where possible, and adjust your shooting as you go along. The above photo was taken with an f/3.2 exposure, using a 1/4th of a second shutter speed, and ISO 400, with a -1/3 EV exposure bias. The results are gorgeous, but a slightly longer shutter speed might have made the water look more 'flowing', and could have increased the 'streaks' of the photographs just that little bit extra. Switching the camera to ISO 100 and 1 second shutter speed would have achieved both of these things.

The most important thing to keep in mind is that there aren't any hard-and-fast rules for how to get the best fireworks shots - Experiment and see what works best for your particular lighting scene!

Even more fireworks photography!

Can’t get enough? Well, try the guides, tutorials and tips from Better Photo.com, Garry Black, about.com, calphoto, DPchallenge, and Smithsonian institute!