To continue my Closer Looks this week, I’m looking at the absolutely beautiful work of Anastasia Taylor-Lind. It’s important to look at a female photographer and her work because I personally feel that women are a little under-represented in photography. To follow through with this theme, then, I will be looking at Anastasia’s series “Women of the Cossack Resurgence” – a fascinating look at Cossack revivalism.
I won’t get too far into the ins and outs of the story and background of the series, for fear of making myself look a bit stupid and publishing inaccuracies. It would be much better if you scooted over to Anastasia’s site and had a look at the flavour text to fully acquaint yourself with the background behind the series. What I want to do with this article, as a portrait photographer, is attempt to get a bearing on just how she achieves such beautiful images.

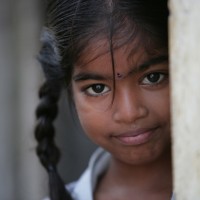
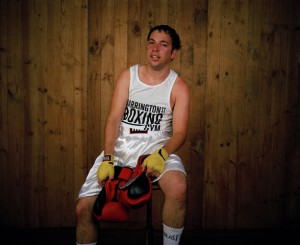
Anya Romanova (centre) and her Year 8 friends at Ataman Platov Cossack Cadet School. This image was featured in the Taylor Wessing Photo Prize 2010.
With portraiture (and photography in general) preparation is key. The image is not just the click of the shutter, it is all kinds of preparation approaching that moment. For these images, Anastasia spent a week in the school with the girls, attending their classes, sleeping in one of the dormitories, being one of them. The benefits of this were twofold. First, it would allow her to connect, identify with and get to know the girls, so that the resulting images more accurately portrayed their character. Second, it would mean her subjects would relax and be used to the camera.
Another preparation that was important here was kit preparation. Anastasia used a 6X6 Bronica with a waist-level viewfinder. Compared to your normal DSLR, this allowed Anastasia to take the camera away from the front of her face: now they were talking to her and not to a camera with someone hiding behind it.
Recently, I have often felt there is something of a barrier between myself and my subject when I raise the camera to take a shot. My own approach to alleviating this problem is to practice being able to effectively compose more quickly, making sure I take the camera away from my face as often as possible, to let my subject know I’m still there and haven’t been taken over by a large metal facehugger. That human connection is very important, in my opinion.
Many of the shots in the series explore the bond between the girls in the school. There are images of the girls dressing each other’s hair, embracing, spending time together in the dormitory at bedtime and, in one of my favourites of the series, possibly whispering secrets to each other. I feel as if these images have been included because they resonate with Anastasia as a woman.
I’m not saying that a male photographer wouldn’t have noticed this connection between the girls, but I wonder whether the moments would have been captured as intimately. Maybe I’m wrong, but I do think there is something to the idea that your best work is borne of an emotional connection of some form with the subject. Again, this reinforces the importance for me of Anastasia staying with the subjects of her portraiture for several days – it’s as much to prepare her for the images as it is to prepare them.

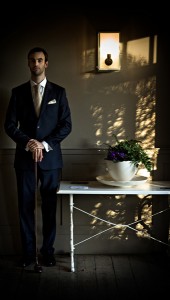
Galina Prokopenko, 75 year old great-grandmother and black-belt karate instructor.
To finish with, I want to look at an individual portrait from the series and tell you what I like about it. I honestly feel like going through every portrait in the series, because they’re all beautiful, but we all know how much of a waffle fiend I am (imagine having to sit and listen to me waffle – at least you can just close your browser when you get bored), so I’ll limit myself to one.
By which I mean two. I was torn between the image of Galina Prokopenko, the 75 year old Karate instructor and the basket-weaving class image. Aside from being allergic to concision, I chose these two images because they are stylistically similar and hold qualities that I, whilst not wishing to be overly gushing, find absolutely wonderful. Putting aside the fact that the subjects are both totally relaxed, natural and bursting with character, they share a compositional style that I am very interested in at the moment.
Anastasia manages to balance the image of the subject in the frame with background detail, without taking focus away from the subjects themselves. If we look at Galina first, there is a beautiful balance between her pose and positioning in the frame with the floral wallpaper. The table tells us a little more about Galina without being an intrusive object in the scene. The lighting appears to be natural window light and the gentle vignetting draws us to Galina (who is a striking enough character to be drawn to in the first place, to be fair to her).
There are similar elements at work in the basket weaving portrait. The positioning of the girl in the frame, combined with the angle of the basket and its outreaching strands, the bottom of a plant creeping in on the image and the small wooden ornament make for an interesting composition. The lighting is again quite beautiful, the face being the most prominently lit feature in the image, focusing our attention on her expression of concentration. There is just enough of a hint of attention in her expression to suggest to us that she is listening to instructions from a teacher to the right of the camera.

A basket weaving class at the Ataman Platov Cossack Cadet School
Although the qualities described above would be enough to class these two images as excellent examples of portraiture, the true magic for me comes from the way everything is subtly visually linked. In the portrait of Galina, the pink of the floral wallpaper links to Galina’s pink lipstick. Similarly, the floral pattern on the wall links through to the floral pattern on the teapot and to the one on the tablecloth. I love how this is contrasted by her military appearance: it shows us that the personas of great-grandmother and soldier can both exist in one person.
Similarly, there is a very strong visual theme of flora and nature running through the basket weaving image: the hanging leaves link to the leafy pattern on the wallpaper, which is linked to the floral ornament on the wall, which is wooden, linking us to the basket itself, linking us to the camouflage pattern of the girl sitting, which is of course intended to mimic colours found in nature.
These are the qualities that take these portraits to the next level. I will cease my trademark waffling now, I hope you have enjoyed looking at these portraits in depth as much as I have.
To wrap up on a personal note – I’m really very glad I’ve written these two “Closer Looks” on a couple of my favourite portrait photographers. My intention was to get you lovely readers geared up about portraiture but, as it happens, I’ve also reinvigorated myself on the subject. It can be all too easy to fall into the trap of only taking photos when you’ve been commissioned to do so: this is a mistake. I don’t know about you, but I’m off to set up some portrait sessions just for the love of it. I suggest you do the same.


 Wow, that’s a really nice picture. It’s a shame about that big spot on her chin though. And she won’t thank you for that bit of hair she has on her lip there. Y’know, I think her hair is a slightly darker shade of red than that OH GOD IT’S WRONG IT’S ALL WRONG.