Learning anything new comes with a whole spectrum of principles, terminology, and practices that have the potential to boil your brain, leave you mildly confused, or anywhere in between whilst you're getting to grips with them. Photography definitely comes with its own theories, vocabulary, and conventions and not knowing what people are talking about when they refer to 'noise' or 'speed' can make you feel about a pixel tall. To try to ease people's paths in photography and prevent eye-swivelling, mind-frying, and either mild or acute embarrassment, we're running a series on photography fundamentals, throwing a bit more light on the things you need to know. I could say that we're starting with aperture because it begins with a, but I'd be lying. We're starting with aperture because it was the first thing that sprang to mind.
Aperture: it might be basic, but it can also be a bit of a stumbling block for people who are just beginning in photography. For a start, altering aperture doesn't have a single effect on your images, but a dual one. As if that isn't enough to confound people, its scale isn't exactly intuitive. Still, understanding aperture is critical for both exposure and composition—the bedrock of photography—so we'd best crack on.
Aperture and light
Aperture means ‘hole’ or ‘opening’. In a photography sense, the aperture is the gap that allows light to pass through the lens. The bigger the opening, or the aperture, the more light passes through. That’s pretty intuitive. When you’re taking pictures in low-light settings, a bigger aperture will help you to take a photo where you can see something.
If you’re taking pictures in bright sunlight, using a smaller aperture will help to prevent the image being one mass of white.
Aperture and depth of field
The second effect that aperture has on photographs concerns depth of field, or how much of an image is in focus. If you use a small aperture, you will notice that the depth of field in your photos will increase: more things in the background and foreground will be in focus.
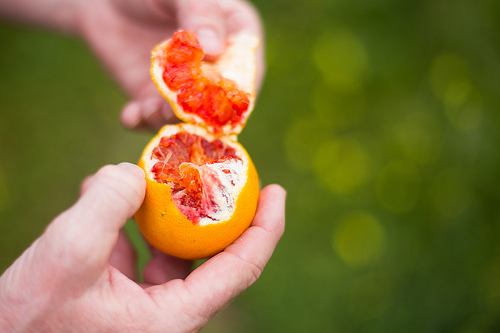
Conversely, by increasing the size of your aperture (and allowing more light to reach your sensor), you will decrease the depth of field in an image. That means that less of the scene will be in focus.
An aperture of ƒ/1.8 meant only a sliver of this blood orange was in sharp focus
Measuring aperture
When you hear people throwing around numbers such as ƒ/1.8, or ƒ/22, they are referring to aperture. Aperture is measured in ƒ-stops, with ƒ/1.4 being a very big aperture and ƒ/22 a very small aperture.
That the large number represents a small aperture and the small number indicates a large aperture can be more than a bit confusing. It will probably help to think of the ƒ-stop scale like this: those numbers correspond to fractions; the fraction being how big the aperture—or the opening—is. Thus ƒ/4 corresponds to a quarter and ƒ/8 to an eighth. An eighth is obviously smaller than a quarter; this means that it is a smaller aperture, it lets in less light and it gives a greater depth of field.
Finally, perhaps you're wondering what those fractions are fractions of? They’re fractions of the length of the lens you’re using. The aperture of a 28mm lens at ƒ/1 will be 28mm. Similarly, the aperture of a 50mm lens at ƒ/4 will be 12.5mm. The bigger the ƒ-stop, the smaller the aperture.
TL;DR
- Aperture means hole, gap, or opening
- A smaller aperture lets in less light, good for shooting on sunny days; a larger aperture lets in more light, good for shooting when it's dim
- A smaller aperture gives a greater depth of field, bringing more of the background into focus; a larger aperture gives a shallower depth of field with less in focus
- Aperture is measured in ƒ-stops
- F-stops correspond to fractions
- The higher the ƒ-stop number, the smaller the fraction, and the smaller the aperture
You know what, go out and take some photos altering the aperture value on your camera. Then you’ll see what we mean!
Photography Fundamentals >> Contrast


