Uncategorized

StudioShare.org: sharing photography resources

StudioShare.org

There’s probably photographic equipment worth a small fortune sitting unused, but still very much loved, all over the world; lenses in boxes on top of wardrobes and lighting umbrellas stashed beneath beds. Wouldn’t it be good if this equipment were actually in use, being hired out to people for a few hours here or a day there? Similarly, there are doubtless acres of studio space which are empty when they could be used for shooting beautiful pictures, along with people who need to use a studio. How useful would it be to bring together equipment and studio space available for hire, along with the people who want to hire it, in one place?

StudioShare.org

StudioShare.org does just that: it facilitates the loan and hire of photographic equipment and studio space between photographers and studio owners. It was dreamed up by Andreas Randow, a photographer who realised how often his studio was sitting empty and thought others might be able to make use of it when he wasn’t. That was in 2008. Over the course of a year he and few other like-minded people developed the concept, wrote the code, and tested the beta on other photographers. StudioShare.org opened to the public in autumn 2009.

What does it do?

Whilst the underlying concept is simple, StudioShare.org does much more than bring together those hiring out studio space or equipment — from macro lenses in Massachusetts to camera bodies in California — with those wanting to hire it. You can even search for people hiring out their services, such as hair and makeup artists, prop and set builders, and post-production specialists.

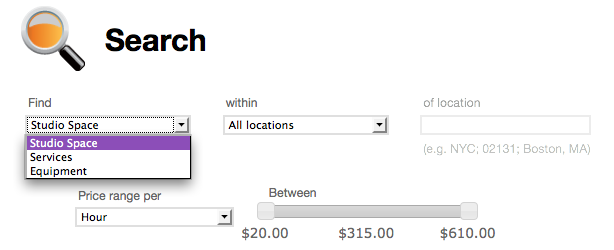
Finding what you want is simple using drop-down menus

It handles everything associated with a booking, from processing the payment, adding the rental to your calendar, emailing you a reminder, to preparing a statement for book-keeping purposes. That is probably one of StudioShare.org’s most widely praised features according to Marin Orlosky, StudioShare.org’s Marketing Manager: it takes the headache out of book-keeping and frees up creative people to be creative.

And how does it work?

Everyone wanting to use StudioShare.org pays an annual subscription fee: US$49 for members — those wishing to hire out or hire equipment or services — or US$79 for studio owners, who also enjoy the same benefits as members. Right now, StudioShare.org has around 1,600 members. Once registered, you can search for what you want, place a request, and expect a response within 24 hours. Then you pay for it, the booking is confirmed, and added to your calendar. You’ll even receive a reminder email.

So what is like to use?

When you log in you have access to a dashboard, which shows you your messages, your agenda, the projects you currently have organised, information from StudioShare.org, and your own account details.

The search interface is simple to use. You select what you need and where you need it (you can set a radius around your location of up to 100 miles) using drop-down boxes and can set a price range using a sliding scale. Then you are presented with a range of options from which to make your selection.

As the system relies on people loaning out their equipment, services, or space, availability can be a bit hit-and-miss. Studio space is pretty wide-spread, but equipment less so, and services are even more sparse. And of course, at the moment it only operates in the United States.

Lots of services are available, but can be a bit hit-and-miss depending on your location

If you are hiring a studio every possible piece of information, from access to post-processing facilities and wall colour to availability of parking and tea and coffee making, is set out for you. Once you have made your request, it will be accepted or declined within 24 hours, so there isn’t too much hanging around and uncertainty.

Keeping track of what you are loaning out or hiring is easy. In particular I liked that you could assign each booking to a given project, so if you needed to hire a studio as well as rent some lighting equipment and maybe an additional lens for the same shoot, they could all be placed in the same project. Not only could you be sure that you had organised all that you need, but everything would show up on the same statement.

Keeping track of what you have hired is clearly set out

What next?

With 1,600 members and growing all the time, StudioShare.org is aiming to become the primary resource for sharing photographic equipment and services. It’s looking at international expansion, especially in Canada, Australia, the UK, and Germany, so that not only can people there share their resources, but if you travel, you can find what you need, too.

The verdict?

Using StudioShare.org is easy, there’s plenty of support in case you need it, and the idea behind it is terrific. Now, it just needs even more people to join and start sharing their equipment and facilities.

Viewbook PhotoStory 2010

PhotoStory

Fancy seeing a series of your photos exhibited at a gallery in Amsterdam? How about having them published in a magazine and a book? I thought it sounded pretty cool, anyway. These are some of the prizes for the talented people who bag the Viewbook PhotoStory 2010 competition.

This is a competition with a bit of a difference, though, because you need to submit a series of photographs that weave a narrative. As the competition director, Alrik Swagerman said: ‘While a single image has a narrative in itself and can be strong in isolation, Viewbook PhotoStory’s focus is specifically on showing series of images, in a well-chosen sequence that triggers a reaction and combines a narrative with photographic excellence.’

Entries will be judged in two categories: documentary and conceptual. Although the overall competition winners will be selected by an international panel of judges, there is also a public vote and the winners of that get some goodies, too. You can submit your entries between now and 1 October 2010, when both public and jury voting commences.

So if you’re pro or amateur and fancy having a go, head over to the competition website. And don’t forget to look at our tips for winning competitions, either!

Phantastical Photography at the Obscura Gallery

Michael Ross: Once Upon a Time in New York - Chrysler Building

For anyone in, around, or heading to Melbourne over the coming month, you should check out the Phantastical Photography exhibition at the Obscura Gallery in St Kilda.

The exhibition features the imaginative work of three photographers: Vivien Racault, Keren Dobia, and Michael Ross. Racault’s series of pictures, Mysteries, explores the idea of the unknown. Dobia has created a collection of photographs that recreate children’s fairytales in an adult setting, whilst Ross’ ten pictures, 10,000 Miles of Dreaming, is a dreamscape featuring Melbourne, Cambodia, and New York City, some 10,000 miles apart.

Sounds pretty fantastic to me!

Phantastical Photography opens on Sunday 11 July at 16:00, and runs until Thursday 5 August 2010 at the Obscura Gallery, Beller House Suite 11, 285 Carlisle Street, St Kilda, Victoria 3183. The gallery is open Tuesday to Saturday, 12 noon to 18:00.

It ain't the camera...

fstoppers

So you think your camera isn’t good enough? You’re probably wrong. No, seriously – you’re about as wrong as you can possibly be. I know I keep droning on about this, but here’s the proof, once and for all.

The awesome guys over at Fstoppers.com have done a video showing off how they were able to do a photo shoot with the worst camera they could think of.

“To prove this, I’m going to shoot an entire fashion shoot with the worst camera possible… Any Olympus SLR camera”… Of course, that wasn’t bad enough… And they shot the whole thing on an iPhone 3GS instead.

Check out the video:

As Lee Morris says: “I posted a few of the images and asked people to critique them (never exposing that they were shot on my cell phone). I couldn’t help but laugh when a few of our readers claimed that these were ‘the best images I had ever taken.’ Nobody ever claimed that they were too grainy, too soft, or lacked detail.”

Oh snap. Check out the full article with a load of sample photos over on Fstoppers.

Yogile: quick and easy photo-sharing

Yogile

There is such a plethora of web-based photo-sharing options out there that I’m always a little sceptical of someone telling me about a new one. It’s not just that it is a flooded market, but the front-runners do it so well. However, I think I might just have been pointed in the direction of something a little bit different.

How about an online collaborative gallery? One where lots of people can upload their own photos of a particular event — for example a wedding — to a single place, and then share the photos amongst themselves or make it available to the general public. It’s available over at Yogile.

After someone has established a gallery, potential contributors, or just viewers, are emailed a URL and password. They click the link to see the gallery and follow the simple instructions to upload photos. Alternatively, photos can be emailed to the gallery directly. Apart from the person establishing the gallery, no one has to be a member.

It’s a clean, unfussy interface and you can even leave comments. Yep, simple, stress-free photo-sharing. Now someone just needs to get married, or throw a party, or organise a village fete…

Comparing comparison websites

There isn't a one-size-fits-all camera comparison website out there, sadly (hey! There's a business idea!), but by combining some of them, you can drastically reduce your research time, at least!

If you have been taking pictures for a long time, you’re probably fairly set in your camera-buying ways. You probably have brands you prefer over others; you know what you want out of your equipment, and you have an idea of the latest developments in camera technology.

When you need to buy a new camera, you’re normally most of the way there before you have even set foot in a shop or headed to your favourite camera-purchasing website. However, it is all a bit different if you are a first-time camera buyer, an occasional picture-taker, or buying a camera as a gift. The market is extensive, and a fairly daunting place. What to do?

There are quite a few camera comparison websites out there so I thought that I’d take a poke around and see which offered the best — or at least most useful — guidance. Seeing as I am a dyed-in-the-wool Canon user, I also employed the assistance of some slightly less camera- (and to be honest, web-) savvy potential consumers: my parents.

The mission: I told my father that I’d dropped his beloved Canon Ixus in the sea and had £150 to replace it, whilst my mother was entrusted with the task of finding an entry-level dSLR for my brother. So what did we discover?

Cameras.co.uk

Reviews, direct comparisons, and selection according to criteria are set out clearly, but the site is heavily focused on compact cameras. The reviews are arranged by camera type, for example ‘simple and easy’ or ‘pocket-sized’, and offers a numeric comparison across that group before you click through to a detailed review of a specific camera.

There is a range of pre-selected head-to-head camera comparisons, but they are pre-selected so you might feel a little limited there, and none of them looks at dSLRs, so it wasn’t very helpful for my mother. When it comes to the camera selection tool, it includes a price criterion and to my father’s relief, there was a link explaining the different terms.

Verdict of cameras.co.uk: good start for compact cameras, but not so useful for dSLR shopping.

DPReview

This site met exactly the same response from both Ma and Pa: ‘It doesn’t have a price comparison feature!’ That is a fairly significant defect, especially for my father, who was working on a strict budget. He was also quite intimidated by the other comparison criteria. It was all too technical for a some-time picture-taker.

Verdict of dpreview.com: good if you already know about cameras (and if money is no object), but not for a novice.

Digital Camera Reviews

This was the least helpful site we visited. There wasn’t any mechanism to select criteria for your camera, which meant that you had to sift through 601 different entries, covering everything from camera cases to memory cards before finding actual cameras.

Both my parents gave up and didn’t even make it as far as reviews. I took a look and was rather unimpressed: three lines doesn’t tell me what I need to know.

Verdict of digitalcamerareviews.org.uk: don’t bother.

Let’s Go Digital

This site hit an instant snag with my parents: there was no select by price function. When prices were mentioned, they were in US$, which is great for all you American readers, but not for my parents. However, I did like the reviews ascribed to individual cameras.

Verdict of letsgodigital.org: a good site to hit after you’ve done some initial research to establish what you’re looking for in a camera and have a few potential contenders.

Snapsort

Snapsort was my Dad’s favourite. Using its ‘Just tell me!’ function, he was able to tell it how much he had to spend on what sort of camera, and it made a series of recommendations for him. My mother was impressed by the colour-coding on the ratings and that it offered clear explanations of different camera terms and features.

I like that it offers head-to-head comparisons between any cameras of your choosing across two different interfaces, but also features its most popular comparisons. I wasn’t quite so impressed by the usability of the selection criteria interface, it was just a bit on the clunky side for me, and that it only offered statistical evaluations didn’t satisfy my ‘I need an opinion!’ craving. However, the killer feature of this site is that it shows prices in seven different currencies.

Verdict of snapsort.com: a clean design for what is probably the most comprehensive site out there.

What Digital Camera

Immediately this site won points with my mother because she was able to select ‘dSLR’ from a drop-down list and could sort the reviews according to price or ranking, and then make direct comparisons between cameras.

Each camera has an extensive review that gives marks out of 20 for design, image quality, performance, value, and features, states it pros and cons, and tells you what the reviewer thought of it. My dad loved that there was clear advice that set out what to look for when purchasing a camera.

Verdict of whatdigitalcamera.com: ugly site design (but hey, I love Small Aperture’s look and there are probably people who don’t) but it helped my parents to make a stress-free and informed selection.

The overall verdict?

There isn't a one-size-fits-all camera comparison site out there, but by combining several of them, you can reduce your research time, at least!

Relying on one site probably won’t give you sufficient breadth of information to make a decision, but by combining their strengths — for example Snapsort’s high-level overview and head-to-head comparisons with What Digital Camera?’s more detailed reviews — you will have a good idea of what is available on the market and can draw up a shortlist of contenders.

Once you’re armed with an overview, you can walk into a shop without feeling quite so overwhelmed and make a selection: After all, there’s nothing quite like holding a camera in your hands to help you come to the right decision!

10 inspiring pinhole photos

Self Portrait with Big Damn Atlas by Katie Cooke

The fact that a friend of mine is doing a pinholes photography exhibition inspired me to start looking for some more fantastic examples of pinhole photography in the deepest depths of the FlickrWebs.

I discovered two things: I need to get back to low-fi photography, and there’s a lot of talented people out there.

But what am I doing waffling – I’m sure you just want to look at photos, don’t you? Can’t blame ya. Here you go!

1 – Pont d’Aquitaine

Pont d'Aquitaine by Steven Monteau

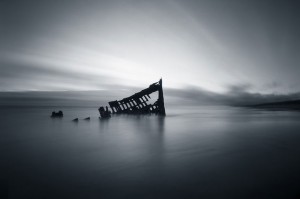
2 – Peter Iredale

Peter Iredale by Zeb Andrews

3 – Virginia Park

Virginia Park by Matt Callow

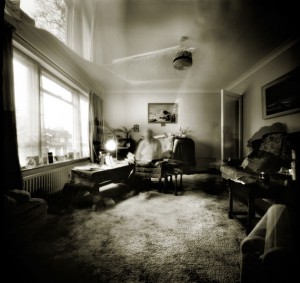
4 – The ghosts in my grandmother’s house

The ghosts in my grandmother's house by Donovan Rees

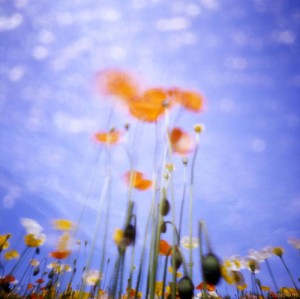
5 – Dream Colors

Dream Colors by Noriko Ohba

Dream Colors by Noriko Ohba

6 – Foot Fetish on Neptune

Foot Fetish on Neptune by Refractionless

Foot Fetish on Neptune by Refractionless

7 – Je est un autre

Je est un autre by Nhung Dang

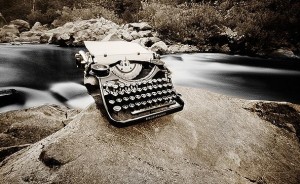
8 – River Typewriter

River Typewriter by Sean Duggan

9 – The First Man to Witness the Beginning of the End of the World

The First Man to Witness the Beginning of the End of the World by Scott Speck

10 – Self portrait with Big Damn Atlas

Self Portrait with Big Damn Atlas by Katie Cooke

Wanna have a go yourself?

If you want to try a spot of pinhole photography yourself, you could do a lot worse than reading Katie’s Teaching a Cardboard Box to be a Camera; it’s a great little introduction to creating your own pinholes.

Of course, you can also skip the film phase altogether and create a pinhole lens-cap for your dSLR camera!

All photos used in this article are used as ‘fair dealing‘. If you have strong reservations against your photos appearing on Small Aperture, please contact us, and we’ll get them taken down. Please support the artists creating these photos by clicking on the photos to take a closer look at their work!

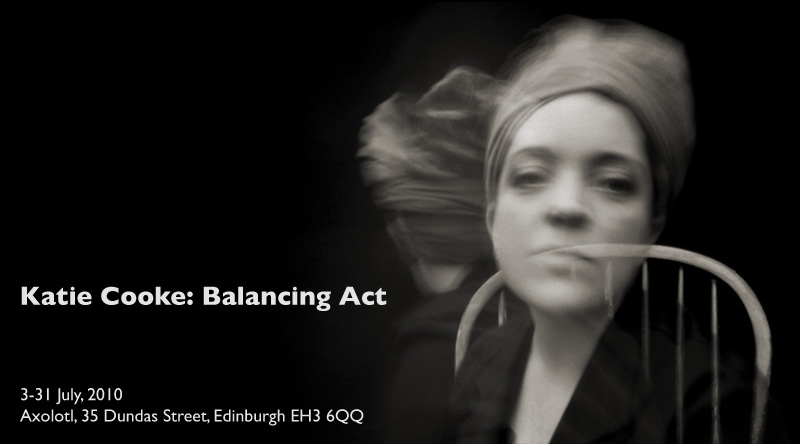
Katie Cooke: Balancing Act

Balancing Act

For those of you who are fans of Katie Cooke‘s pinhole photography you’ll be pleased to know that she has a new exhibition opening in Edinburgh on 3 July 2010. If you’re not familiar with Katie’s work, you should probably check her out.

Balancing Act is a series of seventeen silver prints of long exposure pinhole self portraits. Taken in 2006 and 2007, the pictures document Katie’s gain, loss, and regain of her ability to stand in between two major surgical procedures.

The exhibition runs from 3 to 31 July at the Axolotl Gallery, 35 Dundas Street, Edinburgh EH3 6QQ.

Lens Cloth of Rights

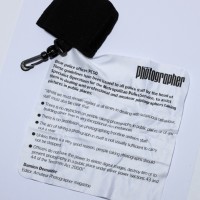
AP Lens Cloth

One day, the British police might get the hang of what it is that photographers can and cannot do in public places, and stop telling us that we can’t take pictures because it contravenes the Terrorism Act 2000. Until then, how about a handy-dandy lens cloth which sets out your rights as a photographer on it?

If you pick up a copy of Amateur Photographer on Tuesday 6 July, you’ll also get a free lens cloth that states, very clearly, what you are allowed to do — or even what the police aren’t allowed to do — if you are taking pictures when out and about. There are five points, and they were issued by no less than the Assistant Commissioner of Specialist Operations at the Metropolitan Police Service as the guidance for dealing with professional and amateur photographers in public places. Doesn’t get clearer than that, really, does it?

And just for completeness, or if you’d like to print off the guidance, laminate it, and keep it with your camera, here’s a recap of what it says:

  • there is no restriction on people taking photographs in public places or of any building other than in very exceptional circumstances
  • there is no prohibition on photographing front-line uniform staff
  • the act of taking a photograph in itself is not usually sufficient to carry out a stop
  • unless there is a very good reason, people taking photographs should not be stopped
  • officers do not have the power to delete digital images, destroy film or to prevent photography in a public place under either power (Sections 43 and 44 of the Terrorism Act 2000).

Of course, this doesn’t apply if you’re outside Britain, but these links might be useful if you’re in Australia, Canada, New Zealand, or the United States.

Happy snapping!

Saving money on your photography

Taken with the compact camera in my handbag. Far from top of the range and runs on rechargeable AA batteries.

Photography is not a cheap hobby. It probably starts out as an inexpensive past-time for most of us, maybe with a low-end compact camera or using Dad’s SLR and a couple of prints here and there – I know it did for me – but as our experience and our enthusiasm grows, so do our kit bags.

Add together the cost of an entry-level dSLR, a couple of lenses, a tripod, and a few other bits and pieces to make your life more interesting and you’ve already spent the best part of £1,000. Before long we realise that we’re having to take out insurance policies specifically covering our photographic equipment.

So if finances are a bit strained, or if you’re trying to save to go on the photographic trip of your dreams, what can you do? Ladies and Gentlemen, I present to you Small Aperture’s guide to skinflint’s photography.

Buy secondhand

From eBay to the local paper to car-boot sales to word-of-mouth there are thousands of pieces of perfectly useable photographic equipment for sale at a fraction of the price they would be brand new. Granted, they come without warranties and guarantees, but shop carefully and there are bargains to be had.

Don’t feel compelled to buy the latest model

At the moment you can pick up a Canon 450D for about £550 / $600 (Amazon UK / Amazon USA) whilst a 550D is roughly £750 / $1,000. If you’re just stepping up from a compact to an SLR the difference in specification is probably not worth £200. The same goes for lots of kit; so weigh up if the extra expense gives you suitable value-added.

Coffee shot through a home-made pinhole camera

Borrow equipment

Without even thinking too hard I can name two of my friends who also use Canon cameras. Did one of them lend me his wide-angle lens when I went away last weekend? Of course he did. Would I loan someone my 50mm prime lens if asked? Almost certainly.

It costs nothing to ask, just make sure you care for someone else’s kit better than you’d care for your own granny. (That is assuming that you like your granny. Otherwise pick your favourite person in the world.)

Rent equipment

Okay, so you use a Nikon and your best friend uses Pentax. You can’t borrow her macro lens for your weekend at the Eden Project, but you can always rent one.

Renting the same piece of kit over and over again will be expensive and you might as well just buy it in the long-term, but every now and again, or if you want to try before you buy, it could be worth it.

Make your own

Need a soft focus lens? Improvise with clingfilm. Don’t have a diffuser? A piece of muslin over your flash will do the job. Left your tripod on a train? Try using a piece of string. Want an interesting portrait background? Look around you: there’s sure to be something intriguing.

There is a bundle to be saved with a little ingenuity and creativity.

Try using old kit

Plenty of camera manufacturers haven’t altered their lens mounts in years. That means that many lenses from manual cameras will still fit on their digital grandchildren. Even if they don’t fit, picking up an adaptor is relatively cheap. Think of all that beautiful glass you could be using!

Use rechargeable batteries

I keep a compact camera in my handbag: it has rechargeable AA batteries in it. Got a flashgun? That’ll take AAs, too. Might as well make those rechargeable.

The photoshoot couldn't get to New York; so New York came to the photoshoot

Use free software

If you haven’t got £230 to spend on Adobe Lightroom, there are free photo editing packages available, for example GIMP, Photoscape, and Picnik. They might not be quite as responsive as something you pay for, but they will do the job.

Shop around for printing

I’m as guilty as the next person of always using the same company to run off prints of my photos. If I were to shop around, looking online and on the high street, I might be able to save myself some pennies on printing.

I do try to save up and print in bulk, though, which is far more economical than ten photos here and there.

In summary…

The day that I realised I was frustrated with my compact camera and wanted the versatility of an SLR, I knew that I was in for the long haul, but at least I know that it doesn’t always have to cost me a king’s ransom!

Tips for winning photography competitions

Be prepared!

Have you ever entered a photography competition and not won a bean?

Don’t worry, it happens to all of us. To help you along, we’ve collected together some of the best tips from some top judges to see if we can’t help you lay your hands on that so-far elusive first prize!

  • Edit ruthlessly and only submit your best shot — don’t be sentimental and don’t submit an almost-shot, submit your best one.
  • Be original — you want something that will make the judges go ‘Oooh!’, with your approach, your technique, and your interpretation. And don’t try to imitate another photographer.
  • Know your craft — ensure that you are seen as in control of the image: you shot it in black and white for a reason; the lighting is just right; its focus is exactly how you wanted it; you get the best out of shooting on film or digital.
  • Seek the opinions of others — don’t be too hard on yourself and don’t be too sentimental about your images.
  • Evoke emotion — be personal and be powerful.
  • Know the rules — you don’t want to be disqualified because you didn’t do it properly. And don’t forget to put your name and the name of the image on your files!
  • Finally: persevere — you might not win this time around, but there is always next time and you’ll have learned from the process.

If you want some more insight, including tips from some competition judges, why not have a look at what Photocritic and PhotoRadar have to say, too?

Now, go forth and conquer!

Shotblox: photoblogging made simple

shotblox

There are millions, maybe even billions, of photographs published on the web and quite a few different content management systems to handle them.

How many picture-specific content management systems are there – you know, ones that really focus on your photographs and aren’t laden down with extraneous features that detract from the real image? If you’re thinking: ‘Not that many,’ then maybe Issac and Kasey Kelly, over at Kelly Creative Tech have developed something to fill this niche.

Shotblox.com is a simple-to-use piece of photoblogging software where the photograph is the centre of attention. Once photos have been uploaded directly from your harddrive or from Adobe Lightroom they are saved in galleries and then each gallery is displayed as a clean block of images. Click on an image and it enlarges. Yes, it really is that simple. I was curious so I tried it out.

A funky user interface should help you along as you're building your new site

It took me a few minutes to sign up, a few more minutes to select a typeface colour and a background colour, and a few minutes to upload some images. Almost before I knew it my distinctly amateur-looking photographs were being presented in a professional-looking format, and I didn’t even have to use the video tutorial. There’s an option to notify your friends or followers of your new posts via FaceBook or Twitter, and if you get horribly stuck the Kelly brothers are an email away. My photos are accessed via the Shotblox subdomain, (http://deb.shotblox.com, if you’re that interested) but if you’ve your own domain, you can point that at Shotblox.com.

As Issac told me, Shotblox is really about what the photographer wants. It is primarily user-led with the emphasis being on simple: simple to use and simple in looks. They want the photography to stand out.

So if you do decide that Shotblox is for you, what will it cost you? Well, there are a range of packages on offer from a free sample of ten photos through to unlimited numbers of photos and unlimited bandwidth for US$500 a year, which means that if you’re serious about showing off your photos, there’s probably a package perfect for you.

Take a look for yourself at www.shotblox.com

BeetleCam: Safari via remote control

Matt and Will with the fantastic BeetleCam

I’ve done a fair bit of work with Will and Matt Burrard-Lucas in the past – they’re both ludicrously talented photographers and great guys. They also have a knack for DIY – and I have to say that their newest project is one of the ones that has interested me most recently – What do you get when you strap a camera to the top of a remote controlled car? You get their incredible BeetleCam.

The modern world of wildlife photography is saturated with thousands of talented photographers producing a huge number of fantastic photographs. As a result it is difficult to produce original shots without really pushing the boundaries and striving for new perspectives. Often, this means putting yourself (or the camera) into places that many would consider impossible.  


Matt and Will with the fantastic BeetleCam

Tired of the dangers of wildlife photography, Will and Matt set out to invent something. “We were driven to embark upon an ambitious project to photograph African wildlife from a new perspective”, Will tells me over coffee: “Traditionally, you get close to animals by using camera traps – stationary cameras triggered by a trip beam or remote. The problem with this method is that it requires a great deal of time, patience and luck. Therefore we decided to invent something a little more proactive!”. Easier said than done, but they did come up with a brilliant solution: The BeetleCam. Put simply, it’s a DSLR camera mounted on top of a four-wheel drive remote control buggy.

When was the last time you captured a shot like this? Incredible, eh?

They booked a trip to Tanzania and set about designing, building and testing BeetleCam. The first step was to get up to speed on the necessary robotics and electronics that would be required to build such a device from scratch. Having conducted our research, they sourced components from around the world. Construction then began in earnest with sawing, soldering, sewing and super gluing taking place around the clock in Will’s garage.

This was the last thing the poor Canon 400D saw before it was mauled by lions. Literally.

BeetleCam’s primary challenge would be getting over the uneven African terrain with a heavy payload of camera, lens and flashes. “We therefore ordered the most powerful motors we could find”, Will recalls, “and large off road tires, too”. After all, BeetleCam had to be able to operate for long periods without being charged, so they also ordered massive batteries.

Next, they constructed a split ETTL off-camera flash cord that allowed the camera to control the output of two flashes depending on the light conditions (this would be important for filling in the shadows cast by the bright African sun). The finishing touches were to camouflage BeetleCam and seal the camera and internal mechanisms from the environment.

The beetle cam in full camouflage

The prototype was finished with a month to spare but it proved to be catastrophically unstable. Whoops – you don’t want to go retrieve a camera from the midst of a pack of angry lions! An emergency redesign was undertaken to lower the centre of gravity and, a few days before their departure, BeetleCam was ready for to be let loose in the wild!

“We decided to make our first subjects elephants.”, Will says, and his face says it all: This was not going to end well. “Photographing them proved difficult”, he laughs. It turns out that their hearing and high intelligence made it very hard to outsmart them. “Eventually we developed a technique that involved manoeuvring BeetleCam into their path and waiting for them to approach”. Needless to say, this took a great deal of guesswork but perseverance paid off and they were able to take some amazing photographs of huge elephants towering over the camera.

You'll be much happier standing a few hundred meters away with a remote control than to actually be pressing the button here yourself. Trust me on this one. Or just ask Will.

Spurred by their success, Will and Matt got brave. “Our second subjects were lions and these proved easier to get close to”. sadly, though, it turned out to be just a little bit too easy. “Within 20 seconds of deploying BeetleCam, the lions had rushed over to investigate, bitten our Canon EOS 400d and run off into the bush carrying the actual BeetleCam itself”. A dramatic recovery mission ensued and they eventually retrieved their battered camera and BeetleCam. The camera would never take another photo, but imagine their excitement: “The 400d had captured some incredible shots in its final few seconds of life!”, Will laughs. Fortunately, they were able to patch BeetleCam up with some string and a few bits of wood. “We replaced the 400d with our only other camera, a Canon EOS 1d Mk III. Obviously we weren’t going to deploy near lions again!”

With our expensive 1D mounted on top of BeetleCam, they were were quite nervous when they decided to try photographing a group of old bachelor buffalos. If you’ve never had the honour of trying to capture ‘em; Buffalos have a reputation for being grumpy and unpredictable! “To our surprise and great relief, these old brutes turned out to excellent models”, Will explains. “they were very cooperative and posed beautifully as we drove BeetleCam around them!

Stunning. Absolutely stunning.

“Upon returning to the UK, we were thrilled with the photographs that we had managed to take during our two-weeks in Tanzania. We have already started work on BeetleCam Mark II and plan to return to Africa later this year to take more photographs.”, Will concludes.

Follow the Burrard-Lucas brethren’s crazy adventures by subscribing to their newsletter or checking out their RSS feed. Videos of the BeetleCam in action and more pics taken with it can be seen on the BeetleCam section of their website.

A huge thanks to Will and Matt for being interviewed for Photocritic. All photos are © burrard-lucas.com. Images used with explicit permission – please contact Matt and Will for further copyright info.


Do you enjoy a smattering of random photography links? Well, squire, I welcome thee to join me on Twitter -

© Kamps Consulting Ltd. This article is licenced for use on Pixiq only. Please do not reproduce wholly or in part without a license. More info.

No longer looking for n00bs (thanks!)

4342229392_dfb66fa229_o

Edit: I’ll keep this post here for posterity, but I have all the help I need. Thank you all so much for your feedback and interest!

So, I’m a writer. I write books about photography. And I get a lot of e-mail from people, asking if I can recommend a good book for someone who knows absolutely nothing about photography. Sadly, I can’t say that I’ve found such a book quite yet.

The problem with photography books out there is that they are either too technical too early (I happen to find shutter times deeply fascinating, but it’s too hands-off for many people who want to get out there and take photos), or they are too tutorial-driven. Several of the most popular photography books for beginners are written in the form of ‘hey, see this photo? Isn’t it awesome? to take it, set your camera to X, Y and Z, and press the shutter’, without actually explaining why you need those settings, and what would happen if you changed them slightly.

Only today, a good friend of mine, Sally, asked me if I could recommend a book. that re-awakened the idea I had: Maybe the time has come that I write my own book for complete beginners. 

Why do you need newbies?

There’s a problem with wanting to write a book for newbies: Sure, I am a photographer at heart, but I’m entirely self-taught. I’ve red hundreds of books about photography, I’ve experimented for a few decades, and I’ve been blogging my way through my first fledgling steps to my current state, as a halfway competent photographer.

Through my work career, I’ve learned some interesting tricks. Specifically, I used to work as a producer for a big TV station, and one of the things we did was focus on user-centred design, test-driven development, and the mantra of ‘test early, test often’, with the idea that it is much easier to adjust a process early on, then to try and fix something six months down the line.

So, my idea is to write a photography book “the wrong way around”: I want to know what my readers want to learn (this would be equal to the ‘tests’ in test-driven development), and then I want to find ways of teaching them. Then, after I’ve taught them about a topic of photography, I want feedback. What was easy to understand? What was tricky? Did the examples and analogies work? And – perhaps as important as anything else – is it still fun? Did you enjoy learning this piece of photography knowledge, and do you feel you know it well enough to build upon it to learn the next lesson?

I want to participate, what do you need from me?

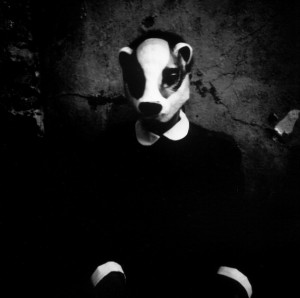
Bunny knows sweet fuck-all about photography, but his feed-back style is too aggressive for my liking, so I sat him down and explained that no, I wouldn't need his help with this particular project. I think he will grow to accept this. Maybe. Eventually.

Well, you need a SLR camera. I would strongly prefer if you had a prime lens, but a simple kit-lens should be sufficient.

You need to be a keen beginner. Perhaps you’ve had your camera for a few months, but you don’t really know what to do with it. Maybe you have a vision for what you want to accomplish, but you haven’t really got the skills to pull it off.

The important thing is that a) you have no formal photographpy training and b) that you know as little as possible about photography. I’ll probably admit a few slightly more advanced learners to the group, but the difficult part – from my perspective – will be to get through to the rank beginners: the ones who want to learn, but who don’t have anything to build on.

I’ve got plenty of other book projects at the moment, so I think this is going to be a very gradual project.

I expect you to be able to commit a bit of photography time, and to comment on each of the lessons (roughly every second week or so, I imagine). I also expect you to keep any discussions that happen in the virtual lessons to yourself – after all, if this end up being a book, I don’t want the world to know everything until I’m ready to unleash it! :)

Finally, I’ll do a lot of the feedback in ‘public’ to the group. If you’re worried about that: don’t be; I imagine that many people will be making the same mistakes, and it merely saves me from having to type up the same feedback again and again. If you’re particularly sensitive to criticism, however, this probably won’t be the project for you.

How do I apply?

Sorry, you’re too late! – Within 24 hours, I received a lot more applications than I had dared hope for. I was expecting about twenty people interested or so, but instead I received well over a hundred e-mails! I’m going to kick the project off and see where it goes, but I think I’m okay for people for now.

Stay tuned to see where this is going, and how we’re going with the book. I’m sure there’ll be a post once I’m sure what’s actually going to happen. Here’s to having my fingers crossed to find a publisher who might be interested!

So, what’s the plan?

I’ve created a private group on Flickr, and I plan to post the lessons as articles / discussion topics. To get access to the group, I need to invite you, so when you send me the e-mail, I’ll take a look at your Flickr profile, and then invite you if I think you’re good for this project.

I’m hoping to kick off with the first lesson in the beginning of March, and then try and gauge for how frequently we need additional lessons to keep you busy. I’ll also do individual photo critiques of your photos after each lesson, and use these critiques as part of my feedback to the whole group.

Oh and you know what? We’re going to have a hell of a lot of fun. It may even be the first time ever that a book has been written using XP methodologies. I know that makes me a geek, but damn if that ain’t pretty exciting!

365 project

3638617715_a70f309312_m

For the longest time, I’ve thought that I wouldn’t have it in me to do a 356 project – i.e. a photo per day for a whole year. If I think about the past five years, for example, there has never been a whole year where I would have been consistently able to post a photo per day. I mean, hell, my whole Flickr stream dates back to August 2006 and only 728 photos in it. That’s an average of 0.6 photos per day or so.

I’m not even sure if I want to subject the world to a project like that. I don’t really like posting photos to Flickr that I’m not reasonably happy with (even though I, too, have a load of junk in my Flickr stream, of course)… Could I really get 365 photos together over the course of a year?  

Then I started to think. I mean, I have a lot of respect for people who pull off ambitious projects, and I’ve seen shots from 365 projects that are creative, fun, moving, intense, moody, acrobatic, inspirational, retro-tastic, and ethereal.

How many days in 2010?

So, for 2010, I have decided to join the fray. And Randy made the silly suggestion of being my running mate, which gave me an idea… Perhaps more people fancy joining in.

Since there is no way in heaven or hell that I’ll be able to post a photo a day for a whole year, I can’t make that commitment. What I can do, however, is that I will post 365 photos to my Flickr stream in 2010. I’ll even make an attempt to post an average of 30 photos per month. I might even manage to do an average of 7 photos per week. And hey, even if I fail miserably, I could turn my attempt into a custom calendar – a perfect gift idea with the holiday season coming up!

That sounds like a lot of mathematics…

One of my less hopeless self-portraits of 2009, taken in Vietnam (clicky for bigger)

… And how do I know whether I’m running behind or not? Well, of course, there had to be a geeky solution: I made a simple counter to keep me (and you, if you like) on track… So if my 365/2010 project has fewer photos in it than the counter would indicate, feel free to give me a firm kick up the jacksie to keep me going!

I need more running mates!

As mentioned, Randy offered to join the fray, but I’d like to keep track of more of you guys who are about to start a project for 365… Post a comment, send me an e-mail, poke me Twitter, send me some smoke signals, or organise a carrier pigeon to let me know!


Do you enjoy a smattering of random photography links? Well, squire, I welcome thee to join me on Twitter -

© Kamps Consulting Ltd. This article is licenced for use on Pixiq only. Please do not reproduce wholly or in part without a license. More info.

iPhone photography exhibit

iphoneexhibit

The virtual image of the iPhone gets exhibited in the real space on the walls of the Giorgi Gallery in Berkeley, CA.

Since the advent of the coupling of the digital camera with the mobile phone, we have witnessed an explosion in the number of photos taken: A folk art form has unfolded where the depiction of reality and spontaneous events has been assisted not through the sophistication of the camera, but through its ubiquitous presence in our everyday lives.

iPhone images are crude with low resolution, so they must be judged by their basic composition and the manner at which they capture the moment, as well as how well the photographer uses the limitations of the camera to express a vision. With this show we are not looking for seductive images loaded with technique, but images that are alive with the ephemeral spirit of reality.

Join the fun

200 images will be printed and displayed in the gallery for the month of February 2010, and will be sold as individual works of art. A book will be published that will include all of the images along with names and a short bio of each iphonetographer.

We welcome all applicants and encourage amateurs, since there is no such thing as a professional iphontographer, at least not yet, as far as we know. For many of the artist this will be their first introduction to having their work shown in a gallery, and we look forward to the chance to discover new talent!

FocalPop and 'reverse stock photography'

There are a lot of reasons why photographers are interested in making some extra money these days. An obvious reason is the economy in general, which has left many of us without our day jobs and photographers with less work.

There’s also the shift towards microstock, which has made it easy for buyers to get very cheap photos while photographers’ commissions continue to get smaller. For many new photographers, it may be the case that you’ve never sold your photos and you’re not sure what kinds of things to shoot or how to go about selling your photos.

A new site called FocalPop is aiming to build an alternate marketplace for photography that that shakes things up a bit.

Here’s how it works:

  1. People seeking photos fill out a detailed request on www.focalpop.com
  2. Photographers are notified of new requests and can submit their photos if they fit the bill
  3. The seeker selects a winner and that photographer gets paid the request.

The idea is to give photographers more information about what buyers want, when they want it, and how much they’re willing to spend. It’s free to sign up and anyone can participate in the photo requests. Photographers can upload photos they already have or shoot new work providing just what they buyer wants. The best part is that the commissions are high, starting at 70%, and FocalPop has a suggested pricing tool to ensure the buyers are pricing their requests fairly.

FocalPop is celebrating its official launch this week, after a three month beta period that began this fall. Looking at all the photos uploaded to the site during beta, it appears that quite a few photographers are interested in this kind of solution. What remains to be seen is if the photo editors of the world have the time to wait for custom photos, or if they’d rather just get their photos off a regular stock photography site…

Book: Put another dime in the jukebox

street-photography-london-big

Some of you have caught on to the fact that I’m sort of fond of this whole concert photography thing – and I’ve written about it at length here on Photocritic, and I’ve got a big(ish) portfolio of concert photos over on Flickr. One thing I’ve been meaning to do for a while, though, is to distill my photographs and what I know about concert photography into an article.

As I was working on said article, I realised that, well, what I’m working on isn’t an article at all. It’s a book. Which is fair enough, I thought, I’ll just create a book on it instead. So, I give you: Put another dime in the Jukebox: A guide to concert photography by yours truly.

Everything you never really cared to know about concert photography, neatly collected in one useful place!

Everything you never really cared to know about concert photography, neatly collected in one useful place!

It has a lot of pages (46, to be precise), a metric tonne of gorgeously high-resolution photographs (around 100, actually), and is riddled with tips, advice, ideas, and examples of how you can take the best possible music photos.

So, who is this book for?

Well, it’s part coffee-table book – full of glorious music photos. If you have no intention whatsoever to ever take a single concert photo, it might still be worth picking up a copy: this thing is hellapretty.

The book really comes to its own for people who want to try concert photography though: 100 photos offers plenty of inspiration, and the book offers info about the photos were taken… It’s got sections on equipment, how to gain access to the press pit, how to convert your photos to black and white, how to deal with poor lighting, and all that loveliness.

Sounds amazing, where can I get a copy?

Lucy Styles on stage on Flickr

Lucy Styles on stage on Flickr

I’ve created the book via Blurb, which means that it’s printed on demand – order a copy, and they’ll print it up and send it out to you.

The quality of the book is truly outstanding: printing quality is so good that you’d never know you hadn’t ordered it from Amazon (as you can still do with my book on macro photography – Amazon.com or Amazon.co.uk), or from your local book shop.

To get your eager little paws on Put Another Dime in the Jukebox, reach for your credit card with one hand, and clicky here with the other (you ambidextrous wünderkind, you)… Enjoy!


Do you enjoy a smattering of random photography links? Well, squire, I welcome thee to join me on Twitter -

© Kamps Consulting Ltd. This article is licenced for use on Pixiq only. Please do not reproduce wholly or in part without a license. More info.

How to hand-colour your photos

handcolour-BKProcess10

I recently had a conversation with Bob Keefer – a talented photographer who has decided to hang on to some traditional techniques in a world which is accelerating at full speed toward better, faster, stronger… His party trick is impressive: Take a black-and-white photograph, and colour them. By hand.

Creating gorgeous, real-yet-unreal photo-based art which redefines how you’ll think about photography and digital retouching? Obviously, I had to catch up with Bob to see what, how – and perhaps, most importantly – why… 


Why bother with hand-colouring?

'Brown Creeper' - 11x14 hand-painted photo. This was shot of a Brown Creeper near its nest in the forest outside my home in Oregon. (click for bigger)

'Brown Creeper' - 11x14 hand-painted photo. This was shot of a Brown Creeper near its nest in the forest outside my home in Oregon.

From the beginning of the 20th century, right up through the 1950s or so, commercial hand colouring was relatively common. Today, there are a few photographers who keep the spirit alive.

“I’m old enough to have grown up with some old hand coloured photos around the house when I was a kid in Alabama.”, says Bob. “There was a beautiful hand coloured portrait of my grandfather, a genuine Southern rogue, in our family album. One of my early baby pictures was hand coloured as well.”

Equipment

'Superstitions' - 16x20 hand-painted photo. Taken in the Superstition Mountains of Arizona. (click for bigger)

'Superstitions' - 16x20 hand-painted photo. Taken in the Superstition Mountains of Arizona. (click for bigger)

The easiest way to get started in hand colouring photos is to use coloured pencils and an oily solvent, which can be anything from mineral spirits to cooking oil. Materials aren’t everything, of course: “Use the pencils to colour in areas on the print and then dab a little of the solvent onto a clean cotton ball to blend the pencil work. It’s amazingly easy to get good results with coloured pencil”, explains Bob. The only catch is that whatever you use for colouring, you really need to work on a photo printed on old-fashioned fibre-based paper.

Traditional-looking hand coloured photographs were done with special oil paints that are similar to artist oil paints but have a much higher pigment load. The company that made them is still around so you can still buy Marshall’s photo oils. If you use these paints, you end up with a palette that looks very much like old-fashioned hand colour photography. Why? Simple – it’s the palette the photographers of times gone by used.

'Fern in Rain' - 11x14 hand-painted photo. In the forest of western Oregon. (click for bigger)

'Fern in Rain' - 11x14 hand-painted photo. In the forest of western Oregon. (click for bigger)

Continuing the tradition wasn’t good enough for Bob, however – he decided to evolve the techniques to create his own creative look: “I soon started using regular artist oil paints for my work, giving me a broader colour palette to choose from.”

“In the last few years I’ve switched almost entirely to artist’s acrylics”, Bob admits. “They’re much less toxic than oil paints and they dry quicker. I also believe they are less likely to degrade photo paper, in the long haul, than oil paints, though those early 20th century hand-coloured photos have stood up pretty well”. Of course, using acrylics brings in a brand new challenge, too: “Acrylics are harder to use well”, Bob says, “in part because of that quick drying time.”

Refining the process

'Heceta' - 11x14 hand-painted photo. Oregon coast. (click for bigger)

'Heceta' - 11x14 hand-painted photo. Oregon coast. (click for bigger)

Of course, there are a lot of books out there which might help you to get started. They can only get you so far, however: “After reading my way through most of the currently published books on hand coloured photography, all of which seem to deal mostly with dreamy boudoir photographs on one hand, and bright, over-saturated pictures of cars on the other”, Bob recalls, “I spent some time serving a self-imposed apprenticeship in hand-colouring that taught me more than any book ever will”.

As with so many other things, the quickest way to masterdom is practice, practice, practice. Oh and did I mention practice? “I pulled out a stack of one hundred of my own photographs, rejects one and all, and sat down to hand colour them all as quickly as possible”, Bob smiles, “The only rule was not to be self-critical of anything, no matter what. I coloured that first hundred, and then coloured a hundred more.”

'Fern' - 11x14 hand-painted photo. In Oregon. (click for bigger)

'Fern' - 11x14 hand-painted photo. In Oregon. (click for bigger)

“I still have them all”, he says, and gestures vaguely towards a set of drawers in the corner of the room. “They’re mostly awful. Truly, unabashedly awful”, he laughs, “But some of them were a little bit good, and the steady practice of painting day after day after day taught me a huge amount about what I wanted to do.”

Most art photographers have made transition from taking photos to making photos – Bob has simply taken that adage another step forward. “What fascinates me about hand colouring”, Bob reflects, “is the subtle interplay between the cool, modern, machine-age precision of photography and the softer, more expressive and deeply primal art of painting.”

Top tips

'Oregon Forest' - 11x14 hand-painted photo. In the Oregon forest one foggy morning.

'Oregon Forest' - 11x14 hand-painted photo. In the Oregon forest one foggy morning.


Less is more. Some of my best hand coloured photographs look at first glance like they might be pure black and white, but they’re a kind of black-and-white you’ve never seen.

Don’t be literal. This is not a time to colour within the lines. It’s also good to add in a few impossible colours here and there to keep the eye interested.

Break the mould. The usual stuffy criteria applied by camera club photographers don’t apply. Sharp focus is unnecessary. Zone system exposure isn’t needed. Perfect darkroom technique is also an extravagance. An interesting print that’s deeply flawed in technical terms may be much more interesting as a hand coloured photo than a technically perfect print of the same image would be. I never throw out my darkroom mistakes.

Go back to basics. The best way for photographers to improve their photography is to stop spending money on the latest camera gear and, instead, get solid training in the basics of art: Take a community college class in drawing, and then another one in colour theory, and finally one in basic design. Your pictures will become immeasurably better as a result.

How to hand colour your photographs

Now that you know the what and why, Bob kindly agreed to show you, step by step, how he does a hand-coloured photograph, from start to finished. Prepare to be astonished… Take it away, Bob!

Hand colouring process
This 8×10-inch black and white photo of summer leaves was shot on Tri-X and developed in Rodinal, a good combination for hand coloring, and printed on Luminos Charcoal paper, which, sadly, is no longer available. Here it’s taped to a work table to be colored.

Hand colouring process
I use regular artist acrylic paints and brushes for my work.

Hand colouring process
After quickly sealing the surface of the photo with clear matte acrylic medium and letting it dry, I begin by painting areas of transparent yellow acrylic on the leaves….

Hand colouring process
..Then I start mixing darker olive green into some of the other leaves.

Hand colouring process
At this point the image looks a little ragged.

Hand colouring process
I pick up a wash of ultramarine blue and clear medium on a brush; the color is an excellent one for darkening and deepening shadow areas.

Hand colouring process
At this point I’m just incrementally adding color, drying the paint, stepping back, taking a look, and adding some more.

Hand colouring process
Here I’ve just painted in some burnt sienna, a good warm reddish color, in some of the leafs. This really adds some subtle sparkle.

Hand colouring process
I sign my work on the front, in paint.

Hand colouring process
The final product.

About Bob Keefer

Bob has a degree in the study of religion from Harvard University. He’s been a newspaper writer for 30 years and now writes about art for The Register-Guard in Eugene, Oregon. In 2006 he was a fellow at National Endowment for the Arts workshop on theater and musical theatre. He crafts fine hand-colored photographs the old-fashioned way, using film. He uses a chemical darkroom, fiber-based paper and artist’s paints, without using Photoshop or any such new-fangled technology. No PhotoShop involved. Each resulting print is a unique work of art.

Check out Bob’s website for more examples of his work – and it’s well worth adding his blog to your RSS reader, as well.


Do you enjoy a smattering of random photography links? Well, squire, I welcome thee to join me on Twitter -

© Kamps Consulting Ltd. This article is licenced for use on Pixiq only. Please do not reproduce wholly or in part without a license. More info.

7 weird and wonderful photo collections

The number 29

You know what the best thing is about photography? It’s not capturing slices of the world for all eternity, freezing your fingers off trying to get that perfect landscape portrait for which you have to get up at 3am and walk two hours to the top of a mountain, or even the hours and hours of discussions you’ll have with fellow photographers over whether Canon or Nikon wears the crown of bestest camera of all time ever.

To me, one of the most fascinating things about photos is that there are absolutely no rules. There are two hard limits on photography: Your fantasy, and the laws of physics – beyond that, you’re free to do whatever you want to do. We can’t do much about the laws of physics (although, with the recent spate of ISO 100,000 cameras, both Canon and Nikon are giving it their best shot), but there are lots of interesting ways you can try to give your creativity a boost.  


In 10 ways to break photographer’s block, I explored a few ways you can shake your creative rut – but to me personally, I think that introducing artificial constraints on my work (as discussed in my Dogma Photography article) is a great way to get creatively juiced up. Recently, I have been spending a lot of time on Flickr, and what strikes me, is that people do some truly in(s)ane stuff – which I, of course, am a complete sucker for.

So, without any further faff, I offer you… A series completely bonkers photo projects, and why they’re worth taking a closer look at…

Stick Figures in Peril

Please dont climb on this railing, by Leo Reynolds

"Please don't climb on this railing", by Leo Reynolds

I have no idea where Peril is or why you would want to go there, but this quite active Flickr group has a collection of mad, funny, thought-provoking and downright bizarre warning sign involving, well, stick figures in some sort of danger.

What can you learn? This project is so great because it stands as a reminder that there are photographs and photographic projects all around us. Have you thought about how many times you see warning signs with stick figures around you? It’s like yellow cars or pregnant women – if you start looking for them, they’re suddenly absolutely everywhere. And it’s the same way with photography opportunities. Once you start looking…

Electric Wheelchairs

Drive-By by Nige

Drive-By by Nige

Someone sent me a link to Nige’s Electric Wheelchairs moblog a while ago, and I’ve been scratching my head over it ever since. It’s street photography, but with a twist; the people in the photos are all on electric wheelchairs of some sort.

Of all the projects here, this is the one that makes me go why more emphatically than any of the others, and still… The photos are good, and I quite like the surrealism of it as well.

What can you learn? There’s a lot to be said for empowering and destigmatizing people, and photography is one way of doing that. As Nige says, “Electric wheelchairs are fanatstic, it’s a shame that only less mobile pensioners or those with disabilities get to have them, we want to zoom around too!”

Tea and Coffee making facilities

essentials by Vixgirl

essentials by Vixgirl

If you’ve got a job where you spend a lot of time on the road and in hotels, you know the feeling: You wander into your room, tired after a long day’s hard work (or waiting around for meetings to begin, which is not as tiring but the frustration alone will make you pine for the nearest pub), and you’re met with a crappy little television, a shower with rubbish water pressure, and the neighbours either having a loud party or making the beast with two backs, smacking the bed against your wall.

Take solace in the one thing which is consistently fabulous about hotel-rooms: the tea and coffee making facilities. This Flickr group is inspired by one of the extras on Bill Bailey’s DVD Part Troll, and does what it says on the tin: Photos of kettles and its accouterments, essentially.

What can you learn? That there is never any excuse for not taking photos – even if the weather is rubbish and you’ve spent every shred of your inspiration account, just look around you, and snap away.

Hotel Door Hangers

hanger 45, by Michael Lebowitz

hanger 45, by Michael Lebowitz

Michael Lebowitz, of Big Spaceship fame, posted a collection which is rather quite fascinating. “When my grandfather passed away last year, my family gathered to go through his belongings.”, Michael writes. “He had been in the foreign service and he had filled a whole wall of his study with hotel door hangers from all his travels throughout the world.” Of course, like a good netizen, Mike decided to photograph them all and post them for everybody to see – it’s glorious to see such a span in styles, languages, and time collected.

What can you learn? There are a lot of awesome things which can be collected and digitized – do you have friends or family members with odd collections? Do you? It’s an exercise in product photography, and you might get some additional ideas in the process!

Locks on Toilets

Redchurch bar, east London

Redchurch bar, east London

I’ve written about this one before… It’s an odd little project, which I came up with when I was hideously drunk one night – like all great ideas, in other words, and I just sort of continued doing it. Of course, it’s a lot more fun if it’s a collaborative project, and that bit seemed to work quite well – The Locks on Toilets pool on Flickr currently has nearly 300 photos in it – that’s 300 slices of rarely-photographed architecture from all over the world.

Daft? For sure. Funny? Well, I think so. Want to know more? Check out this post, then!

What can you learn? Obviously, if even I can come up with a naff photography project, then anyone can. Go on, give it a shot!

The Number 29

The number 29

The number 29

What happens when you one day take a photo which has the number 29 in it, and then decide to find out what would happen if you were to take a photo of that same number whenever you saw it? You get the awesome Number 29 project.

It has photos. Containing the number 29. In lots of different styles, places, and ways. Um, yeah, that’s really all there’s to it, but do go take a look, it’s pretty nifty.

What can you learn? Nothing, really, and I’m sort of regretting adding a ‘What can you learn’ bit to each of these, because what this post really should have been is a simple list of ‘Hey, look at these awesome projects’, and now, instead of working on my day job, I’m sitting here coming up with contrived ideas for things you can learn from silly projects. Feh.

The Squared Circle

Screen shot of the Squared Circle Flickr pool

Screen shot of the Squared Circle Flickr pool

It’s a very simple concept: Take a round object, place it inside a square photograph, and see what happens. If you think it sounds a bit too simple, then I have to admit that I agree with you, but 85,601 contributions to the Flickr Photo Pool can’t possibly be wrong: this is one of the longest-standing and most popular Flickr photography projects. It shows some incredible creativity, a lot of variety for such a constrained topic, and no small amount of humour, as well.

What can you learn? I guess round pegs do fit quite neatly into square holes – and I’m very fascinated by how people still seem to be able to come up with new takes on what now is a battered old photographic meme.

What are your favourites?

Scroll about 3 inches down this screen, past the advert which nobody actually sees or ever clicks on anyway, and you’ll find a comment field. If you know of a wicked project I’ve missed, go on, share it!


Do you enjoy a smattering of random photography links? Well, squire, I welcome thee to join me on Twitter -

© Kamps Consulting Ltd. This article is licenced for use on Pixiq only. Please do not reproduce wholly or in part without a license. More info.