Equipment

Lightroom 5 available now

There were a few worried faces and strained questions when Adobe announced its intention to switch Photoshop from being a standalone package to a cloud-only subscription service earlier this year - what did this mean for Lightroom? Adobe was quick to confirm that Lightroom would remain a standalone option as well as being available in the full Creative Cloud subscription, at which point I think there was a collective sigh of relief, and this moring Adobe has released the newly upgraded Lightroom 5 package.

What then do you get for your £57.64 ($79) worth of upgrade or £102.57 ($149) of brand new photo editing magic product? (Or the automatic update that comes with your monthly Creative Cloud subscription.)

Instead of having to piddle about with the spot healing brush, trying to get a round brush to cover a square imperfection, there's now the Advanced Healing Brush. This allows for irregularly shaped splotches and blotches to be fixed with a bit more panache than a round thing. I mean, really, since when have imperfections been perfectly round?

Being the stickler that I am for straight horizons, I'm looking forward to trying out the Upright tool. Using the angle tool wasn't especially tricky, but having a tool that analyses and corrects at the click of a button might be useful.

If you've bemoaned the inability to apply off-centred or multiple vignettes, the new Radial Gradients tool should bring an end to your woes.

The Book module has been updated to include standard or customer-specific templates and the video slidehow function lets you combine images, video clips, and music in one feature.

If, like me, you store your Raw images on multiple extrenal hard drives rather than on your computer's hard drive, not being able to re-edit an image because you and your files are separated by a plane ride, a train ride, or just a walk upstairs is a bit frustrating. Smart Previews is there to ease the pain of the 'Image Offline' notice - you can make your edits offline and next time you connect, the changes will be applied to the original images.

The brand new standalone package and the upgrade are available now. Head over to Adobe for the details.

Super-sensitive, super-light graphene sensors: which manufacturer will bite first?

Image courtesy of NTU We're accustomed to stratospheric ISOs making their ways into camera specs, helping us to capture images in lower and lower light situations. But what if changing the material from which camera sensors are manufactured could make them even more photo-sensitive, and lighter and more energy efficient to boot? A team of researchers at Singapore's Nanyang Technological University, led by Assitant Professor Wang Qijie, think they've cracked it. With graphene, the super-strong, rather flexible, heat-resistent carbon compound.

A graphene-based sensor has the potential to be 1000 times more sensitive to light than a current model CMOS or CCD sensor by making use of a light-trapping nanostructure that is able to retain light-generated electron particles for longer. In addition, graphene is lighter and more flexible than your usual sensor, with the potential to be five times cheaper. Rather than graphene-based sensors demanding a complete overhaul of the manufacturing process, it's possible to swap-out traditional metal-oxide semiconductor sensor bases for the new-fangled graphene versions without any major changes. It keeps getting better.

We're not just looking at more light-sensitive and more engergy-efficient sensors in our smartphones, compact cameras, or interchangeable lens cameras; being broad-spectrum sensors, they have roles in satellite technology and infra-red imaging, too.

Which major manufacturer will be the first to bite, then?

(Headsup to Tech News Daily, Will Jennings, and Nanyang Technological University)

Haje's review notes: Canon EOS 6D

After Photocritic editor Daniela came and showed me her shiny new camera - the Canon EOS 6D - I was gobsmacked. I have used my Canon EOS 5D for a while, and for quite a long time, I had been extremely happy with the photos, but living with this nagging feeling that there was something 'off' about the 5d. As soon as I picked up the 6D, I realised what it was. The Canon EOS 5D mark III is an astonishing piece of kit. The low-light capabilities are out of this world, it takes incredible photos, and the controls are so natural that it is probably the camera body I've gotten used to the fastest. It's a masterpiece of electronics and design. However, as I discovered when I first held its baby brother, it's too large.

This may come as a surprise to someone who's met me. I'm a tall guy (around 6'4" / 196 cm or so), and I have freakishly large hands. But, when I was writing a lot of books about photography, I forced myself to use entry-level cameras - not because I particularly wanted to use them, but because one of the key things I make in my books is that equipment doesn't really matter. That is very, very true, up to a point -- but given that most of my books are written for beginners, I had to 'eat my own dogfood', as they say: I figured it wouldn't make any sense to use a 5D mk III and then sing the praises of entry-level SLR cameras.

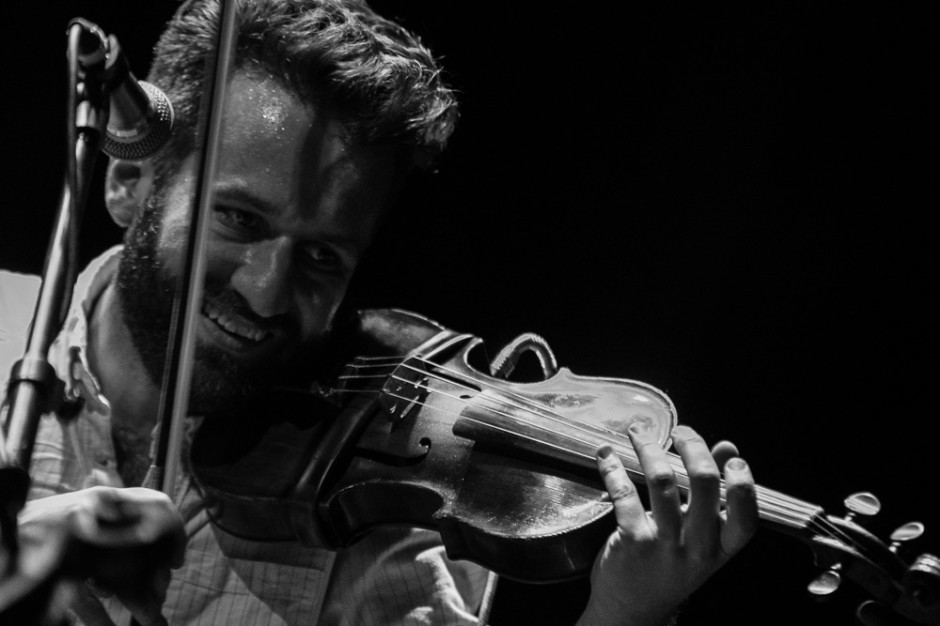
Dead Rat Orchestra -- Concert photos taken at Islington Assembly Hall, 1 June 2013.

Anyway: Last night, I did my first gig with the Canon EOS 6D, and ran into the first time where the 6D fell short. With the 5D, you can take gorgeous 22-megapixel shots in raw all day long; I never ran into a full buffer. On the 6D, however, I ended up missing several of the shots at the concert due to the camera's buffer being full.

I can't quite convey my disappointment: The 6D is a perfect camera for me in so many ways. I love the 20 megapixels, I love the ergonomics, I love the fact that it's a lot smaller and a bit lighter than the 5D. I like that it has GPS built in (great for travel photography!). I suppose it's naïve to think that any camera can completely replace a camera that's £1,000 more expensive.

Despite this one minor hiccup, I do still think I'll end up selling my 5D mk III. In the end, the consideration is this: How often do I take concert photos (not that often), and how often do I travel and take photos (frequently). The lighter weight, smaller size, and built-in GPS are worth more to me than being able to go all rapid-fire at a gig. And, of course, there's a way of dealing with this shortcoming, too: Become a slightly better photographer, and be a little bit more selective about the photos I take.

See the full gallery of concert photos taken with the 6D over in my Flickr set!

Olympus E-P5: first impressions

I was fortunate enough to have the opportunity to go hands-on with an Olympus E-P5 last night. The E-P5 is Olympus' new wi-fi-enabled flagship PEN, with a 1/8000 second maximum shutter speed and a 16 megapixel sensor that is reputed to offer the same image quality as the OM-D. But what did I think?

  • I loved having individual control dials, one for shutter speed and another for aperture, that can be altered to adjust ISO and white balance at the flick of a lever
  • The auto-focus seemed entirely capable in conditions that were less than optimal
  • Tilting touch-screens are always fun
  • It felt comfortable in the hand and looked stylish on the eye
  • I'm looking forward to trying out that 1/8000 second shutter speed!

The Olympus E-P5 should be available towards the end of June 2013. Body-only, it will cost around £900; kits start around £1000 for the 14-42mm lens while the ultimate kit, with a 17mm f1.8 prime lens and new VF-4 high resolution viewfinder, is in the region of £1350.

Mark your calendars: remote camera triggering webinar on Thursday

If you're free on Thursday at around 2PM EDT (7PM BST, or see this handy link for the correct time zone near you), you're in for a treat: Triggertrap and Datacolor are doing a webinar on remote camera triggering! It's like a seminar, but online!Most cameras have a range of creative remote control capabilities you may not even know exist. In this exploration of remote camera control possibilities we will cover the basics of shooting tethered to a computer, remote release devices, time and interval shooting (including interval shooting for combination into video streaming later) and remote triggering via long-run wired and wireless connections.

Applications will include, but are not limited to: commercial, stop-motion, wildlife, city and landscape photography.

It's a 1-hour seminar with David Saffir and C David Tobie, discussing the creative approaches you can use to trigger your camera remotely!

You can register for the seminar on the Datacolor webinars page today.

Enjoy!

Olympus getting out of cheap compact cameras? Good!

The news that Olympus is ditching their compact camera division this week caused quite a stir, but I can't help but think that the camera manufacturer is on to something. I've long thought that entry-level compact cameras are a Bad Idea. Nikon's line-up is a great example: Their SLRs are phenomenal. The Nikon 1 series are incredibly capable machines. But their $80 entry-level cameras are best avoided. It's not a particularly closely guarded secret that they're contract manufactured in a completely different factory, the design isn't done by the core Nikon team, etc. Basically, the entry-level cameras don't look or feel like Nikons.

The same goes for Olympus, but they also have a couple of other challenges they're facing.

I think Olympus is probably better off without these fellas.

There are two ways to look at this:

1) If your first camera is a cheap Olympus camera, you might be happy that it didn't break, and you'll buy another Olympus further down the line

2) If your first camera is a cheap Olympus camera, you might be appalled by the build quality, and decide to go elsewhere.

It's a hard gamble, because for cameras that are sold for less than a ton, it's pretty obvious that camera manufacturers have to cut corners somewhere. Cheaper enclosures and naff colours mean that they look and feel cheap. Cheaper LCD screens makes it hard to see how good your pictures came out. And cheaper lenses, sensors, and processors means that the camera will be slow, that there's a physical limit to how good the photos can be, etc. On top of that, the cheapest cameras often end up in the hands of people with the least of a clue - the very same people who could benefit the most from having a more 'intelligent' camera.

So, in deciding to pull the plug on their cheapest cameras, Olympus is making a wise move: They probably can't (and shouldn't) compete in a market that's a race to the bottom: Developing a cheap camera that is designed to be as good as it can be means spending a metric arse-tonne of cash on development, then another huge amount on manufacturing an enormous quantity of them, then piling in the marketing dollars to shift 'em. And even then it's a gamble, hoping that Nikon or another bottom-end manufacturer didn't happen to release a slightly better (or slightly cheaper) model a couple of weeks before you did.

Good riddance, I say: Olympus can now continue focusing their attention on the spaces where they are true innovators: The Olympus OM-D, the other mirrorless cameras, and their superzooms.

Raspberry Pi, meet camera

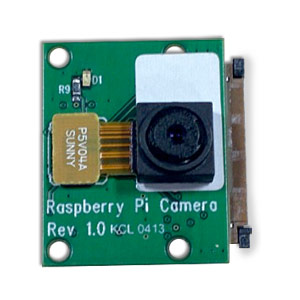
Raspberry Pi camera For the princely sum of £20 you can now attach a camera to your Raspberry Pi unit, to fiddle about with and figure out how to take a photo with bare-bones code. This is very much more about learning to code than learning about photography, but it's about learning: I'm enamoured.

The camera unit comprises a five megapixel sensor and lens on a board measuring 25mm x 20mm x 9mm, that's capable of recording 1080p video.

Given it attaches to the Raspberry Pi via a socket and is little more than bare lens, chip, and board, and in order to release the shutter you need to enter a line of code, you might need a bit of ingenuity or teamwork to take a picture. And don't forget that once the camera's plugged in, it's up to you to figure out the code needed to operate it and locate the images that it captures. (Although the Raspberry Pi community is very good at lending a helping hand.)

But isn't that the point? Raspberry Pi is meant to spark children's enthusiasm and curiosity for programming. You plug it in and through a process of trial, error, and discovery, you get to where you want to go. (Or maybe nowhere near it, but it was fun all the same.) In particular with a camera, it gives children something that's both familar and tangible to latch on to whilst they're in the process of learning. Learning, after all, is supposed to be fun.

Once you've figured out how to take a picture, where it's kept, and what to do with it next, there's a Raspberry Pi photograph competition running until 14 June 2013. Pictures need to be taken with a Raspberry Pi (d'uh) and fall into one of four categories: Your Workshop/Den; Your Pi Project; People and Pets; Outdoors.

I think I'm buying one for my niece. (And naturally, by that I mean that I'm buying one for Eva so that I can play with it.)

Raspberry Pis can be purchased on the Farnell element14 Raspberry Pi website for just over £28. The camera unit is just under £20.

(Via Engadget)

Review: Pentax X-5


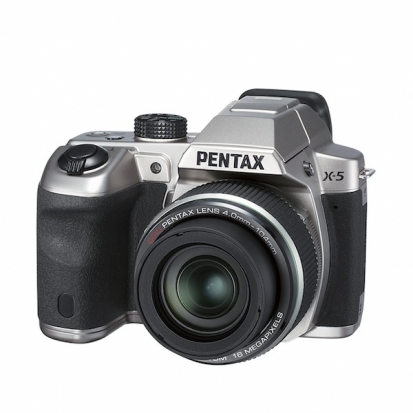
I spent a few weeks with a Pentax X-5. I used it whilst my brother's girlfriend was decorating the Christmas tree, I took it down to my father's allotment, and I conducted the requisite 'general fiddling' too.

Basic spec

The X-5 has 26× optical zoom capability (22.3 to 580mm, extendable to 4174mm with Digital Intelligent Zoom in 35mm equivalent) with a dual shake-reduction system and 1cm minimum focusing distance in macro mode. The 16 megapixel back-illuminated CMOS sensor has a maximum sensitvity of ISO 6,400. It can shoot upto 10 frames per second, capture HD video, and comes with a range of filters and in-camera tools.

It is powered by four AA batteries and can be picked up for around £180 or $245.

Build and handling

The X-5 feels very much like a scaled-down dSLR in the hands, with a chunky grip and protruding lens. It was comfortable to hold and the button layout was sensible. Would I have preferred to be able to switch on the camera without having to remove the lenscap? Yes. Is it going to change my life any? No.

The X-5 offers you M, P, full auto, and a range of other preset shooting modes. No, there's no Aperture Priority or Shutter Priority modes. After spending far too long messing about with the controls in an attempt to secure a decent exposure in manual mode and getting highly frustrated by the auto-focus with a mind of its own in fully automatic mode, I shot predominantly in Program mode. The ISO settings are squirreled away in a menu, but it was far less problematic to change the sensitivity than it was to deal with auto-of-focus pictures or to refer to the camera's idiosyncratic exposure meter and functionality. (I disliked the meter's display on the LCD and found it unintuitve.)

I wasn't at all comfortable using the electronic viewfinder. It looked far too much as if I should have been playing a video game than taking photos. As a consequence, I used the LCD screen exclusively and enjoyed its tilting ability, especially when I put the camera on a low-set tripod.

Powered by AA batteries, you are supposed to be able to get 330 shots from a fresh set of four. I'm sorry to say that I didn't come anywhere close to that number of images. Maybe 150?

Performance

Once I'd freed myself of the tyranny of the self-selecting auto-focus and switched to Program mode, I quite liked using the X-5. It has a great zoom range, the image quality is absolutely fine for web reproduction, and it's generally simple to achieve what you want (within its capabilities, of course).

The ISO tests showed that it was fine up to ISO 400, but after then, quality began to degrade significantly. Colour reproduction in daylight was good, but I found that the auto white balance tended towards too yellow in incandescent lighting. Set the white balance to incandescent, however, and the colour reproduction was far more accurate. I was pleasantly surprised by the impact of the pop-up flash indoors. It wasn't too harsh.I had pretty good results with the macro mode, too.

I don't have any particular love for in-camera filters, but the X-5's range of 12 were easy to use and could be applied non-destructively to the original image. In addition to those filters, you can play around stretching your images, giving people small faces, and creating collages. You can resize and crop in-camera, as well as edit video, too. There's also the ability to shoot direct to the camera's memory and then transfer the images to an SD card.

The Verdict

You get a lot of camera for your money with the X-5. But, it doesn't offer you anything outstanding and I found some of its features so frustrating to use that, from my perspective, they might not even have been included. Furthermore, I'm just not convinced by the bridge camera concept; they seem to sit in a photographic no-man's-land.

Would I buy it? No. Between my dSLR and a highly specced compact, my needs are met and the X-5 comes in no way close to fulfilling them.

Would I recommend it? If you really want a bridge camera, it offers such great value for money that I don't think you can ignore it.


More images on Flickr.

Review: Pentax K-30


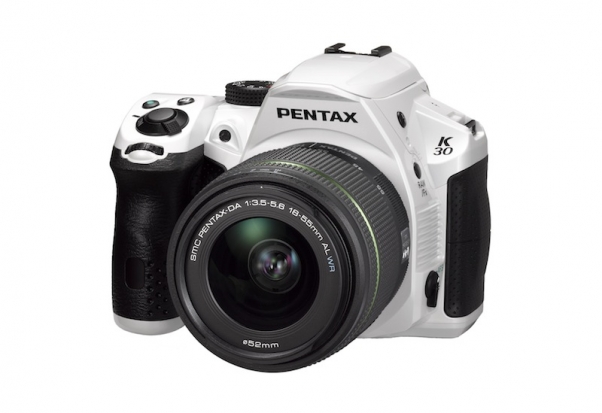
I spent two weeks with a white-bodied Pentax K-30 and its 18-55mm ƒ/3.5-5.6 kit lens. I took it around and about the villages where I'm currently living, into Cambridge for a day, to a craft evening, to my aunt's birthday dinner, and I conducted the necessary 'general fiddling' at home. 

Basic spec

The Pentax K-30 has a 16.3 megapixel sensor coupled with a PRIME M engine. Sensitivity ranges from ISO 100 to 12,800, but this can be extended to 25,600. It has a maximum frames-per-second rate of six, if switch out of Raw and into JPEG mode. There's also full HD video with a choice of 24, 25, or 30 frames-per-second. It's also unusual amongst its fellow mid-range cameras with its weather sealing, allowing you to take it out in the cold, the wet, and the dusty.

At the moment you can pick up a K-30 with an 18-55mm kit lens for around £470 or just under $1,000. With the added seasonal cashback offer Pentax UK is running, this certainly makes the K-30 better value in the UK.

Build and handling

When I took the K-30 out of its box, my first impressions were of a solidily built camera with an interesting design. No, I wasn't quite convinced by the white body, but it does come in more sedate black as well as a bit more racy blue. The large, blocky, handgrip might not be to everyone's liking, but I found it very comfortable to hold. It is worth bearing in mind, however, that I'm not a big person at all and my hands are very small.

There were a few quirks of ergonomics that I did find irritating, however. The direction of the on/off switch felt counter-intuitive. It's a very minor thing and one that I'm sure I'd not think about twice with a little more use. The placement of the aperture control dial is a different matter, though. It was too far to the left for me to be able to use comfortably. Granted, this is something that's dependent on me and my anatomy, but it's still worthy of consideration.

I also found the shutter release button uncommonly sensitive. On more than a few occasions I took a photo when I was still adjusting the exposure or focusing. It's not a terrible fault, but something that I noticed.

As a general rule the menus were sensible and well laid-out. Every now and again, however, I'd be confronted with a situation where I simply couldn't find what I was looking for. Of course that's frustrating, but the more that you get to use something, the more familiar it becomes.

Performance

My first outing with K-30 was to my aunt's birthday dinner, held in a dimly-lit restaurant. I was very impressed with the colour reproduction and thought that it handled higher ISOs well, but I noticed what I think is probably the K-30's biggest downfall: its pitifully slow auto-focusing capability. I was disappointed when a good proportion of the photos weren't as crisp as I would have wanted them.

In good light, however, I had no complaints about the auto-focusing, and the auto white balance was pleasing, too. I'd be inclined to leave it on auto white balance, rather than fiddle about with the pre-sets.

I did notice a touch of under-exposure in images where there were particularly bright areas. (The photos taken at the river in Cambridge being a good example.) There is the Highlight and Shadow Correction option to help out here, and in these instances, the photos were easily corrected.

When it comes to ISO, you can use the K-30 comfortably up until ISO 1,600. You begin to notice degredation at ISO 3,200, but you could still get away with things here. I wouldn't push the ISO to the maximum 12,800 (expandable to 25,600) unless really necessary.

The K-30 comes with both Custom Image modes and digital filters. Having the two different settings to achieve a range of effects such as monochrome, toy camera, or bleach by-pass seems a bit kooky to me. Surely one function for these types of features is enough? However, I discovered to my cost that digital filters can't be applied to Raw images; there's no automatic 'Save Raw + JPEG' function. Yes, this is an oversight, but all of the effects can be achieved in post-processing if you really want them. So if you screw up, like I did, it isn't the end of the world!

The slow auto-focusing came back to haunt me when I tried to take some photos at a craft evening with my WI group (I took turning 30 very seriously, mmkay?). We meet in a hall with horrible lighting and the K-30 really struggled to pin-point its subject. It feels such a shame when it performs so well in other areas.

The verdict?

I really enjoyed using the K-30. I used it to take some great photos and thought it had some terrific features, especially that weather-proofing. I did feel let down by the slow auto-focusing, which really doesn't allow the camera to capitalise on its fantastic ISO performance. (I'm reliably informed that it does improve with the 18-135mm lens, but that adds to the price considerably when you're starting out.)

Would I buy it? Well, no. But that's because I'm already invested in another system and this isn't the camera I'm looking for.

Would I recommend it? At the moment, in the UK, the K-30 is cracking value for a mid-range dSLR with weather sealing. If you're looking for a decent SLR that will provide you with the opportunity to produce high quality pictures and a lot of fun, you should take a look.


There are more photos on my Flickr stream. You can take a look here.

A tiltpod? What's a tiltpod?


When I was first asked if I'd test-drive a tiltpod, I shrugged my shoulders and thought 'Why not?' A portable, tiltable compact camera or iPhone securing device? There are worse things I could be asked to do, even if I weren't quite sure how I'd end up using them.

About a month on, I love my iPhone tiltpod and I can see the benefit of the compact camera version.

Tiltpods come with a lightweight, magnetic base that's set with a small socket, and a corresponding magnetic ball joint that either screws into the tripod mount of your compact camera or has a slot for your iPhone 4 or 4S. The ball sits in the socket, is held there by the marvel that is magnetism, and being a ball-and-socket, rotates. Rather than being tripods, they're more like gastropods, I suppose.

The camera version's base attaches to your camera via a lanyard and the ball joint is unobtrusive enough to live permanently in the tripod mount. (If you've an off-centred tripod mount, there is a sticky ball joint, instead.) It's a clever bit of design: the chances of losing one bit or the other have been diminished whilst the possibility of actually using it is increased by virtue of it always being there. As for the iPhone version, it can dangle most comfortably from your keyring.

Now that the ergonomics have been covered, what about using the things? Quite serendipitously, a project that is currently consuming just about all of my waking moments has demanded a heap of iPhoneography recently. The tiltpod has proved its mettle here, especially when it came to self-portraits. Find a flat surface, set the angle, use your self-timer function of choice, and away you go. Even if you don't need to be quite so artistically-inclined as my endeavours, a tiltpod is still ideal for grabbing photos of you and your beloveds, instead of pictures with oddly angled arms or devoid of one of your party.

Or you could just use it for Facetiming, if that's more your thing.

As for the camera version, it's pretty much the same deal. Find your surface, set it up, off you go. I've not had any issues with wobble, slide, or slip, and positioning it has been a question of how daring I've felt.

Tiltpods aren't without their limitations, though. Unless you magnetically attach the base to a radiator, lamppost, or railing, you're restricted to taking landscape oriented photos with the camera version. Whether or not you've the stomach to dangle your P310 from a balustrade via a magnet is up to you. I mean, I tried it, in the interests in writing a review, but I don't know if I'd be prepared to step beyond catching distance of my camera lest gravity get the better of it. (The tiltpod team does point out you can always attach the sticky ball joint to your camera to facilitate vertically-oriented shooting, but if you're already using the sticky foot, you can't. And you might not want to stick a sticky foot to your camera, either.)

If you precision-angle your iPhone, you can stand it vertically in its tiltpod. This set up does, however, feel a little precarious for my comfort. I would have apreciated just a little more depth and width in the base, so that I could use it to take portraits and not have to worry about my iPhone tumbling into oblivion, or have my iPhone standing up on my desk without fear of it toppling over should a door slam. Still, it hasn't stopped me from using the tiltpod to cradle my phone on my desk horizontally.

Finally, they do need to sit on a surface: a wall, a shelf, a nest of tables that I stacked one of top of another to gain sufficient height for one particular photo. But the problem itself isn't insurmountable (although my furniture obstacle course might have been) and it's the trade-off for their significant advantage over other camera-stabilising devices: they are emininetly portable.

The camera version stays attached to your camera, so it goes with you (and your camera) automatically. The iPhone version attaches to your keyring. They're designed to be used, not left languishing in a drawer or at the bottom of a bag.

At a smidge under $15 each, a tiltpod doesn't break the bank, although I'll admit that I probably wouldn't have gone out and bought one for myself. I am, though, very happy to have them in my possession. If you do lots of iPhoneography (or Facetime frequently), the iPhone version is worth it. And I reckon that they make pretty nifty presents, too.

Tiltpods are available from Gomite's webstore, costing $14.95 each.


Disclaimer: Gomite did send me two unsolicited review models. I didn't pay for them and I have been allowed to keep them.

Lending your gear to friends: is it all that scary?


Willis the dog, taken by Tom (aged 4)

Gosh photographers can be a funny bunch. A little while ago I stumbled onto a forum thread where someone had asked if he weren't the only person to refuse to lend kit to friends if they asked. The vast majority of the answers were in the 'Hell no! I never I lend my kit to anyone!' camp.

The responses were generally point-blank refusals, not even conditional considerations. One guy even went so far as to say that his wife is banned from so much as touching his cameras, let alone using them. I sat there goggle-eyed with disbelief and quickly went to find myself some photos of puppies or kittens to remind me that the world isn't really such a dismal and mean-spirited place.

The puppies and kittens obviously did the job, because I didn't think about this peculiarly possessive discussion until this week, when two events reminded me of it.

First, on Thursday I was editing some photos when my four year old nephew, Tom, sidled up to me and asked if he could have a go at taking some photos, too. I was so thrilled that he was interested in picking up a camera that I nearly knocked him over as I leapt from my seat to fetch my gear.

I flicked my dSLR in auto-mode (he is only four, after all), told him he had to walk and wasn't allowed anywhere without me, showed him to look through the viewfinder and which button to press, then hung it around his neck and we went off to explore. Twenty minutes later he'd photographed mum, dad, big sister, me, and the dog. He was thoroughly proud of himself.

Meanwhile his older sister had lost interest in her bead-threading activity and was clamouring for a go, too.

The same rules applied to her, and she took off to photograph pretty much the same things, less the photos of herself and plus some of plants in the garden.

Within half an hour I had two young'uns interested in photography. If I'd have been preciously fanatical about my kit, what were the chances that I'd have let two sticky-fingered kids loose with it? How would they have had the opportunity to experience the excitement that's taking a photo and letting everyone else see the world the way that you do? Yes, I laid down some ground-rules with them and I might have thought twice about it if I didn't think that they would treat my camera appropriately, but I can promise you that the warm and fuzzy feeling I got from watching them enjoy themselves far, far outweighed any jitters I might have had from letting them use my camera. This was their opportunity to learn and I didn't think that I could be selfish enough to deny it them.

(I could sit in my psychologist's armchair now and suggest that it is only by allowing children access to valuable and fragile objects that they learn to appreciate them properly; but I'll leave you to ponder that one in your own time.)

Then on Saturday evening I received a Twitter message from someone who's looking to buy her first dSLR. She wanted a bit of advice. I left the technical side of things to Haje–he's already written about that, and covered it extensively. Instead, I go for slightly more practical hints, for example to hold in your hands every camera that you're considering buying. It needs to feel comfortable; you need to be able to imagine yourself going out and using it and enjoying it. Photography is meant to be fun, after all, and it's a bit late when you've been shooting with your 60D for a few weeks and you realise that it makes your wrists ache.

If you know someone who owns a camera that you're considering buying, ask them pretty-please if you could have a go with it to see if it suits you. In fact, I would go as far as to actively consider investing in the same system as that which your friends and family might use. If you are a trusting and respectful group of people, you have the opportunity to borrow from and lend to each other all sorts of interesting bits and pieces as your equipment stashes grow.

When you're just starting out and your resources–both financial and physical–are limited, that can be heaven-sent. But years later, it still comes in useful. Last summer, my bacon was well and truly saved by a fellow photographer who leant me his camera when mine decided that it just wasn't going to play nicely with some studio lights. Without his trust and his generosity, I would never have been able to complete a scheduled shoot and it would have left me in a very difficult situation with some deadlines. I'm still grateful to him now, and should he ever need a similar favour from me, I'll help him out.

If for one moment you think that I'm bats enough to lend my camera to just anyone without any thought as to how they'd treat it, I promise you I'm not that nutty. My equipment might be insured, but I'm not in the habit of tempting a claim. (Your gear should be insured, too. If it isn't, go sort it, right now.) And if I were in need of it myself when she or he wanted to borrow it, I'd have to decline. But there has to be some give-and-take in life; if I think that they'll respect my gear and it isn't going to end up in pawn shop in Moss Side or at the bottom of the Thames, then I'm happy to lend. For no other reason, I don't know when I might need the favour returned.

Cameras are incredible things. Expensive things, too. But they're just that: things. There's a key element in the light+camera=photograph equation, and it's the photographer using the camera. We can't replace our creativity and we can't replace ourselves, but we can replace our cameras. So why not be a little more giving? It can't hurt that much, can it?

Choosing your first dSLR camera

With a slightly better screen than the others, the Nikon is an attractive choice in the bargain-SLR category

Whenever a new excuse for buying stuff (Christmas? Birthdays?) rolls around, the retailers are rubbing their money-grabbing little paws in glee, in anticipation of making a killing over the holiday seasons. Be that as it may, fact remains that there is a lot of choice out there, and whether you are buying your first camera, or whether you are out shopping for a friend of family member, you might need a hand.

Welcome to the 7th edition (!) of my in-depth guide to choosing an entry-level dSLR camera: What should you be looking for, what should you be buying, and why? It’s all in our handy shopping guide, right here… 

Where should you even begin?

Once you’ve decided to start looking for a dSLR, you might have some reason in mind already. Perhaps you feel as if you’re outgrowing your compact camera, whether that’s creatively or technically. Maybe you’re not really feeling as if you’re challenging yourself enough as a photographer. Either way, you’ve decided to go play with the big boys – welcome aboard!

The first and most important thing you need to know is that there aren’t any really bad digital SLR cameras out there.

In fact I would argue that there aren’t actually any bad digital cameras on the market anymore in general – stick to a respected camera brand, and you’re home free. If we’re looking at compact cameras, you can buy a respectible camera for under $100 – the Canon Powershot A2200, for example wil set you back $99 or thereabouts, and is a lot of camera for your hard-earned dollars.

Anyway, we were talking about dSLR cameras. Here are a few things you should be looking at..

Things to consider before making your choice

Do you already own a SLR camera?

If you have already bought into a particular brand of camera, take a good, hard look at your lenses. If you’ve bought a lot of high-end lenses and flashguns etc, swapping from one brand to another might have a lot of hidden costs in them. On the other hand, if you have a lot of old, tattered equipment with scratched lenses, see it as an opportunity: eBay off the lot, and start afresh.

Canon or Nikon?

This is a perennial question which I’m not going to go anywhere near.I defy anybody to be able to tell the difference between a camera taken with a Canon or with a Nikon camera. Or a Sony. Or a Panasonic. Or a Sigma. Things have moved on hugely since the raging Canon-Nikon debates of the early 1980s (and they scarcely made all that much sense then).

Whichever camera system you buy into, you’re going to live with for a while (probably), so do think about it. You – not your camera equipment – is going to be the bottleneck, so don’t worry too much about what you might have heard form the old graybeards…

Buying into a system?

You know best what kind of a photographer you are. If you’re likely to start buying high-end lenses (or ‘fast glass’, as it’s frequently called among seasoned photographers), then you have two choices: Canon or Nikon. There are a lot of other people out there building great DSLR cameras, but once you start talking seriously high-end equipment, it’s one of the two big ones, I’m afraid.

On the other hand, if you are a semi-serious hobbyist, don’t discard other camera brands out of hand: Sony, Olympus and Panasonic are building some very capable cameras indeed – with some serious money-saving opportunities, too!

Body or glass?

If you have to choose between buying an expensive body and cheap glass or a cheap body and expensive glass, then go for the posh lenses. Every time. Personally, I am still using lenses that I bought nearly 10 years ago, even though I’ve changed my camera bodies half a dozen times since: You can take fantastic photos with an entry-level body and expensive lenses.

Putting bargain lenses on a top-level body is, frankly, a complete waste of money. Even better: Buy yourself a nice prime lens, and be amazed at what your camera body can do.

Megapixels?

In general, don’t worry about megapixels – most dSLR cameras come with 10 megapixels or more, and that’s enough. Hell, there’s even a prominent group arguing that more pixels aren’t necessarily better, and that 6mpx is all you need, really. I’m inclined to agree – you very rarely use them at full resolution anyway. What I’m trying to say is that Megapixels should be the last thing you look for in a digital camera in general – and a dSLR especially.

screen_shot_2011_11_25_at_080324.jpg

The above photo was taken with... an iPhone. Proving that any camera can take a good photo.

So, to summarise:

  • Don’t worry too much about the brand of your camera body
  • Buy Canon or Nikon if you anticipate dropping a lot of money on lenses in the long run
  • Spend your money on lenses, not camera bodies
  • Oh. and also consider looking into EVIL cameras - they're smaller and lighter than SLR cameras, but you keep the ability to swap lenses, and they can take great-quality photos! (loads more info about EVIL photography here)

3 great bargains

So, you’ve decided to leap into the pool of DSLRs, but you want to spend as little money as possible? These three cameras are your best options:

Sony Alpha A390

93449.jpgThe Sony Alpha 390 is an absolute bargain, and a great entry into the world of SLR. You get 14.2 mpx (more than enough), RAW image format (which is a must), and an incredibly nifty little feature: In-camera optical ‘SteadyShot’ image stabilisation! This means that any lens you connect to the Sony Alpha camera will be image stabilised – this is a feature you pay tons of money for in the lenses of other camera manufacturers!

The Sony Alpha lenses are compatible with Minolta AF and Konica lenses, so you get a reasonably good choice of glass, and the camera has a pretty wide shutter speed range of 30 seconds to 1/4000th of a second.

On top of all this, the Sony can be picked up with a fabulous kit lens – sure, it’s not the best glass you can buy, but who cares when you’re eager to get started. You can always chuck away (or eBay) the kit lens later, and upgrade to something better, once you know what kind of photos you’re likely to be taking!

You can get the Sony Alpha 390 with a kit lens from Amazon.com for about $449 and from Amazon.co.uk for about £349.

Canon EOS 1100D / Canon Rebel T3

canon_1100d_t3.jpgThe world of digital cameras has come a very long way indeed. I remember buying my first DSLR in the mid-to-late 1990s, and, well, you’d pay a small fortune for something that wasn’t all that amazing.

These days, though, you’re not needing to spend that much money to pick up a big-brand SLR camera. Obviously, Canon felt Sony and the other budget-DSLR manufacturers breathe down their neck, and they had to respond. And boy, did they respond: The EOS 1100D / Rebel T3 is one heck of a camera. Sure, so they’ve cut a few corners here and there, but, frankly, I don’t give a damn.

Personally, if I were to buy a SLR today, I’d buy one of two cameras: A Canon EOS 5D mk III (which costs a small fortune), or a 1100D / T3. Why? Because the imaging sensor is brilliant, and you can start saving up to buy lenses that will be with you and your camera system for a decade or more. When you finally out-grow the 1100D, eBay it and buy a mid-range camera (like the Canon 600D), or start looking at spending serious money for a serious camera (Canon 5D mk III if you want full-frame coverage, 7D if you don’t) – but none of the money you spent on lenses was a waste: It’ll all still be there, ready for you to snap away.

Of the bargain-snappers, only the 1100D / T3 has a CMOS sensor – which makes a surprising difference in image quality: Not necessarily better, but for some reason the grain on a CMOS sensor at higher ISO is a lot more similar to film than CCD sensors pushed to the limit… All of which means that the 1100D photos ‘feel’ more natural when you look at them.

You can get the  Rebel T3 from Amazon.com for about $490 or the Canon 1100D from Amazon.co.uk for about £400 – both with a Canon EF-S 18-55 kit lens.

Nikon D3100

nikon_d3100_angle_medium.jpgNikon’s baby camera is the D3100 – and it’s another bloody strong contender to the bargain crown. It comes with a super-advanced light meter – the 3D Matrix metering system borrowed from far more expensive Nikon cameras, which means that the Nikon is definitely the most capable in terms of getting the light measurements right.

The other thing the D3100 gets right is that it has a fabulous 3-inch LCD screen on the back of the camera, which makes a huge difference when you’re checking your photos in the field, to ensure you've captured what you're looking for all right.

Just like the Canon camera, the Nikon is an opportunity to start climbing the ladder – Buy the most expensive lenses you can afford, get some tasty flashguns, and they’ll be with you for a long time indeed.

I have to admit that I’m a Canon man at heart (I’ve used Canon cameras since I stole my dad’s Canon A1 out of the cupboard when I could barely walk. I didn’t break it, luckily), but it’s starting to seem as if Nikon currently have a nicer progression through the cameras – the D3100 is a peach, and the D5000 or D5100 – which is the next step up without being that much more expensive – is a deceptively simple, yet very serious, camera, for serious photographers.

You can pick up a D3100 from Amazon.com for about $640 and from Amazon.co.uk for £440 or so.

So… What should I choose?

If you want to take the step from compact cameras to SLRs, but foresee that you’ll continue being a casual amateur, go for the Sony. It’s a great little camera, a fantastic bargain, and the lenses available are not bad at all.

If you are ambitious in your photography, grab a dice. Throw it. Even numbers are Canon. Odd numbers are Nikon. They’re both absolutely brilliant cameras, and – considering what you get for your money – bargains. The Canon has a slightly better imaging sensor (but you wouldn’t be able to tell until you’re at higher ISO speeds) and the Nikon has a marginally better light meter (which doesn’t make that much difference in real life) and a better screen (which does). Seriously, if you’re having trouble making up your mind, throw the dice. It’ll save you a lot of headache.

Any final tips?
Buy a cheap camera body, then invest in some lovely lenses. You know it makes sense...

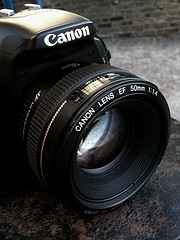
I know I’ve repeated this several times in this article, but if you’re new to SLRs, I would advise to buy the entry-level model from a manufacturer. Start taking photos – you won’t out-grow your camera body for a while, trust me on that, but you might out-grow your lenses. Start by buying a ‘Nifty Fifty‘ (a 50mm prime lens). Most manufacturers have a f/1.8 which is good and a f/1.4 which is great…

Once you have one of those, start thinking about the type of photography you do. If you want to start shooting macro, you’ll need to start looking into a macro lens. If you want to photograph gigs or wildlife, you’ll want a fast tele-zoom (I can’t recommend Sigma’s 70-200mm f/2.8 DSM lens highly enough – it’s a bargain for what you’re getting). If you’re more into in-door or landscape photography, you want to go wider – but only you know exactly what you want.

Buying cheap lenses is false economy – unless you don’t really know what you want to take photos of. If you’re just experimenting, flailing around a little (as we all are, at first), stick with your prime and your kit lens for a while. If you find yourself at the wide end of your kit lens most of the time, perhaps it’s a sign you need to spend a bit of cash on a wider lens. If you’re constantly at full zoom… well, you figure it out.

If you’re worried about spending hundreds – if not thousands – of dollars (or pounds, should you be on my side of the pond) on glass, go ahead and rent the lens you’re considering for a few weeks. Does it do everything you want it to? Is it too heavy? Does it feel right? Is it fast enough? If you’re not happy, rent a different lens, and keep searching. When you find the right lens(es) for you, you’ll know it – and that’s the right time to start shelling out the big bucks.

Seriously: Buy glass first. (If you want to learn more about lenses, I've got everything you could possibly want to know right here...) Worry about camera bodies later. By the time you have bought some serious lenses, you’ll know what you need from a camera (wide angle? Full-frame sensor. Sports? Fast, high-frames-per-second camera. Walking a lot? Buy a capable, but light-weight camera body… Etc)… But it’s a supremely silly thing to do to spend a lot of money on a camera body until you know what you really want/need.

So, Haje, what do you use?

I love my Canon 450D. Its cheap as chips, but does the trick!I’ve had a lot of cool cameras in my time – I worked as a freelance photographer for a while, and bought all the top-shelf gear. At one point, I drove around in a £1,300 car with £49,000 worth of camera equipment in the boot. I think it’s pretty safe to say that I’m a gadget nut, and a camera aficionado to boot.

… Which is why it might surprise you that currently, my main camera is... a Canon EOS 550D. It’s not the newest camera on the market anymore. It never was the best. But it does everything I need from a camera: It’s plastic, so it’s reasonably light weight. It’s relatively sturdy. It uses SD cards (which plug straight into my MacBook Pro – it’s a small thing, but I like it).

The five-fifty takes all my lenses (I have loads, but the ones I’ve used in the past 6 months are a Sigma 17-35mm f/2.8-4.0, a Canon 50mm f/1.4, a Sigma 70-200 f/2.8, and my Lensbaby G3 lens), and it doesn’t look too conspicuous. It’s also cheap enough that I’m not too crazy worried about it getting stolen or dropping it. All in all: Perfect for my uses. And it's one cheapest camera you can buy with a Canon badge on it.

This article was first published in 2007, but has been updated with the most relevant information every year since. It was most recently updated in April 2012.

Universal underwater housing patent... Could it work?


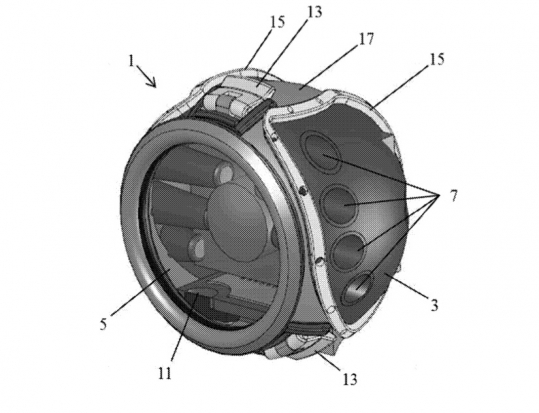
Today, an interesting article popped up in my RSS reader, from Photorumors. The article discusses an universal camera housing for use underwater photography. As an avid diver (I'm a PADI Divemaster), my ears perked up: Universal? For SLR cameras? What a fantastic idea.

Whilst it looks like a great idea initially, anybody who has done much diving will be able to tell you that it wouldn't work. The patent application outlines a type of rubber 'gloves' that would enable you to manipulate your camera underwater. However, there many problems with this. The biggest one is the challenge of pressure. Imagine, for a moment, that you fill balloon with air, and take it under water with you. When you dive down to only 10 meters (only a fourth of the depth that recreational divers can go), the pressure will have reduced the balloon to half its previous size. Take it down by another 10 meters, and it'll be a third of its original size. at 30 meters, it'll be a fourth, and at 40 meters (the max depth for recreational divers), it'll be a fifth of its original size.

The opposite is also true. If you fill a balloon with air at 40 meters (It is possible: You look like a fool taking your regulator out to blow up a balloon, but it can be done), and you ascend, the balloon will grow to five times its original size. Or, with a balloon being a balloon, it'll pop before you get to the surface.

How does a normal underwater housing work?

Most underwater housings are rigid. The idea is simple: By letting the pressure of the water simply press on the outside of the housing, the pressure makes it water-proof. All it needs to do is to withstand a lot of external pressure.

At that point, the challenge is simply an engineering challenge: Create a plastic or metal housing that can withstand 5 atmospheres of pressure.

The challenge with this design

Now, the problem with this patent is obvious: you'd need a rigid part (so your lens can take photos), but also flexible parts (so you can operate your camera's controls). The problem happens when you have both rigid and flexible parts - the flexible rubber-like parts would come under a lot of stress from the water surrounding the camera housing, and would likely collapse under the pressure from the outside. In effect, the 'glove fingers' would fill with water, extending their size hugely, making the camera hard to use.

The patent application further explains that the manufacturers plan to cancel that effect out by having a "A pressure equalization system". The easiest way to equalise pressure would be to fill the enclosure with a liquid (since most liquids don't compress at the pressures we are talking about), but since we're talking about camera equipment here, that's probably not going to fly. Of course, there are liquids that could be used without short-circuiting the electronics in a camera, but non-conductive liquids tend to be expensive, and either way, they would affect the optical qualities of the lenses and the camera.

So, the other way to equalise pressure is to simply add more gas (air) to the enclosure when you dive down, and let the air back out when you go up. Sounds easy, but anyone who has ever tried using a Lift Bag underwater, will know that maintaining the correct amount of air to equalise, compensating for the constantly changing pressure based on the amount of water you have above you, is bloody hard.

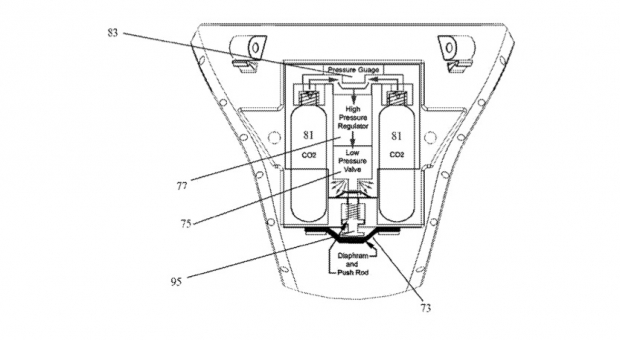
It seems as if they're trying to solve the problem in this patent, by equalising the pressure inside the casing with CO2 cartridges:

screen_shot_2012_03_30_at_135502.jpg

But I can't help but thinking that, whilst an universal underwater housing is a great idea, and I want SalamanderSkinz's invention to work, but based on the patent application alone, it makes me wonder whether anybody would ever risk their pride-and-joy camera to the device, if and when it ever gets built. I don't want to sound like a stick-in-the-mud, but for now, I think the other nearly-universal solution that already exists is a better (and much cheaper) option...

Canon 100mm f/2.8 Macro: A love story

Some times you find a lens that is so relentlessly delicious that you simply have to write it a love poem. Since I'm not a poet, I fear it may merely have to be these words. Think of it as short prose, perhaps, masquerading as free-form poetry.

This photo:

6847881597_bff897ee4a_o.jpg

was taken with a Canon 100mm f/2.8 Macro lens. The Non-image-stabilised version. It costs $570 / £420, and is a truly magnificent piece of kit. For one thing, it is supremely sharp. It's a 100mm lens that's perfect for portraiture, and it's bright as well - at f/2.8, it's great for photographing in relatively low light.

Of course, its crowning feature is the 'macro' bit, and that is where it truly shines. The photo above was taken free-hand: No tripod, no flashes, no lighting; just my Canon EOS 550D, and the Canon 100mm lens. It's a little bit grainy, mostly due to having to shoot at ISO 800 to get the shutter speed high enough to be able to get the shot without much motion blur.

I know I keep raving about my 50mm f/1.4, but I've gotta say; this 100mm f/2.8 is storming up there as one of my all-time favourite lenses.

Borrow it if you can, hire it if you must, buy it if you love it.

Happy Valentine's Day! :)

My week with Q


Small, very small

When you read the specs for the Pentax Q, you know intellectually that it's small, but it doesn't really hit home until you see it for yourself. It really is tiny. In fact, it's so dinky you'd be forgiven for thinking that it's a toy… before you hold it in your hand (just the one).

It definitely doesn't feel like a toy. There's a decent heft to it and nothing about its build feels tinny or plasticy. It's a camera that's been made to do business, despite its diminutive size. Fitted with the standard 8.5mm (47mm equivalent in 35mm format) f/1.9 lens, it slipped into my handbag or coat pocket, but not my jeans pocket.

So it came with me everywhere for almost a week, including a visit to my brother over the weekend, a walk in the park to photograph some wildlife, and a Christmas party where it generated plenty of oohs and aahs. It's these experiences on which I've based my review, so there aren't any painstakingly photographed charts to test white balance. But I'll admit to setting up a shot to test the filters when I felt a bit creative, and I wanted to take a closer look at the ISO, so I messed around doing that for a bit.

Hands on

I got used to the layout and menu system fairly quickly. Sure, it was unfamiliar initially, but that was to be expected. You choose your mode, from fully manual to fully auto, using the dial on the top of the camera, where there's also the wheel to adjust aperture or shutter speed. There's a dial on the front that can accommodate your favourite filters and a green button on the back that you can customise to access your most-needed function.

The four-way controller on the back covers white balance, ISO, flash, and the timer. There are also the information and menu buttons to take you down into the guts of the camera. Seeing as the camera's so small, it's hardly a surprise that its buttons are, too. I coped fine with them, but anyone who's a touch bigger than me or has finger nails a sliver shorter than mine might struggle, let alone if you're a body-builder in your spare time.

The flash has a pop-up facility, which I found suitably amusing and of course is useful for preventing the curse of red-eye and ensuring that your extra light won't just bounce off of a longer lens. I was slightly concerned that it might take out my eye if I were to deploy it in a hurry, though.

The response time between switching on and being able to take a photo was good, and navigating between and adjusting shutter speed, aperture, and ISO was intuitive. But when I began taking photos, I ran into a couple of problems.

Frustrations with focusing; irritability with exposure

First, I kept running into arguments with the autofocus. There would be occasions when it simply focused where it thought it should be focusing, not where I wanted it to focus. If I'd had it on auto mode, that might be just about understandable, but in fully manual, it's beyond comprehension and terribly frustrating. You don't get many second chances in photography and seeing them float by because of a tipsy autofocus was disappointing.

Second, every now and again the metering would seem to waltz away and have a party of its own, leaving my images wildly under-exposed. This wasn't nearly so prevalent as the autofocusing issue, but it did mean that I was more exasperated with a camera than was exactly healthy.

Post-processing fixes

So what of the images? I've taken some photos that I really like and my favourites are up there for you to see. The colours weren't muddy or washed-out, although the white balance was occasionally off by a quarter country mile - so much so that my poor brother looked green in a few portraits - but that was nothing that a bit of post-processing couldn't fix. The noise levels didn't want to make me scratch out my eyes until at least ISO 800 or 1000, which is entirely reasonable.

When I compared the RAW and jpeg images straight from the camera, what struck me the most was the barrel distortion from the lens. The warped horizons on landscape shots was very noticeable, and I found the bent look in my office floor almost alarming. Sure, the jpeg option straight from the camera does correct it, and it's something that you can fix yourself in the RAW file in post-processing, but it's rather significant.

Fun with filters

There are more filters and options to do crazy things with colour and processing in the Q than I think I've had hot dinners this year. At first it was almost overwhelming, but as soon as you surrender to your childish desires to combine posterising with bleach-bypassing, or grimace at just how hideous you can make a perfectly decent picture look with selective colour, it's a lot of fun.

Verdict?

When it came to packing the Q into its box and sending it back, I was a lot more reluctant to do so than I thought I'd be. Despite the odd temper tantrum involving autofocusing or exposure, I've enjoyed playing with this camera over the past week or so, and doubtless I'd continue to if I had it for longer. But I've a sneaking suspicion that a great deal of this fun is reliant on knowing that I've a proper optical viewfinder and a much better sensor waiting for me in my dSLR, and my S95 slips into my jeans pocket, has a lens that's far more versatile than the 8.5mm standard lens on the Q, and produces images of about the same quality. If the Q were my only camera, I think I'd spend a fair chunk of my time feeling frustrated.

There's no denying that Pentax, Nikon, Olympus, they're all on to something with teeny-tiny interchangeable lens cameras. These are a significant development in the photographic world, but they're not there yet. So I can't recommend that you buy a Pentax Q when for less you could pick up a Canon S100, a Nikon P300, or an Olympus XZ-1 that delivers just about the same image quality with greater versatility and in a more compact package. One day, maybe; but not today.

Finding the Fuji that fits

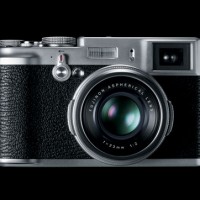
Fuji's X100. Gorgeous, but actually I'm not convinced

Those of us who’ve been around cameras for a while pretty much know what we want out of our magical lightbox machines when we come to upgrading or getting a new toy. But if you’re new to photography, or not surgically attached to your camera, buying one is a tricky business. There’s more choice out there than Imelda Marcos faced on a daily basis selecting a pair of shoes, from price, to spec, to how they look and feel. It’s headache-inducing. Small wonder, then, that I love things that can make choosing a camera easier for people, and I got a bit excited when I trundled over to the Fuji website and saw its new-fangled camera comparison widget.

I was all set to find the right Fuji camera for me, or more likely my camera-phobic mother. I was expecting a few simple check box questions, asking about my camera needs, my proficiency levels, and my budget. And then, whizz-bang, it’d spew out a few suggestions. But no, that was a bit too much to hope for.

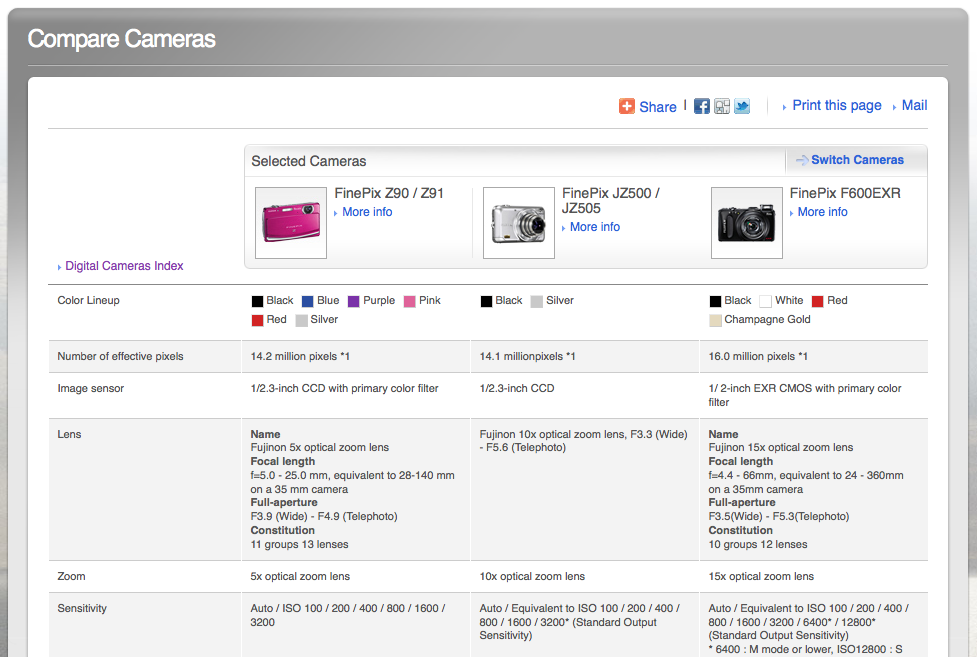
Instead, you get to compare the specs side-by-side of three different cameras. You can filter your selections by series, zoom, how wide the lens is, pixel count, stabilisation, and even heaven love us, by colour. Once you’ve made your choices, you can see how your three cameras’ of choice resolutions, lenses, sensor types and size, sensitvities, screens, video capbility, and about 15 million other specifications match up against each other.

The Z90 against the JZ500 against the F600

Now that is, in itself, a fairly useful feature. But it assumes that you’ve already a good idea of what you’re looking for. Different types of camera aren’t explained. It doesn’t take into account that people might not know the difference between the X100 and the F600. It doesn’t accommodate people who aren’t sure if a bog-standard point-and-shoot is what they need, or if something a bit more zoomy will suit them better. And price doesn’t even come into it. I can imagine a first-time camera buyer taking a look at it and exclaiming something along the lines of ‘Wuh?’

Seeing as I’m being a bit picky, too, it’s usually a good idea to standardise units of comparison. So I wasn’t thrilled seeing some sensor sizes given in imperial and some in metric.

It’s hard to say that Fuji has missold this widget entirely. The tagline is ‘Find the right camera for you, review camera specifications at a glance.’ It compares camera specs, dead on. But it doesn’t really help people to find the right camera for them. Still it’s a shame. With a bit more thought, Fuji could have a developed something actually useful for its consumers, instead they’ve produced a gimmick that’s vaguely useful for some of us, and doutless overwhelming for a whole lot more.

Pity. You can go judge for yourself on the Fuji website.

Focus and re-focus after the event with Lytro

I get asked what I think the next big thing in photography will be, or what direction technology will take, quite a bit. It’s one of those things that you can’t really answer. Not until you’re actually living in that imagined future does it seem possible. So if you’d asked me a few years ago if a camera that would allow you to focus and re-focus your image as much as you wanted to after you’d captured it was on the cards, I’d've probably shrugged my shoulders. But it’s here now. It’s the Lytro.  

The idea behind the Lytro is that it captures all of the light rays in a given scene. According to Lytro, it captures a scene in four dimensions by recording the colour, intensity, and the direction of every ray of light that hits the light field sensor in the camera. And what does it do with all this information? It processes it using a light field engine so that you can re-focus pictures directly on the camera. If you want to share your images on-line, this light field engine will travel will them, allowing anyone to interact with them from any device, from mobile phones to desktop computers. No special software required.

I’ve had a play with some sample images: you click on the area where you want to focus and… tah-daa!… the focus will shift there in a second or so. It’s simple and quite good fun. You can mess around there, too.

Despite the technology involved, Lytro wants to keep their cameras sleek and simple. There are just two buttons on the camera – on/off and the shutter – and everything else is achieved through a touchscreen. As for the design, I can’t help but think it looks a bit like something I would’ve made using mirrors and cardboard when I was seven, but perhaps I was weirdly ahead of my time. Still, it’s small, light, and comes in blue, red, or graphite.

The lens has a constant aperture of f/2.0 and an 8× optical zoom. With no need to focus, it’s pretty speedy; and as it captures all of the available light in a scene, it should have pretty good low-light capability, too.

The Lytro comes in two sizes, an 8GB model in blue or graphite that stores 350 photos, or a 16GB version in red that holds 750 images. They cost $399 and $499 respectively. If you’re one of Lytro’s first customers, they'll provide you with free storage for your light field images uploaded to Lytro.com, too. They should be shipping come the new year.

You can learn more from Lytro.

Pentax Optio RS1500 review

templatesRS1500

We do enjoy getting toys to play with here at the Small Aperture Mansion. The latest to pass through our grubby mitts has been Pentax’s Optio RS1500, the little point-and-shoot with the customisable front. The idea is that you can take off the lens ring and change the ‘skin’ on the front for anything ranging from candy-cane stripes to camouflage. Armed with its 14 megapixels, 4× optical zoom, 15 picture modes, smile detection, and nine filters, we set about finding out what we thought of it.

Build and design

It’s a small, light-weight camera. Even in my tiny hands, it felt little and I dread to think what sort of damage you might do to it if you drop it. Without any of the fun skins that you can slot beneath the front cover to turn it into a zebra or a Green Lantern superhero special, it’s a plain looking beast. The front’s silver and the back’s matt black. I don’t have any problem with that, but half of the appeal of this camera is its chameleon appearance.

Features and controls

The on-off switch and the shutter release are the only buttons on the top of the camera. Everything else – zoom rocker, play back, smile detection, and menu buttons, customisable ‘green button’, together with the four-way controller – is positioned to the right of the LCD screen. I found the menu system quite fiddly to use, and when I tried to put the camera in Program mode – which is as manual as it gets – trying to adjust the ISO wasn’t as intuitive or as quick to access as it should have been.

Afro Ken does the boudoir look

Its fifteen different shooting modes range from auto to portrait via candlelight and blue sky. They’re accessed from the four-way controller, together with the flash, focus control, and self-timer. You can set the green button, which doubles as the delete button, to access the video mode, EV compensation, or ISO. This will help to alleviate the fiddly-ness factor for one of those settings, but not the others. But then, I’m not sure how bothered someone using this camera will be by EV compensation. So it probably doesn’t matter all that much.

Performance

Roasted tomatoes in auto mode

In daylight, this camera produces some decent images and I really couldn’t complain about them too much. Okay, yes, maybe reds and oranges were a touch over-saturated. But honestly, it was fine.

Roasted tomatoes in food mode. Any different?

With fifteen different modes to choose from, it was almost overwhelming, and honestly, I preferred the photo of some roasted tomatoes taken in auto mode rather than taken in food mode.

It’s in lower light situations where the problems begin to creep in. The auto-focus struggled badly and sometimes couldn’t latch on to anything at all. This was hugely frustrating and resulted in pictures that were mushy and had to be binned. Pictures were pretty noisy, too. And Gareth and I both commented that we found the flash glarey.

Gareth also pointed out that the filters were quite poor. It’s as if they’ve been tacked on because every camera needs to have a toy camera and sepia effect now. As for the screen, Haje commented that its quality isn’t great, but it is quite large.

Verdict?

You get what you pay for with a £70 camera. In daylight, it takes some pretty decent photos. Anything approaching low-light, however, presents its auto-focus with some serious problems and the noise in the images that it does manage to produce is quite unpleasant. With its interchangeable skins, it’s a fun, small, light-weight camera. You could do better, and you could do worse.

Portraits in daylight are just fine

SOS, Drowning in Lens Choices, Send Help

lens

“Only a complete idiot would pass up the opportunity to grab a 14-50 f/2.8 Zoom EFS EX IS USM ASPH L DFS OMG LOL Mark II at that price”. You may have heard this sentence (with fewer made up acronyms at the end) from some grumpy camera store owner who decided to bite your head off because you dared to consider buying a lens beyond the kit lens your new DSLR came with. (disclaimer – only 94% of them are like this, some are nice). Intimidated by the camera shop troll, you decided to go online, where the user ratings were either “5 stars! Buy this! Remortgate your house it’s worth the £3,000!” or “0 stars! Avoid! This lens gives you smallpox somehow!” and nothing in between. Well now you can relax, because here at Small Aperture, we’re going to help you on your way to a relaxing, informed first lens purchase.

Lens Terminology Explained

First off, let’s look at an example lens name and go over what each part of the description means, so you know what features you’re looking at. I’m going to use the Canon EF-S 55-250mm F/4.0 – 5.6. I’ve picked this lens purely for the name, as it has the most commonly occurring type of description and it will allow me to run through what it all means.

Canon EF-S is the brand name and the fit of the lens – it tells us what kind of cameras it will fit on. I’m a Canon user, so if you have a Canon, take a look at your camera now. If it has a red dot and a white square, your camera can use lenses that are described as either “Canon EF” or “Canon EF-S”. If you only have a red dot, you can only fit EF lenses to the camera. It’s worth pointing out at this stage that you don’t have to buy only Canon lenses as a result of this – any lens that is described as “Canon-fit” will be OK for your camera. If you’re unsure, your best bet is to take your camera with you to the shop, endure the eye rolling and see whether the lens you’re after will fit your camera. It’ll give you a chance to test it, too.

On location, my "walkaround lens" allows me to zoom out and capture environmental detail which my prime would have trouble with.

55-250mm indicates the focal length range. Simply put, the low number is how wide your lens will go (literally how much width and how “zoomed out” your point of view can get) and the high number is how far you can zoom in. For reference, a 17mm focal length will give you a decent amount of width for landscape images and 250 will give you a decent amount of zoom for basic wildlife photography (although those looking to travel abroad on safari and the like would probably be interested in a higher zoom, something like 500mm).

F/4.0-5.6 describes the maximum aperture at both ends of the focal length range (more on aperture in our first PCoF here, read this first if you’re not sure about aperture). In this example, F/4 is the lowest aperture you can set at the “wide” 55mm end of the focal length range, and F/5.6 is the lowest aperture you can set at the “zoom” 250mm end of the focal length. You will notice that some of the more expensive zoom lenses only have one number here, for example the Sigma 70-200mm F/2.8. This means that the lens is able to be set to its lowest aperture of F/2.8 at any focal length, be it 70mm or 200mm.

These are the most commonly occurring suffixes to a lens name that you’ll need to know and understand. There are many, many other suffixes – some that describe features, some that describe the particular product range that brand of lens is in. For example, “L” on a Canon lens is referring to the top of the range series of lenses that Canon make (indicated by a red ring around the base of the lens) whereas “USM” refers to “UltraSonic Motor” and refers to a small motor built into the body designed to aid speed of autofocus. There are so many of these and they tend to be company-specific. In addition, they tend to be half product description, half marketing tool, so don’t get too dazzled or excited by these things.

So Which One Do I Buy?

To know what lens to buy, it’s important to ask yourself what kind of photography you undertake the most.

I took this using a 50mm prime for the extra detail it provides me.

Portraiture

As a portrait photographer who takes a lot of head / head and shoulders images, my main lens is a Prime Lens. A prime lens is one that has a fixed focal length: that is, you can’t zoom in nor can you zoom out. A fixed focal length means that there are significantly fewer moving parts inside the lens. This allows the glass inside the lens to be much more precise, allowing for sharper, higher quality images. This is exactly what you need for striking portraits. The other advantage is that this sometimes brings the price down. I don’t want to be seen as endorsing a particular company over another, but I have used the Canon EF 50mm f/1.8 II for a few years and it is dirt cheap for the quality it provides me. You can pick one up for about £80. For balance, Nikon have an equivalent lens of the same price, the Nikkor 50mm F/1.8 is a good buy and also seems to get very good reviews. Another good reason for using a prime is it teaches you to think about composition more, as you can’t just zoom out or in more to get the desired crop.

Landscape / Architectural

If you are a landscape and architectural sort of person, you will want a lens with a good wide-angle focal length. I only dabble in landscape for my own enjoyment, so I find my walkaround lens (see below) serves me just fine with a wide focal length of 17mm. Those that are serious about landscape will want to look at how wide the focal length goes (14mm is good) and the actual quality of the lens glass itself. Detail and sharpness are of the most importance for the landscape photographer. Maximum aperture is less of a problem, because you will be looking at setting your aperture to ranges of f8 -f11 and beyond anyway, to get all the detail of the landscape in. As I say, my Tamron walkaround creates landscapes that are sharp and vivid enough for me, but those of you looking for more might want to take a look at the Canon EF 17-40 F/4L (where it starts getting pricey), the Tokina 12-24mm f/4 which fits Nikon cameras (very wide angle) or you might even want to go super wide with the Sigma 10-20mm f/4-5.6 EX DC.

All this lens talk is making me want to buy things.

Close Up, Abstract and Insects

If you like looking at ants up close (weirdo) or if your photography is all about extreme close up, abstract work, you need a Macro Lens. These are lenses with very high levels of magnification, and are used for insect and other high-magnification photography. I can’t say I’ve done much of this but it sure looks like a lot of fun! I don’t have time for fun. I would advise reading up extensively on the subject if you’re serious about macro photography.

Don't forget that you can play around with the rules - here I've used a landscape lens to create a portrait. What a rebel!

Stop Trying to Pigeonhole Me you Square! My Photography Transcends Categories, I Photograph All!

If you do a bit of everything (and even if you don’t) you’ll want to find a good “walkaround lens”. This is a term used to describe a general purpose lens that will always come in handy for most situations – something that will do a variety of jobs to a decent level of quality. When on assignment for a magazine commission, I take my both my walkaround lens and my prime for portraiture. Again, not wanting to advertise, but you will find that many people recommend the Tamron 17-50mm f/2.8. Now if you’ve been paying attention, you will see that this means the lens has a maximum aperture of f/2.8 at both 17mm and 50mm focal lengths. You can pick one of these up for around £320-£360 these days and, for the price range, the image quality is excellent. Put it this way: I have been using it for published magazine work for over a year now, and my clients have been more than happy with what we’ve ended up with. It’s good for me because I can use it for portraits but also I can zoom out and grab some surrounding environmental detail aswell.

So who’s feeling spendy? Is spendy a word? Does anyone care? It’s Friday, which means tomorrow is Saturday, which means it’s time to buy your very first lens. Hopefully, by applying what you’ve learned from this, you’ll be able to stride into the camera shop and bellow “SHOPKEEP, PROCURE ME A CANON-FIT PRIME WITH A 50MM FOCAL LENGTH OF THE FINEST QUALITY, SPORTING AN ULTRASONIC MOTOR! MAKE HASTE!“. Go on, do it. I double dare you.

Why I don't need an expensive camera.

On My Flickr Feed, I some times get questions about my use of camera. “Why”, it is asked, “do you shoot with a 450D/550D”?

I understand the question completely. When I was photographing professionally, I wouldn’t have dreamed of using the then-bottom-level camera (the 300D, at the time, I think) even as my back-up camera. The 10D (and later the 20D and 30D) was my the back-up and second-lens camera to my 1D. So how did I end up photographing with the bottom-of-the-range model from Canon only a few short years later?

Let me in on a secret: Even the cheapest d-SLR cameras on the market today are absolutely phenomenal pieces of equipment, and chances are that you don’t need to spend much money to take phenomenal photos.

What am I missing?

"Waves breaking Slowly" - a smoke photo. Taken with a Canon 450D (clicky for full size and details)

As some of you might have noticed, I occasionally dabble in concert photography, and this is where my 550D occasionally lets me down. And then, only in one very specific aspect of my photographic work: I want to take photos faster. I want to be able to take more photos in a shorter period of time. Some times, you realise you’re witnessing something awesome, and you just want to keep the shutter pressed until the awesome has gone away – and then keeping your fingers crossed that one of the six billion photos you’ve taken in the meantime is the shot you were hoping (and praying, if you’re a praying man. Which I’m not. I think I might have gotten better photos with a god on my side, but this is just not That Kind of Blog™) for.

Interestingly, that is the only situation where I’ve ever felt my 550D isn’t up to the job. With the appropriate lighting, my portraiture work comes out lovely. I’ve taken my camera to a load of different countries, and I’ve taken some rather splendid street photos in all of ‘em (if I may say so myself).

The other situation where you might find yourself stuck (although I haven’t had the experience myself, as I make a point of staying as far away from sports as I can) is, er, sports photography.

So, if the 550D is good enough… Is it all just a scam?

You'll often find that lighting is a much bigger factor in photography than the camera you're using. (shot with a Canon EOS 450D. Clickie for bigger)

Wait a minute, cowboy, I never said that. All I’m saying is that at my level (and, I wager to say, at the level of many other photographers), the 550D (and any equivalent low-level SLR cameras) are plenty good.

The problem with photography is that it’s simply too tempting to splash a lot of money for everything, and then end up bankrupting yourself on the wrong things. Sure, I would love to have some of the features offered by more expensive cameras, but I can work around them. For concert photos, I’ve learned to anticipate the movements of the artists, and then try to act on those. I have no doubt that I’ve missed some cracking shots along the way, but equally, I think the limitations of my photographic kit has made me a better photographer. Put differently: Put a 1Ds mk III in my hands now, and I think I’ll be able to take better photos with it than I could have before I learned the limitations of another camera.

The most important thing to remember, though, is that as far as a camera body goes, it doesn’t actually have all that much to do with the picture-taking process itself. Yeah, I know. Controversial. But I said it, and I meant it.

Portrait - taken with a 450D. (click for higher res & info)

Think about it: You are taking a photo of an antelope jumping across a savannah. The sunlight comes from high above, hits the antelope, flies through your lens, into your camera… and the only part of the camera which actually gets involved is the imaging sensor.

I’m not going to lie: I use expensive photographic equipment. I’ve recently splashed a few thousand dollars on lighting equipment. I have some extraordinarily delicious lenses – including my ludicrously fantastic Canon 50mm f/1.4 USM prime lens, a rather sexy 70-200mm f/2.8, etc etc etc. But this illustrates an important point: I’m spending the most money on the bits of kit that will actually impact my photos.

Truth be told, there isn’t that much difference between a 7-year-old Canon digital SLR camera like the 300D and a brand spanking new 550D. Sure, the latter has higher resolution and better toys, but most people simply don’t need the extra resolution. What you need is a shutter that works, a mirror that will move out of the way in time, and a sensor without too many dead pixels. From there on out, it’s all about the quality of your glass (i.e. your lenses), the quality of your light (i.e. sunlight / flash / natural light / diffusers / softboxes / light filters / etc) and… You.

With all the electronics, magnificent optics, and delicious equipment at your beck and call, the sad, scary, horrible truth is that the weakest link in everything I’ve just described is you. A competent photographer can take good photos with a single-use camera.

My advanced motorcycling club has a motto: “Upgrade your skills to match your machine”. In other words: Your motorcycle is probably better than you are, and you need to work smart (and hard) to not kill yourself. Granted, I’d be willing to accept that more people kill themselves with a set of handlebars between their hands than with a SLR, but the point stands: If you haven’t got the skills, there’s no point in blaming your tools.

What are the benefits of pricier cameras?

I quite like the fact that the Canon 450D looks unobtrusive: It makes street photography just that tiny bit easier.

As you go up the Canon and Nikon ranges, you get some very good benefits. If you’re working as a (semi-)professional photographer, the first thing you’ll notice is build quality. The budget cameras aren’t badly put together, but they’re made of plastic. Drop one, and there’s a pretty good chance it’s all just game over. The more pricey cameras are built of aluminium or magnesium, and can take significantly more abuse.

The higher-priced, higher-specced cameras also tend to have better screens, higher-resolution sensors, higher shooting and processing speed, and more gadgets to help you get the photos you desire. I’m not saying this is a bad thing: there’s a ‘right’ tool for every job. Very often, a more advanced tool can be used to do jobs that a cheaper tool could have completed, but not vice-versa.

I also note that ISO speed has come up in the comments a few times, and that had me wondering. I asked a good friend of mine who reviews camera equipment for a living. He explains that ‘budget’ SLR cameras are as good as their larger parents. It is possible to get better performance, of course, but that involves going full-frame, and then you’re suddenly well and truly out of budget-camera-territory, price-wise.

On the ISO front, you sometimes get an improvement with the latest high-end model but it very quickly filters down (see for example how fast the 550D got great high-ISO capabilities so soon after 7D).

Hey, aren’t you meant to be some hot-shot writer?

Again with the street photography! Don't I ever give up? Nope, of course not. (clicky for bigger)

Uhm… Yeah, I’d like to think of myself as one, anyway (and I’ve got the resume to back it up, if you’re particularly curious…), but the truth of the matter is that most of my writing is aimed at photographers who rank from ‘geez, which hole do I look into to see what I’m taking a photo of’ beginners, to ‘Hey, I do wonder what the comparative benefits of shooting in RAW is, compared to taking only JPEGs’ intermediate photographers. Truth is, more expensive cameras are objectively ‘better’.

… But the bottleneck is still the photographers. Take it from me: you’ll be much happier with a ‘cheap’ dSLR, a decent lens, and an oath to work hard on taking better photos, than by owning the hippest, coolest, and newest equipment on the market.

Concert photography is the only time where I'm feeling the 450D can occasionally let me down. But then again, I seem to have learned to work around its weaknesses, and still walk away with some pretty nifty photos... (clicky for bigger)

There’s nothing quite as embarrassing as a clueless newbie behind the wheel of a sportscar. My 550D is the all-rounder that lets me do everything I need to do with a camera.

And best of all? A 550D isn’t throw-away money, but if something horrible were to happen to my camera and I lost or destroyed it somehow, I could swear for 45 minutes straight, before walking into the nearest shop to buy myself another one. A Canon 1Ds mk III is small-family-hatchback territory; not the kind of money I can afford to lose.

The bottle-neck of good photography is often the photographer. This photo, I could have taken with a disposable camera (well, maybe. Certainly with a compact).

Finally, the 550D is more like the camera that my readers are likely to use. Truth of the matter is that people who own a much more expensive camera are more likely a) to no longer need my articles, b) to think they no longer need my articles, or c) to be so far ahead of the game that I haven’t got anything to offer them anymore.

Oh, and by the way… I sort of like the fact that the 550D is made of plastic. It’s much lighter to travel with, looks cheaper (and so is less likely to get stolen from me) and is less invasive when I’m working with my street photography projects

Which doesn’t mean that I don’t occasionally think about upgrading... The 60D and 600D are both rather tasty cameras - and the ability to sync with Speedlites without an external ST-E2 is tempting... But I don't really hunger for the top-end Canons.