Image aspect ratios

tobacco.jpg

In a recent photo critique, I went off on one about the aspect ratios I prefer, when I look at photos. But have you ever thought about why you would prefer a particular image ratio? Is there a rule about what size photos should be, and if so – who decides the rules?

I’m just sharing my own thoughts here, but I’d love to hear your opinions on the matter as well!

sleepy.jpgThere are a lot of ideas around regarding what size things should be. ISO 7810, for example, specifies the size and shape of a credit card, the aspect ratio of which many people find is a comfortable, conceivably because its official size (85.60 × 53.98 mm) is pretty close to the aspect ratio of a golden rectangle (related, of course, to the golden ratio. See also the silver ratio, which is used, among other things, to determine the shape of an A4 sheet of paper).

So why do most photographers operate with 3:2, 4:3 or 1:1? Well, truth be told, it’s a historical thing: The modern 135 film (also known as 35mm – referring to the width of the film – or 36mm – referring to the width of a negative frame – film) was 36mm by 24mm in size. The past 80 years or so, we have become so accustomed to the 36×24 (that is to say, 3:2 aspect ratio) photos, that it just looks… right.

flower.jpg4:3 is the aspect ratio of a normal television, which is of course another size we have become used to over time, and it is the aspect ratio used by most computer monitors. Some digital camera manufacturers took to – including Canon: my Digital Ixus / Elph takes photos in the 4:3 aspect ratio. Some cameras – including the Canon Powershot G7 – even support both image ratios, selectable in the menu system. If you are curious which cameras use which aspect ratio, check out Digital Photo Review. Since the dawn of time (well, since Phil Askey has had the the stats on his site), they’ve kept track of which camera uses which.

The last aspect ratio that is popular is 16:9, because it is used in cinemas as ‘wide screen’, but there are dozens of others in use, too.

So, err, do you use a calculator when you crop your photos?

Oh, not at all! The marquee tool in Photoshop has a powerful function which is called ‘fixed aspect ratio’. As you probably know, if you use the marquee tool and hold the shift key, the selected area is forced to be a perfect square. You can also select your own aspect ratio, however, in the tool menu that shows up when you select the marquee tool:

aspect-ratio.jpg

Here, you can type in whatever aspect ratio you prefer, and the select tool will lock on to it. If you want to switch between 3:2 and 2:3 (for example, if you want to crop portrait instead of landscape photos), you can just click the button with the two little arrows: It swaps the numbers over for you.

Nifty, yes?

tobacco.jpgWhat makes you choose an aspect ratio over another?

So, why do I refuse to crop images to anything other than either 3:2? It’s an odd one, I’m fully aware of that, but to me, there’s something almost holy about 3:2. I like my photos to be photo-shaped, and to me, the 3:2 shape just looks the most right. I find it peaceful to look at, and there is something exciting about working to the arbitrary and dated restraint of 3:2.

At the same time, I did a photo shoot about 4 years ago which opened my eyes to shooting square photos. I had a few photographs that were very successful, but that just didn’t quite want to work out as photos. In the end, I spotted that perhaps it would work if it was square, and this was the result:

IMG_4982.jpg

Ultimately, I can’t tell why I decided to stick to those two formats. Perhaps it looks tidier. Perhaps it saves time if and when I decide to have the photos printed. Or perhaps I’m just an old-fashioned has-been, who refuses to let the fact that you can crop your image to whatever the hell you want to break on through.

So… What about you? Do you have hang-ups about aspect ratios of your images? Leave a comment!

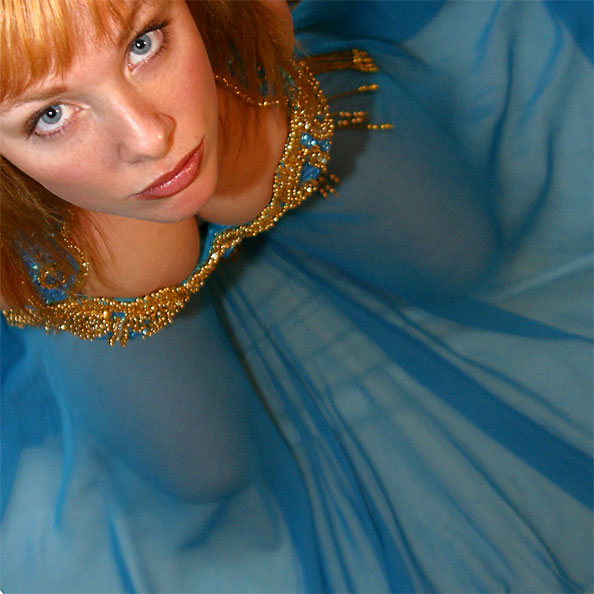
(can you spot what all the aspect ratios in this post were? The girl is 1:1, the glasses and sleepy person is 3:2, the flower is 4:3, and the brown stuff, which actually is tobacco from a cigarette, magnified 6x, is 16:9)


Do you enjoy a smattering of random photography links? Well, squire, I welcome thee to join me on Twitter -

© Kamps Consulting Ltd. This article is licenced for use on Pixiq only. Please do not reproduce wholly or in part without a license. More info.

Framing and cropping your images

RishiriFuji3.jpg

lilies.jpgFor this issue of the Photocritic Photo Critique, we’re going far afield! Joel Legassie is a Canadian who is currently living in Japan, and is an avid photographer. His photos are sharp, stylish, and striking… So can we offer him any advice? 


Joel uses a I use a 6.3 megapixel Canon Kiss Digital (that’s the Digital Rebel / Canon EOS 300D to the rest of us), with the standard 18-55mm lens.

Photo 1:
lilies.jpg

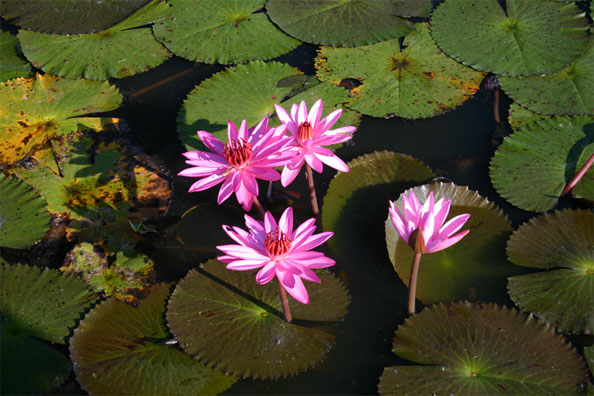
Water flowers always make for amazing photography, and these Lillies are no different. Initially, the slightly damaged leaves to the left and top of the photo bothered me, but they actually grew on me – the autumnal colours combined with the deel greens and browns of the leaves make a very nice contrast to the strong reds and pinks offered up by the flowers.

The photo seems ever-so-slightly over-exposed: some of the leaves of the flower are a bit whiter than I woul dhave expected. This could be reflected sunshine (i.e the same problem as in our last critique), but I do expect this is a plain overexposure problem. It isn’t overly disturbing in this photo, but nevertheless it would be worth keeping an eye out for in the future.

From the EXIF information embedded in the file, I can see you shot the image at f/8 (a good idea, this is the aperture whee your lens is sharpest) and 1/50 sec shutter time. Personally, I think I would have liked that same photo seen shot with a 50mm prime lens, wide open. If you manage to get close enough to the flowers, that should actually blur out the background ever so slightly, bringing more of the focus on the flowers themselves.

lilies2.jpgThe main beef I have with this photo is that it is a little haphazardly framed. I can’t work out why you decided to put the flowers in the middle of the frame, with the ‘broken’ leaves towards the side. Personally, I have a dirty, dirty fetish, which is (I can tell you all can’t wait to find out…) to crop in tighter. Always closer in to the action. It’s a matter of taste, of course, and I fully respect if you decide to make a different choice, but if I had taken this photo, I would have gone in a lot closer, much like the mock-up crop shown to the right.

The only thing I have done here is to crop a rectangle constrained to an aspect ratio of 3:2 around the three flowers and whatever else came into the frame at that aspect ratio on the left.

Why? Well, for one thing, it gives the image a purpose, a direction, perhaps even a message. The contrast between the wilting leaves on the left, with their dark, decaying colours, against the hope of the pink flowers on the right appeals to me.

The final suggestion I would have made: If there was anyone around, you could have asked them to hold out an arm, a bag, or an umbrella to cast a shadow on the right side of the image. You want the flowers basking in the sun, but anything you can do to help the background be a little less conspicuous would probably be a good idea in this case.


Photo 2:
RishiriFuji.jpg

Joel sent me 4 photos, but I decided to choose another of his photos with flowers in it for the second part of this critique.

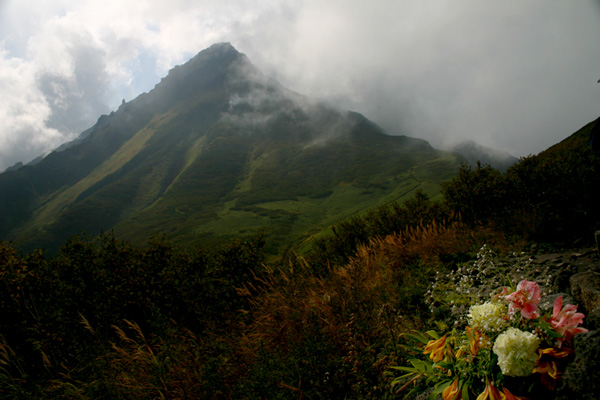
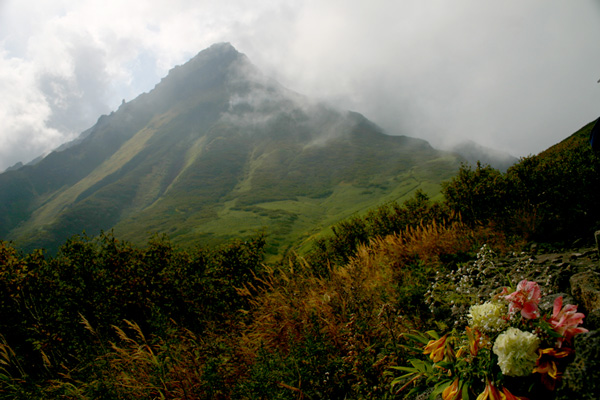
This photo is called RishiriFuji. My Japanese is non-existent, but I assume it means ‘mount fuji, and I totally live the idea behind this photo.

What you did wrong in terms of framing in the previous shot, you definitely did right here. The dimmed hazy colours of the mountain covered in gray clouds in the background is balanced out with the oranges, browns and multicoloured bouquet in the bottom right of the frame.

If I were to nitpick, I think there is too little going on to the right of this image, but it isn’t something that is easily fixed with cropping. Personally, I prefer either a 3:2 or a 1:1 (perfect square) aspect ratio for aestetic reasons, but there is no way you can crop this image using either of those without losing too much on the right, or cutting the top of the mountain off. This could have been addressed on location by taking a step back (making the flowers smaller in the image), moving the camera down (which would put the flowers just beneath the foot of the mountains), and then zooming in slightly (to re-establish the frame).

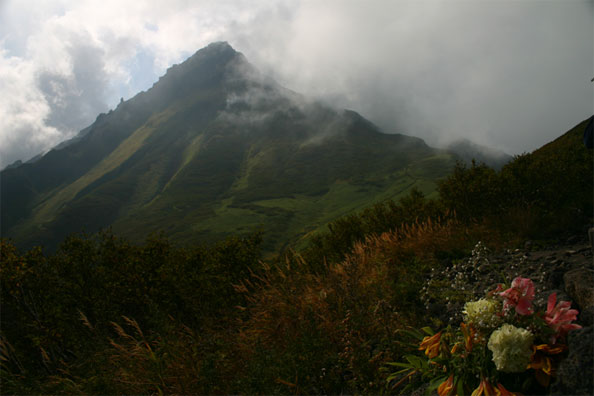
The other niggle I have about this photo is that I feel it is lacking in contrast, and a little bit too dark. The problem is that the lighting is very soft and even, and that upping the brightness by increasing the shutter time or opening up the aperture would have lost the moody feel of the image. You would have ended up with something like this:

RishiriFuji2.jpg

… Which completely ruins the beauty and subtlety of the original photo.

If you have a tripod, a flashgun and an off-camera flash lad, you could have tried to frame the image properly, expose the photo for the mountain, and then add a tiny dash of flash light on the flowers, just to really make them stand out in the image. Once again, you have to be really careful, as it is very easy to over-do the effect, but just the tiniest change would really draw more attention to the photo. I’ve simulated it here, but fill-flash is rather difficult in Photoshop, so do forgive me for not getting it quite right:

RishiriFuji3.jpg

I hope I got close enough to illustrate what I was trying to say, however!

Anyway, both these two pictures discussed here, and the ones you sent to me separately show a lot of care and interest in photography – I hope this critique serves as a push in the right direction!

The main message to take home, is that after each photo you take, think ‘what is my message’, and ‘what am I trying to achieve’. If the photo you just took doesn’t convey that message, or doesn’t achieve what you would have liked, try to identify why, and to take another photo which may address the issue at hand.


Do you enjoy a smattering of random photography links? Well, squire, I welcome thee to join me on Twitter -

© Kamps Consulting Ltd. This article is licenced for use on Pixiq only. Please do not reproduce wholly or in part without a license. More info.

A new meaning to 'tele-photo'

tele-zoom.jpg

Mobile telephones start having better and better phones – most of them are currently between two and three megapixels, and the vast bulk of them even have digital zooms on them. But what about optical zoom? Well, not a lot of that, yet…

At first, I shunned cell phone cameras, but after I bought a decent-quality Sony Ericsson with a 2mpx camera, I’ve actually used it quite a few times. Quality still leaves something to be desired, but some times it’s better to have a bad photo than not to have a photo at all.

Now, it seeems as if the accessory companies are warming up to the idea of camera phones, with a series of telephoto lens attachments for cell phones. Tele-Phone, meet Tele-Photo… 


The units are made by Brando, and are available for sale right now.

Itching to get in close with your cameraphone? Check out this telescopic lens attachment, which turns your Nokia or Sony Ericsson into a zooming machine. Slightly more conspicuous than just snapping off a shot normally, the lens pops onto the back with a mount, and gives you up to 6x optical zoom.

Find out more, and see some example shots, check out Esato, Digital Lifestyles, and over at Gizmodo UK.

The lenses are available from Brando.


Do you enjoy a smattering of random photography links? Well, squire, I welcome thee to join me on Twitter -

© Kamps Consulting Ltd. This article is licenced for use on Pixiq only. Please do not reproduce wholly or in part without a license. More info.

The Lensbaby lens

lensbaby1.jpg

lensbaby1.jpgWhy would you put a $100 lens on a $8,000 camera? Well, because even the professional photographers have to go back to their roots, and re-learn the passion of photography. The Lens Baby can help.  


I use the Lensbaby with my Canon EOS 1Ds Mark II. Of course, the logical first question is, “Why put a $100 lens on an $8,000 camera?” The only answer is that the Lensbaby offers a new frontier in creative freedom, fun, and challenge. With the soft accordion focusing collar, I can shift the area of sharp focus by shifting the lens in any direction. And, with each shift, surrounding areas are rendered with a soft blur or streaking.

Of course, similar effects can be created in Photoshop CS, but there is a huge difference in seeing the effect as you shoot versus adding the effect in the post-capture processing phase.

Read more about the Lens Baby over on Zuga, and once you’re convinced, check out the Lens Baby website for more information, and how and where to get one!

Do any of you have good experiences with the lens baby? Why not add your review – or a link to your review, if you’ve posted it elsewhere – below?


Do you enjoy a smattering of random photography links? Well, squire, I welcome thee to join me on Twitter -

© Kamps Consulting Ltd. This article is licenced for use on Pixiq only. Please do not reproduce wholly or in part without a license. More info.

Getting your camera repaired

konicaminolta_dimagez2.big.jpg

konicaminolta_dimagez2.big.jpgAnother long-term reader and frequent-commenter had a question for us, and because I’m such a nice guy, I couldn’t let this one go, because I feel his pain: He has ruined his camera, and doesn’t know what to do next… 


I’m facing having my camera repaired, and although its not a DSLR, its not a point-and-shoot either. Its a DimageZ2 and I think its good until I save up for a full DSLR. As you know Sony bought out Konica Minolta’s Digital imaging side so now I’d have to send it to them for repair and its not much less than I paid for it in the first place.

So in general is sending a unit back to the MFG for repair always the best? Are the other resources and are these places also willing to work on consumer cameras. An extra question: are they nice? I went to a a camera store to ask about repair and I didn’t leave with a good feeling

Ai, Stu, it seems as if you’ve got yourself a nasty pickle there, mate.

If your exhaust on your car breaks, you can generally replace it with an off-the-shelf solution, or if a window in your house gets broken, you have lots of choice for who repairs it.

Digital cameras are vastly different: They share very few parts, and the ones that are shared (imaging chips, card reader units, all that stuff) is generally soldered in, so they can’t easily be replaced. Even if you could replace, say, a card reader, the time it would take to un-solder the old unit and re-solder a new one would make the whole thing un-worth-while. Instead, the repairmen will replace the faulthy part and everything that is connected to it. In your case, you don’t mention what’s actually wrong with it (Electronic? Battery related? Mechanical?), but in the example of the card reader, you’re looking at a main board replacement. Generally, the manufacturers don’t make a lot more main boards than cameras (they make a few, in case of warranty faults), so if your main board breaks, you are basically shit out of luck.

That’s the way with all consumer electronics, unfortunately: If the remote control for your TV breaks, you might have to buy a new TV. If the screen on your mobile phone goes, you need a new mobile, and if your camera kicks the bucket – even if it’s a really small and nominally cheap part that breaks – it is generally not replacable, and you’re left without any camera.

There are very few manufacturers who actually offer repairs for compact digital cameras anymore. If anything goes wrong with your camera in the warranty time, they’ll send you a new one, because it isn’t economically feasible to get an engineer to fix it. Because there are so few people who deal with it, most manufacturers won’t have a distribution network for parts in place, and all borked cameras will get returned to the manufacturer, instead of distributing parts. This means that the only people who can actually do anything about a broken camera are the manufacturers themselves.

The case is much the same for dSLR cameras, in fact. Generally, they don’t break (although they might need a sensor clean or similar every now and again) but if they do, you’re out of luck, and the item has to be replaced. For cameras which are in abundant supply (such as the popular consumer cameras from Canon and Nikon), a number of spare parts are available, both off ‘scrapped’ cameras and freshly produced parts destined for the repair industry. Professional dSLR cameras are a different matter altogether, because they are built for heavy abuse, and generally have more servicable parts (shutter mechanisms, mirror lock-up mechanisms, movable parts etc are all designed to be easily replaceable).

To answer your question – I wouldn’t hold in high hopes that anyone can put humpty dumpty back together again. Sorry. If I were you, I’d hurry up and put a d-SLR on your Christmas list…


Do you enjoy a smattering of random photography links? Well, squire, I welcome thee to join me on Twitter -

© Kamps Consulting Ltd. This article is licenced for use on Pixiq only. Please do not reproduce wholly or in part without a license. More info.

Olan Mills update

A couple of days ago, Photocritic broke the story about Olan Mills going under. It was a weird one, because I don’t generally run corporate news stories like that. However, the story struck a chord with me, because I know what it is like to be struck down without a job as a photographer, and how much trouble it can cause.

I know that this type of thing is a nightmare for those concerned: Sure, the people who were waiting for prints are ripped off, and are left without presents and money, but the real victims of this one are the studio staff and day-to-day employees of the chain. Strangely, it appears as if our article was the only one considering much of this aspect (except for the Mirror, who ran the tabloid-a-licious headline “1,000 workers sacked by recorded phone message“). Other news media also picked up the story, including local press (2, 3), but other than that it has been oddly quiet.

Except from right here, of course. Lots of Olan Mills employees found the Photocritic article. Among the stories, there are some truly moving stories of the adversities the staffers and lower management of Olan Mills, along with a dose of fear about what is going to happen in the future.

Not exactly the kind of Christmas story you want to read, but it’s worth having a look

Comments on this thread are turned off, please add any comments or insights you might have to the original thread.


Do you enjoy a smattering of random photography links? Well, squire, I welcome thee to join me on Twitter -

© Kamps Consulting Ltd. This article is licenced for use on Pixiq only. Please do not reproduce wholly or in part without a license. More info.

Becoming a photographer

The other day, I got an email – somewhat out of the blue from Miranda, who wanted to interview me for her High School paper on careers. She chose ‘photographers’, and found me somehow – presumably via this web-site.

Anyway, she sent over a list of quite interesting interview questions, and as I’m a right rambling mofo, I went on and on and … etc. But anyway: I figured that there might be quite a few other people out there who are young, aspiring to be photographers, and have questions about how to go about it, so I decided to just publish my answers.  


What is the most important thinfs to know when entering the field of photography?

You need to have a serious, sound technical knowledge of how cameras work, how light works, and how it all combines into a photograph. Without this knowledge, you will never be able to get the pictures you want. However, there’s good news: The technical side isn’t that difficult, and can be learned.

The second thing you need can’t be taught or trained, it’s something you either have, or manage to build up over time. It’s an eye for a good photo. It’s a difficult yet important part of being a good photographer.

The final thing you need to be is a people person. Photography is usually about the people in front of the lens, and if you can’t make them relax and be themselves, the photos will never come out well.

What is your favotrite part about photographing?

My absolute favourite part about photography is being able to show people things they could have seen, but never did. That’s one of the reasons why macro photography is such a big passion of mine.

Also, I did a whole article about this – see here.

did you go to school at all for photography? If so how long and did this help in your carrer?

Nope, not at all.

Do you think it is important for one to go to school for photography or anything related?

Not really. As I say, you do need to take a good picture, but there’s no reason why internet research and a lot of practice can’t make up for it. if you’re planning to set up for yourself, it makes more sense to take a course on how to run a business – the pitfalls, challenges, dealing with staff, taxes, all that kind of stuff.

Ultimately, you have to be able to take a good photo. I’ve seen people who’ve finished photo college with a decent grade who couldn’t photograph their way out of a wet paper bag, and I’ve seen non-formally-trained amateurs who would put Magnum photographers to shame.

what is the biggest challange in photography?

Understanding people, and what makes them tick. Photography is very much about telling stories, and while you are using a visual medium to do so, you still need to be a good storyteller, and have an eye for what appeals to people

What is your favorite thing to photograph and why?

I really like doing portraits of people close to me. Invariably, they tell me they aren’t photogenic, and frequently, I prove them wrong. There’s something special about managing to capture people you know well, because you know their quirks and mannerisms – things they might not even be aware of themselves. When they say ‘this photo looks a bit odd’, their spouse / friends / families say ‘but that’s SO you!’. That’s a thrill.

> ~Do you believe that in some cases being a great photographer can come naturally?

If you mean to ask ‘is talent a part of being a photographer’, then the answer is yes. As I said, I think the main part of photography is the part that can’t be taught – you have to build up a visual thought pattern, and you have to be able to visualise an image, the lighting, and all that.

It all depends what you want to do with your photography career. You can work at some crappy photography studio somewhere, which rakes in the cash by taking formulaic, boring, and utterly pointless portrait photos. Individually, the photos are quite good, but after you’ve seen a week’s worth of their output, you realise that every pose, every lighting setup and every shot is exactly the same. That kind of stuff is soul-crushing, and it’s not photography: you’re merely a technician in a machine, limited by the limit on time and creativity.

The time it takes between the first time you pick up a camera and when your photos start turning out the way you envisioned depends heavily on talent, so yes, that part can come naturally.

When did you first get interested in photography and why?

Honestly? I totally don’t remember. I think I’ve always been interested. I’ve had SLR cameras for as long as I could walk, and I bought my first digital compact camera (a Casio QV-2000) in 1998. I’ve just never looked back.

Are you a Freelance photographer or are you hired on to a newspaper, magizene, etc…?

I was never a staff photographer, but I freelanced for about 3 years, before I decided I’d rather have photography as a hobby than a job, and changed my career path. I’m now the web editor of a car magazine.

Do you prefer being freelance or being hired on?

Both have definite upsides. Freelancers generally pull in more money over time, but you have to work hard to get to that point, and you have to put up with all the hassle of running your own company.

Beign a staff photographer means more regular working hours (well, it normally does, anyway), higher job security, and you don’t have to worry about getting your own equipment.

Personally, I would strongly suggest starting out as a staff photographer if possible. You’ll get a lot of silly jobs and all that, but the connections you’re building are invaluable, and it helps having been part of a working environment, so you learn the language used, and know what your picture editors are looking for.

Do you prefer Digital or film photography and why?

Digital. All the way. Because it’s faster. Because it’s faster, you learn quicker. Immediate feedback means that when you realise one set of camera settings isn’t working, you can immediately make a change, and see what happens. That level of control means that you can take note of what happens when you do A, B and C, so the next time you’re facing a similar problem or situation, you’ll start doing the right thing immediately.

Also, for the time being, as long as you are working on press / magazines, there’s no real reason to shoot with film anymore. If you’re an advertising / studio photographer, the case might be made for medium or large format, and if you’re a hobbyist, you should definitely have a go at photographing with film, doing your own developing and copying and all that.


Do you enjoy a smattering of random photography links? Well, squire, I welcome thee to join me on Twitter -

© Kamps Consulting Ltd. This article is licenced for use on Pixiq only. Please do not reproduce wholly or in part without a license. More info.

Adobe to hand out Photoshop CS3 Beta?

According to a press release on the Adobe site, the company is about to release a Beta of Adobe Photoshop CS3… 


Adobe is delivering a widely available Photoshop CS3 beta to enable customers to more easily transition to the latest hardware platforms, particularly Apple’s new Intel-based systems. The beta is available as a Universal Binary for the Macintosh platform, as well as for Microsoft® Windows® XP and Windows Vista computers. The final shipping release of Adobe Photoshop CS3 is planned for Spring 2007.

The software can be downloaded http://labs.adobe.com, in the early hours Pacific Standard Time on December 15. Right now!

It appears you can try the beta for a limited time (3 days? 28 days?), but that it will be usable for a longer period if you have a valid CS2 serial number. I haven’t had time to download it myself yet, but if I find out anything more I’ll update it. If any of you get it and learn anything interesting – post a comment!

Update: Someone already posted a first preview and screen shots, too!

(via)


Do you enjoy a smattering of random photography links? Well, squire, I welcome thee to join me on Twitter -

© Kamps Consulting Ltd. This article is licenced for use on Pixiq only. Please do not reproduce wholly or in part without a license. More info.

Expose for the highlights...

Ben-Darfler-1.jpg

Today’s topic came about after I was sent some fabulous images from Ben Darfler, as part of our photo critique series. He sent me four excellent photos, and I picked two that illustrate a common theme: How to expose a photo correctly.

You would think that exposing a photograph correctly would be easy – you just point the camera at what you want to take a picture of, and let the machinery take over from there, right? Well, most of the time, that will give pretty good results, but if you have ambitions of developing as a photographer, manual exposure is where it’s at.

The way you choose your exposure is one of the biggest differences between film and digital photography. When photographing with film, you want your shadows to be drawn as well as possible; because of this, my high-school photography teacher would drone on about “Expose for the shadows; develop for the highlights.” Well, digital changed all that… 


Perhaps surprisingly, a digital imaging chip works much like slide film does: The more an area is exposed, the brighter it gets. Up to a point. Beyond this point, you get ‘burnt out’ images, where a larger area of the image is pure white. This is because your film is beyond its dynamic range. If you think of a film as a continuous light-meter gauge, (which it is, essentially), ‘burn out’ is where the light meter has gone off the scale: If you are putting water into a 1 litre measuring jug, and the jug is full, it will still read ’1 litre’, even if your entire kitchen floor is full of water.

Which brings us to the first picture:
Ben-Darfler-2.jpg

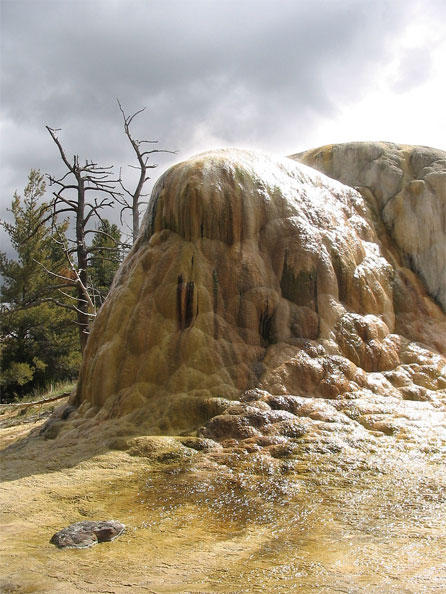
Thanks for submitting it, Ben! Right, in this photo, we have an awful lot of interesting things going on. The unusual shape of that rock, combined with the gnarly trees, the interesting sunlight, and the stream at the bottom are all competing for attention. My first advice, then, would be to tighten up the focus of your image. What was it that intrigued you about this particular scene? Why did you decide to take the photo? That is what you need to decide on, and that’s where your focus needs to be.

Composition

Personally, the barren-ness and the alien landscape appeals to me, while the evergreen(?) trees in the background draw my attention away from these particular aspects. Perhaps you could take about five steps to the left of where you were standing, and eliminate the green from the image that way?
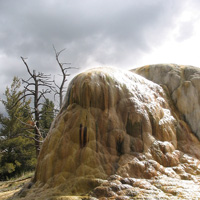
hjk21.jpgThe second thing you could consider is if your cropping makes sense. There’s an awful lot of space at the top and bottom of this image that doesn’t tell a story. Why is it there? Walk, or zoom, in closer to get rid of it, or just chop it off in Photoshop. I’m all for negative space, so in this particular photo, I’d probably go for a square frame – like the crop shown to the right.

Sharpening

A little side note: When taking a closer look at your photo, I see that it’s sharpened quite a lot – either in-camera or with image editing software – to the point that it is actually quite disturbing to the overall image. You can see this has been done by the white ‘halo’ around the barren trees in the background.

Exposure / burned out highlights

The biggest problem in the photo is that you are plagued with serious burn-out on the rock, which detracts from the overall photo. This is a technical issue, not necessarily a creative one. If this image was in the beginning of your portfolio, and I were an art director or a gallery director, I’d close the portfolio right there and then, and send you on your way, instantly losing interest.

It’s a typical beginner’s mistake, and that’s why I’m happy you decided to submit this photo, because now I have an excuse to explain how you can avoid it!

Picture-42.jpgWhat you are looking at in the white areas, is the ‘burn out’ I started talking about in the beginning of this post. You can actually see it digitally too: Open up your photo in Photoshop, and choose “Levels” from the Image – Adjustments menu. You should see a curve which looks a lot like the one seen to the right of this paragraph.

Discovering overexposure

The Levels tool shows a graph of the presence of the brightness of the pixels in your photo. Left is perfect, pitch black, and right is complete, perfect white. As you can see from the graph, you haven’t got a single perfect black pixel, and a sharp spike to the far right of the graph. This indicates that quite a few pixels are ‘off the chart’ – which is why you can see the white stuff in your final image.

Many cameras have built-in histograms (that’s what that graph is called – on Canon cameras, click the ‘info’ button a few times, I’m sure Nikons have the same function), so you can inspect the tonal values of your photos in the field.

Avoiding overexposure

So, now that you know what the problem is and how to spot that something has gone wrong, how do you avoid it? The answer is in the title of this post: Expose for the highlights. In your case, I can’t tell from the photo what shutter time and aperture you used. The solution is simple: You should have used a faster shutter time, or a smaller aperture (ie. a larger aperture number). This makes the whole photo darker, which means that you capture more detail in the highlights. As you can see from your graph, however, you have no ‘black’ pixels, so no harm would have come from exposing the image a little less.

If you prefer to shoot fully automatic, you can force the camera to take a light metering from the lighter areas of the frame by aiming your camera at the lighter area, pressing the Exposure Lock button (marked with a star on Canon cameras, with EL or AE on some other cameras), then framing your image, and finally clicking the shutter to take the photo.

If you don’t wish to do that, you can use EV compensation to force your camera to underexpose, you can use AEB (Auto Exposure Bracketing) to hedge your bets on getting the right exposure, or – the most recommended option – you can just use manual exposure settings, check the result, and adjust accordingly.

Now that you have exposed for the highlights, you can use the Levels tool discussed earlier to bring out the detail in the shadow parties of your photos. You’ll be amazed how much detail is hidden there: Just open a few of your photos and play with all three of the sliders. The leftmost black point slider discards dark tone information from an image, the rightmost white point slider discards light tone information, and the middle mid point slider can be used to induce a bias towards bright or dark photos. For an excellent tutorial on what the Levels tool is and what it does, check out this tutorial over on the Cambridge in Colour site.

Can the photo be saved?
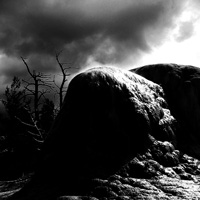
hjk22.jpgFor your particular photo, I don’t think there is a lot of hope of ‘saving’ it… Or is there? I had a play around with it. I turned it into Black and White (using the channel mixer), and increased the contrast ridiculously (by pulling the black point and white point sliders towards the middle of the histogram) – as seen to the right. It isn’t a great solution, but the result is striking, if nothing else.

Try a polarizer

Finally, in this photo, it appears that the highlights are, in fact, sunlight reflected of a moist surface. If I were you, I would have tried using a polarizer filter (more about those on the Luminous Landscape website) to see if you can filter out the reflections. If this would have been possible, you could have gotten away with this photo with similar brightness levels, whilst avoiding much of the reflected sunlight.

Learn more…

If you want to learn more about exposure, you’ll want to have a look at the Zone System (try Norman Koren’s website, or Wikipedia) – it is a tried and tested system explaining all of this in great detail.

Ben’s 2nd picture:

Ben-Darfler-1.jpg

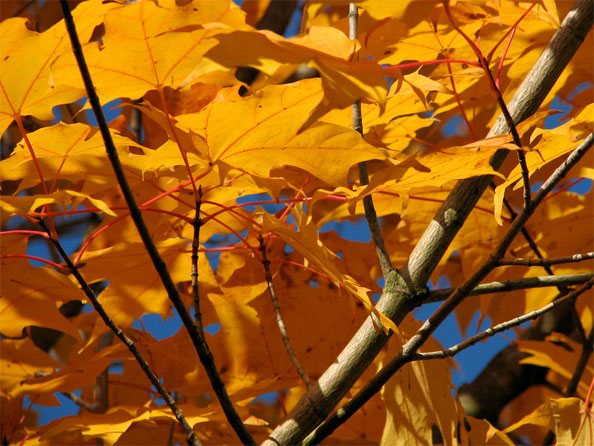
Ben, your second picture is – rather obviously – a drastic departure from your first shot. It has a limited depth of field, which leads the leaves and the branches in the background to be out of focus. This helps the foreground leaves get pulled in as the natural biewing points in the image – a very cool effect indeed.

I love the near-perfect chronographic opposition between the blue background and the orange leaves (open your image in photoshop, then invert the colours of the photo to see what I am talking about), and the lighting is perfect. As is the exposure, the framing is interesting, and there isn’t a lot to detract from the photo itself.

There isn’t much of a message in this photo – it isn’t a love note, an emotive photo, or anything like that, which means it won’t appeal to all people. It isn’t even very original: Sure, I could go out and photograph an image exactly like this on a late summer’s day, as could any other competent photographer out there, but – and here comes the important bit – that is not the point of this photo. It is a technically perfect photo with vibrant colours. If I had taken this photo, I’d have it printed out, and hung it on my wall. It’s one to be proud of.


Olan Mills goes bankrupt

olanmills.jpg

Just heard a disturbing piece of news, which was confirmed by the Olan Mills website yesterday: Olan Mills has gone into administration, effective immediately.

According to my source, the UK chain has tried to sell its business for a while, unsuccessfully. The staff have been told they will not be paid for this month, and the area managers have been told to lock up the stores and go home. There have been reports of some store employees taking equipment home (cameras, computers, studio lights, etc), holding it as ‘hostage’ against unpaid wages.

Can anyone shed any light on if this affects the US company as well? It’d be rather surprising to see one of the most famous portrait studio chains go tits-up…


Is the closure of Olan Mills affecting you?

View Results


When I posted this blog story the first time around, there was no news about this on Google News or anywhere else, but the UK website posted the following:

Olan Mills Holdings Ltd / Olan Mills Ltd (both in administration) (“the Companies”)

Richard Philpott and Myles Halley both of KPMG LLP were appointed in the High Court as Joint Administrators to the Companies on Thursday 14 December 2006.

Following an initial review of the business and its finances, the administrators regret to inform you that the Companies are unfortunately no longer able to continue trading. All stores have now closed and we are unable to fulfil any outstanding orders or appointments.

The administrators are also unable to make any refunds of monies paid. If you are owed money by either of the companies you will need to register your claim by writing to the administrators at 2 Cornwall Street, Birmingham, B3 2DL giving details of the amount you have paid.

At this stage we do not anticipate that any funds will be available to enable a distribution to unsecured creditors.

It is obviously a worrying situation, because Olan Mills was a major employer in the photography sector in the UK. It is possible to argue that the quality or type of work they were delivering was a bit on the ‘conveyor-belt’ side, but ultimately, this item of news about people and their jobs…

So, what do you guys think that the closure of Olan Mills is going to mean for photographers? Will there suddenly be a lot of portrait photographers looking for jobs — which is bad for the industry as a whole, because employers can get away with paying even less to their photographers? Will this closure be the forewarning of the closure of other large chains? What can we, as photographers, do to help each other?

Sadly, I don’t have any of the answers – several of my close friends were affected by the closure, and they are facing a particularly depressing Christmas this year, with no money and no jobs to go to in the new year. My condolences to all who are affected, and the warmest wishes of a healthy rebound in 2007. Just don’t give up hope.

Finally – what do you make of all this? The comments that have been coming in have been insightful and heartfelt so far, but I’d love to hear from more of you.


Do you enjoy a smattering of random photography links? Well, squire, I welcome thee to join me on Twitter -

© Kamps Consulting Ltd. This article is licenced for use on Pixiq only. Please do not reproduce wholly or in part without a license. More info.

Photo Critique - Mike Fuhl

hjk1.jpg

fuhl-1.jpg

Right, I figured that the best way to illustrate the proposed new feature on Photocritic – proper photo critiques – would be to show off what I was planning to do with the feature. First up is a long-term reader of Photocritic, who submitted two photos.

Photo 1:
fuhl-1.jpg

Dear Mike, There is a lot that can be said about this particular photo, and a lot of it, I’d have to admit, isn’t particularly favourable. Not because it is a terrible photo, technically, but because it does leave a lot to be desired. The main problem I have with it is that there doesn’t seem to be a lot going on. There is a lot of sky, and a little bit of plant and buildings, but none of it seems to complement each other or strengthen a message.

Technically, the photo is very dark, and could have done with a bit more contrast – pulling out the blacks in the levels tool in Photoshop would have thrown the plans and buildings into complete blackness, making them silhouettes. This would have been much preferable, but then theere isn’t enough of them to warrant to show them all that much.

To improve this photo, I would go back to teh drawing board. You see those plants down the bottom left of the photo? Make them your foreground. Let them rest along the left third of the image (as in the rule of thirds), and make sure that your focussing ensures they are pin-prick sharp. Then, expose for the sky behind, so the plants in the foreground are completely black. This would create a more interesting silhouette – see this photo for an example of what I’m talking about.

Finally, the picture has a lot of grain in it – I would suggest using the lowest ISO setting your camera has (100 on most dSLRs, 50 on many compacts), a tripod, and set the aperture to around f/8 or f/11, to make sure that the plant in the foreground would be wholly and fully in focus. Then, use a long shutter time (you are probably looking at 15-20 seconds, judging from the brightness of the photo) to expose the sky correctly.

Photo 2:
fuhl-2.jpg

hjk1.jpgYour second picture is immediately a lot more interesting – the sky is more dramatic, and there is more of a foreground to enjoy, and there is a lot more contrast in the image. Instantly more appealing, but there’s still a lot to be done. A lot of the same commentary as above applies, but personally, I would have loved some people in this photo. Perhaps a silhouette of a person being sad, happy, or silly – expressing some sort of emotion (think iPod adverts, if you want to be cheesy), or perhaps a couple interacting… I did a quick mock-up (see to the right here)

For ideas on silhouetting people, try Silhouette or A Lesson in Life. For landscape silhouette, see if you can draw some more inspiration from this landscape photo.

I’m sorry these critiques couldn’t be more positive, but I hope they will help you in the ‘right’ direction. Good luck!


Do you enjoy a smattering of random photography links? Well, squire, I welcome thee to join me on Twitter -

© Kamps Consulting Ltd. This article is licenced for use on Pixiq only. Please do not reproduce wholly or in part without a license. More info.

Replacing a removed IR filter

prism.jpg

prism.jpgA couple of months ago, we did a feature on how you can remove the IR filter from a digital SLR, to enable it for Infra Red photography. All good and well, but surely, that filter was there for a reason?

One of our readers was wondering about just this, and sent me a question: “I was wondering If it was possible to have a external IR filter that threads onto my lenses that will block the IR light to the sensor but still transmit all visible light through it, mimicking the original internal IR filter that was previously attached to the cameras image sensor?” 


Well actually, yes, you can! It is even quite easy.

When working with IR photography, you need to have the IR filter removed from inside your camera, but in addition, you need an IR Pass filter. This is short for “Infrared Pass / Visible Light blocking” filter, meaning that the filter blocks out all visible light, and lets IR pass through. The visible light spectrum occupies wavelengths roughly from 380 to 780 nm, and the near-infra-red is directly above (780 nm upwards). As such, you want a filter that blocks out everything up to 780 nm or so, and lets through everything beyond that.

Specifically:

Wratten* filters of numbers 87, 87C, and 88A block visible light and pass IR. The 87C is the most visible-blocking of these, with almost complete blocking of wavelengths below 800 nM, and some significant absorption even into the mid 800′s.

If you are interested in the specifics of all of this, you could do worse than check out infra red and the Visible Light Spectrum on Wikipedia.

Either way, if you have taken your IR filter out of your camera, all you need to do is to get an on-camera filter that does the opposite of an IR pass filter. Unsurprisingly, these are known as an IR Block filter. Unfortunately, these are difficult to come by – it turns out it is easy to block out visible light, and let through IR. The other way around is more tricky. Of course – seeing as how these filters exist in digital cameras already – it must be possible, but there aren’t many of these filters commerially available. In normal photography, people mostly worry about filtering out ultra-violet light rays, as these generally are more disturbing to general photography.

Go to a good photography shop and ask them to sort you out with an IR block filter. If all else fails, you could always replace the IR filter in your camera with a filter with increased frequency pass.

Finally read this article which offers a lot of detail on both IR Pass and Block filters.

*) Find out what Wratten filter numbers are, and see what they classify


Do you enjoy a smattering of random photography links? Well, squire, I welcome thee to join me on Twitter -

© Kamps Consulting Ltd. This article is licenced for use on Pixiq only. Please do not reproduce wholly or in part without a license. More info.

Fire writing

Picture-6.jpg

It’s so simple, yet so effective – grab a burning torch, use a tripod, set to a long shutter time, and write in the air. What more could you possibly want? It’s FIRE!

Now go outside and play!

Picture-33.jpg
Picture-41.jpg
Picture-51.jpg
Picture-6.jpg
Picture-51.jpg

(thanks, Hilary, for the idea!)


Do you enjoy a smattering of random photography links? Well, squire, I welcome thee to join me on Twitter -

© Kamps Consulting Ltd. This article is licenced for use on Pixiq only. Please do not reproduce wholly or in part without a license. More info.

Respectless photographers?

I seem to be months behind on this item of “news”. I actually spotted it a couple of weeks ago, but didn’t think it was that interesting. It seems as if people didn’t agree, as the topic is getting some serious discussion. Basically – a picture of a photographer in the middle of a marathon race is pissing off a lot of people.

On one hand, I can kind of see what is going on here. As Robert Capa said: “If the picture isn’t good enough, you’re not close enough”, and getting in the middle of a race is one way to get closer, I suppose… 


On the other hand, you are guest on somebody else’s path, and getting in the way of runners who are at the limit of their tiredness, and only want to make it to the finish line, is at best rude.

Now, I don’t know the circumstances around this photo, but would like to talk about it a little bit anyway. My reaction is different, based on if she is a commissioned photographer or an amateur. If the latter, she’s in the wrong place, and someone should have told her to shove off. I’m not sure about the outraged calls of “getting ticketed… or worse” in the Flickr discussion, though – a bit harsh, I feel. If there were so many people who were outraged about this behaviour, why didn’t they just tell her to move out of the way?

One commenter mentions:

To all of you taht seem to think that she has the right to do somehting like this…… WAKE UP!!

I mean really now, I don’t recall having ever seen a race of ANY sort that is INTENDED for photographers. If there were, I’m sure that it would be around the block and not 24k (or whatever). If you had the right as a photographer to do this, the nice telephotos would be cheaper, the sporting events would be shorter, and a good photo would be a dime a dozen. It’s just not a good shot if you ruin the event that would in fact MAKE it a good shot.

I agree to a large degree, but if she was, in fact, a press photographer, things could have been slightly different: This was in New York City, and if this was a photographer for the New York Times, I believe she had a bigger ‘right’ to be in the way, than Joanna Q Random, amateur photographer. Why? Well, photographers should never be part of the story, so those two photos in the Flickr stream shows she’s in the wrong, but perhaps she was photographing the event all day long, and that was the only time she was in the way?

Or maybe not: This is what the original poster said:

The whole thing took around 3 – 4 minutes and around 30 runners were inconvenienced (or that is how I saw it).

Having said that, though, Magnum agency sent a photographer along as well, and their photos look as if their photographer was on the road as well…

Obviously, the Flickr comment stream turned into a random slagging-off match, as one of the commenters notes:

All of these message boards and websites for photographers…and it seems like there’s a direct correlation between the level of professionalism exhibited in the comments and the actual professional status of the “photographer” posting. The cattier the comments, the less likely the poster is really a professional photographer.

Ultimately, I believe it all boils down to why you are there. If you are shooting for an important newspaper or magazine, your job is to represent the publication honourably (because you are their face to the world. If she was wearing a huge National Geographic jacket, people would have been more careful with their comments, but that doesn’t mean what she is doing is any better, from the runner’s viewpoint), but also to get the best photos possible.

If a wartime photographer has to risk his life for the best photo, that’s what he has to do. If a sports photographer has to inconvenience a runner or two in the course of her job, well then so be it.

Personally, I hate pissing people off, but there have been situations where the only way I could get the best shot was to elbow another photographer, push a policeman out of the way (!), and block off a road with my car. Granted, that was a one-off, and I seriously angered about 30 people that day, but I was the one who came home with the best photo, and nobody else’s pictures got used. Some times, being rude is a business decision…

What do you guys think? Good behaviour or bad behaviour, on her part? Vote in the poll, and leave a comment here or in the Flickr stream.

n

The NYC marathon photographer... Is she in the wrong or not?

View Results


Do you enjoy a smattering of random photography links? Well, squire, I welcome thee to join me on Twitter -

© Kamps Consulting Ltd. This article is licenced for use on Pixiq only. Please do not reproduce wholly or in part without a license. More info.

Better pictures with a compact

compact.jpg

compact.jpgA compact camera is an “all in one” camera. This type of camera is (as the name implies) small and compact. There are many different types and qualities of compact cameras, from your average run-of-the-mill camera that you might get for free when you subscribe to a magazine, to highly expensive and advanced varieties.

We’ve done a lot of writing about compacts before here on Photocritic, including choosing the right digital compact for your needs, about Macro Photography with a compact camera, getting the most out of a compact, and adding threading to a digi compact. To my great surprise, I haven’t written anything in general about compacts, though, so I thought it was high time I changed that… 


The compact cameras is today, mainly split into three different categories, namely by their form of storing the pictures. The three varieties are APS, 35mm or digital. All three kinds have their pros and cons, but for most purposes, APS is dead, and the 35mm compact is going the way of the dodo – Digital is definitely the way forward!

It can be argued that disposable cameras are compacts, but for the sake of simplicity, we can just say that disposables are very simple compact cameras who use 35mm film (or in some rare occasions, APS), and concentrate on the more interesting features of compact cameras:

Short history of the compact camera

The history of compact cameras is indeed a bit vague. To be honest, one of the very first cameras that was sold in volume, the Kodak Brownie, was a compact camera. The real distinction for the compact cameras didn’t begin until 1936, when Germany’s E.H.G introduced the world’s first 35mm SLR. When the big companies, like Nikon, Canon and Leica started introducing SLR’s in the end of the 1950s, beginning of the 1960s, the difference between compact and SLR became more important.

By the mid-1970s, fully automatic compact cameras started appearing, a type of camera that would now be referred to as point and shoot.

Historically, the compact camera has always been the tool of the person who “just wanted to snap pictures” while photographers use SLR, Medium Format or a variety of other types of cameras.

Lately, the digital cameras have made an introduction. Ironically, history repeated itself: The first true digital cameras* were compacts, and it wasn’t until recently (mid-1999) that there was a digital camera that was good enough to be used by the press and other serious photographers

*) I am happily ignoring the fact that there were digital backs to medium format cameras available. These first digital cameras would cost the same as a medium-class sports car, and have nothing to do in this write-up about compact cameras :)

Characteristics of a compact camera

Currently, most compact cameras are electric, meaning electronic light meters, electrical film advance (winding the film to the next frame, and rewinding the film when all the frames have been filled) and everything. Usually you have not many choices when it comes to taking pictures, except from turning the flash off and on. There are a few of the top-range models that can have more advanced things, like shutter time, aperture settings etc, but in general, these cameras are for the “specially interested”, as the price of these cameras usually supersedes that of an entry-level SLR, and most users in that price class will probably chip in a few extra dollars (or pounds, kroner, kronor, gulden, drakmer, whatever your unit of currency might be) to get a full fledged SLR system.

Tips on using a compact camera (or: how to get more out of your camera)

Using a compact is not hard – and you can’t really do anything wrong. However, here are a few tips on how to improve your picture-taking with a compact camera:

Take many pictures – Obvious as this might sound, if you take many pictures, you will get used to your camera, and you will know its strengths and weaknesses after a while. Besides, the more pictures you take, the bigger is the chance of one of them being really good.

Don’t zoom in – walk closer – Due to physics, zooming in and walking closer are two quite different things. Just try it – look through your viewfinder, and zoom in on, say, a coca-cola bottle. Then, zoom out, and frame the picture just as you did. In about 90% of the cases, the second picture will just look better. Without explaining why (look for some of my later photography articles :), this is a general rule – it’s just the way it is. Besides, most compacts are constructed in such a way that if you zoom out, the lens has a bigger aperture. This means that it lets more light through, and that you get less depth of field – usually this is a good thing.

Zoom in on portraits – Flatly contradicting myself, I know. However: when shooting 35mm film, it is generally recommended to take portrait pictures on between 100-200mm length. If you take a look at the front of your compact, it will probably say something like “35-105mm” or “28-70mm” or something like that. Most compacts (with a few exceptions, just to make things more complicated) only have a limited maximum range – but zooming in all the way usually makes for better portraits. (this has the same reasons as above, but don’t take my word for it – just try it yourself)

Finally, Make sure you manage to avoid the Red Eye phenomenon.

Well.. That should get you going. Enjoy, and good luck!


Do you enjoy a smattering of random photography links? Well, squire, I welcome thee to join me on Twitter -

© Kamps Consulting Ltd. This article is licenced for use on Pixiq only. Please do not reproduce wholly or in part without a license. More info.

Inspiration: Go find something rusty

rusty-2-copy.jpgAs you are all probably aware of by now (mostly because I just won’t shut up about it), I’m writing a book. Part of the whole process means that I’m taking a lot more photos than normally, and I am playing with some pretty nifty equipment while I’m at it.

Last week, I was in Holland for a couple of days, and was digging through an attic, where I found an old saw. A plain, boring wood-saw. I cut something in half (I was helping my mother doing some DIY), and then spotted tha the blade was quite rusty. ‘Hmm’, I thought, ‘This whole rust thing is actually quite nifty’. So I decided to try and take a couple of photos.  

Hereby presented to you… A rusty saw blade. I hope you are sufficiently inspired to go take pictures of rusty things, too. The colours are great, and no two rusty things are the same. And, well, it’s good fun!

If you get any particularly good shots, why not chuck them on your blog, on flickr, or whatever, and link to them in the comments?

rusty-1.jpg

rusty-2.jpg


Do you enjoy a smattering of random photography links? Well, squire, I welcome thee to join me on Twitter -

© Kamps Consulting Ltd. This article is licenced for use on Pixiq only. Please do not reproduce wholly or in part without a license. More info.

New details about Photoshop CS3

Picture-3.jpg

Picture-3.jpgYou can’t argue the fact that Photoshop is an incredibly important tool to photographers, so when I found more info about the upcoming Photoshop CS3, on Think Secret, I was incredibly excited. Sad, isn’t it? 


Photoshop CS3′s interface is said to closely resemble the look and feel of Adobe After Effects 7, with easy palette organization and brightness adjustment for the overall interface itself. Palettes can be moved, minimized, customized or collapsed down to a single icon with ease; even that familiar two-column toolbar can be converted into a narrower single column bar, if desired.

Another new feature substantially improving both workflow and raw performance is Live Filters, which effectively brings the dynamic editing features of Layer Styles to Filters. The pixel radius of a Gaussian Blur, for example, can be adjusted long after it has been applied with just a single mouse click. Sources report substantial performance improvements to the filters themselves, as well, and have speculated that Photoshop may now be tapping the GPU of the video card to help the CPU crunch filters.

Incredible stuff, can’t wait. In the meantime check out the rest of the article over on Think Secret. There is also more information on Pocket Lint, Mac NN, Apple Insider, Digit News and Mac World! Eat yer heart out, kids…


Do you enjoy a smattering of random photography links? Well, squire, I welcome thee to join me on Twitter -

© Kamps Consulting Ltd. This article is licenced for use on Pixiq only. Please do not reproduce wholly or in part without a license. More info.

New photo of the day contest

earth.jpg

earth.jpgI quite frequently get e-mails for people who want me to promote their site, and I can’t blame them. After all, this website rules more than words can possibly describe (I guess I’ve been reading a little too much of Maddox‘ work recently).

A large proportion of the sites I get e-mails about are various competitions etc, and most of them are complete and utter rubbish. So when I got an e-mail from Will, suggesting I have a look at his photo of the day competition website, I was elated – finally, a decent example of how it should be done! 


There are more photography competitions out there than you can shake a stick at, which is completely silly, as most of them are piss-poor excuses to get a lot of photos for free (which has been discussed before). But EarthShots is completely different – Quite apart from the fact that the quality of the website is great, the competition is so sharp it’s nearly vicious. And hell, if you ever needed any inspiration, the Earthshots archive is hardly the worst place to start!

Check out Earthshots, you might just like it!


Do you enjoy a smattering of random photography links? Well, squire, I welcome thee to join me on Twitter -

© Kamps Consulting Ltd. This article is licenced for use on Pixiq only. Please do not reproduce wholly or in part without a license. More info.

New entry-level Nikon

Nikon-D40.jpg

Nikon-D40.jpgBlah-blah-Photocritic doesn’t write about products-blah-blah-whatever. I’m excited about the launch of the new Nikon D40, and I’m a self-professed Canon man, so god knows you should be excited too!

The D40 is the newest, most inexpensive member of Nikon’s entry-level digital SRL range, announced only a few days ago. To reduce cost, some features of the D50 have been simplified to give a suggested retail price of only US$600 with the 18-55mm G-II kit lens. 


The camera is lower spec than the Canon EOS 400D, but in a market where the cheapest dSLR will always pick up some new buyers, this might just be the edge that Nikon needs in the neverending Canon/Nikon war.

Excited yet? Good, you should be. The images of the new D40 were leaked a while ago, but now, the first reviews are trickling through as well. Read lots more about the Nikon D50 on Wikipedia, Digital Photo Review, and if you want one, check out Froogle (uk / us) to find the best prices!

(thanks for the heads-up, David!)


Do you enjoy a smattering of random photography links? Well, squire, I welcome thee to join me on Twitter -

© Kamps Consulting Ltd. This article is licenced for use on Pixiq only. Please do not reproduce wholly or in part without a license. More info.

Event photography

events-all-around.jpg

One of the many ways you can make money as a photographer is to specialise on events. Weddings, christenings, and all sorts of other events where people make memories can be lucrative business. The great thing is that all you need is a good camera, lots of memory cards, and some business cards.

Let me show you how… 


Where to take photos

It’s vitally important that you get creative on where to take photos. The best possible events are events where people want to keep the memories alive. Extra bonus points can be had if the event is the type of happening where people want extra high quality, or if you can offer something which means that the people couldn’t have taken the photos themselves.

I have a friend who is making a green-grassed fortune off photographing junior football (that’s soccer to most of you, I think…) games. Here in England, kids are dreaming of being the next Beckham or Best, and their parents are often encouraging of their sporting efforts. What my friend does is that he calls up the team manager, ensures its okay to take photos at a football game (getting labeled as a pervert is bad for business). He then goes to the game, and takes photos. When my friend shows up with a huge 600mm lens – same as all the parents have seen on television – he is taken seriously, and he takes great care in making sure he’ll get a couple of action shots of every kid on the field. At the end of the game, he hands out his flyers (printed cheaply from an on-line printing company such as printing.com). Later in the evening, he uploads all the photos to his events photography website, and sells the prints for £10 each – or £20 in bigger formats, framed. The only costs incurred are the petrol he uses for driving to the game, and the flyers, which cost next to nothing. At bigger tournaments, he can shoot 8-9 teams in a single day, hands out around 100 flyers, and in the longer term, sells £300-500 (that’s approx $600-$1000) worth of photos. Not bad for a day’s work.

Myself, I’ve done wedding photography on the same model: You arrange to shoot the wedding reportage-style, and make sure that you capture everybody. People talking, people smoking cigars, people flirting with the bridesmaids, along with all the ‘official’ photos you do. You can charge the regular fee for photographing the wedding, and in addition you can arrange for your URL to be printed on the wedding invitation (offer the happy couple a 30% discount to get the URL on the invitation and on any other paperwork they distribute, then make sure to mention to everyone you photograph that they can buy the photos on-line on the URL on the invite). It’s a lucrative business, and in addition you are offering a service most photographers don’t: The option of letting anybody get copies of the prints easily and conveniently.

The trick is to find a niche where you can can excel by being the best photographer in the room, and offering an easy way for people to buy your photos. Horse shows, car shows, dog shows, livestock competitions, fashion shows, parties, rock shows, plays, festivals, portraiture – everywhere there is a market, you can try and do events photography. In addition, for many of the events, you can make money by selling your best images as stock!

Marketing the photos

Personally, I’ve had great success by having flyers printed – simple A5 flyers in full colour, with 2-3 of my best photos, and an URL. Mention who you are, mention how easy and cheap it is to buy photos from you, and hand them out to anyone who might want to buy your photos. If the event has a car-park, all the better: Stick a flyer under the window wiper of the cars.

If you can get a tie-in as an ‘official photographer’, it’s worth setting up a booth at the event as well. Hire someone to sit there with a printer and a computer, and print out the best photos there and then, allowing people to buy them, but make sure to have a stock of business cards or flyers as well, to allow people to buy the photos at their leisure, at home, via the internet.

How to sell the photos

The mechanics of selling photos can be quite complicated. Back when I started doing concert photography, I decided to have a go at doing it all myself – and Rockprints is a testament to that (incidentally, Rockprints was designed by the same guy who did the current Photocritic design – Martin Jacobsen). I ended up using a commonly available gallery software called Coppermine, and hacked the hell out of it, so I could use it to sell photographs via Photobox.

In retrospect, it was a clumsy and extremely annoying way of doing things. The solution wasn’t particularly scalable, and I spent more time adapting the PHP code than actually uploading photos.

A lot of things have happened since then, and there are much more efficient ways of selling events photography. There are quite a few specialised sites out there, who help you out by providing ways of selling photos. I ended up using Printbutton (the professional photo sales service offered by Photobox – as used by Reuters and lots of other big photo suppliers), but when I signed up, you had to pay £400 up front to set up a Printbutton account. Now, one of the requirements for printbutton is “Company turnover in excess of £100K (€150K) per year”, which means that Printbutton, while being a phenomenal service, is unattainable for most of us. Gutted.

Luckily, there are other solutions out there. Photo Stock Plus offer a ‘events-photography-in-a-box’ solution, which works far better than anything I’ve ever managed to puzzle together myself. In their own words, “We provide you with your own e-commerce enabled website, a fully integrated printing system that allows you to set mark ups to a variety of print sizes and over 100 photo gift items, bulk uploading software that will get your photos online quickly, and customizable marketing material such as business cards and fliers that you can use to direct customers to your storefront.” Sound familiar? Yup – that was exactly what I was trying to do with my rockprints website. In the immortal words of Homer: Do’h!

The company takes a fee up-front of $99 (aroudn £40) per year. That’s a hell of a lot better than the £400 I had to fork out for Printbutton. For your money, you get a 500MB printing account, which can store up to 10,000 images. All you need to do is to use the uploading tool (which also watermarks and resizes your photos for you, saving you a metric tonne of time) to create events galleries, and you’re up and running.

Don’t take my word for it, find out more on the Photo Stock Plusal website, and sign up for a trial account to find out what they offer.

A final word of warning

Events photography is damn hard work. No, seriously. You’ll be constantly on your toes, trying to get the best images, fielding questions from people around you, handing out flyers, travelling to locations, copying images, preparing galleries, etc. You’ll hate it until you’ve managed to get used to the pace of the work, and managed to work out a good workflow.

On the other hand, there is a lot of money to be made if you are happy to put in the hours. I have half a dozen friends who make serious money doing events photography, and most of the photographer friends I have use a similar setup to this whenever they do weddings, to maximise their income.

Best of luck to you!


Do you enjoy a smattering of random photography links? Well, squire, I welcome thee to join me on Twitter -

© Kamps Consulting Ltd. This article is licenced for use on Pixiq only. Please do not reproduce wholly or in part without a license. More info.