

Everything to have happened in photography has been iterative, slow, and gradual, building on technology that already existed, to create cameras that are slightly better than the previous generation. Not so with Lytro.
Stay in touch on Twitter - find us on @Photocritic

When you hear the term 'high-res' thrown about with such abandon when it comes to images for web use, have you ever stopped to think just how big or how high quality and image meant for the web needs to be?

There's an assumption that high-contrast images are more dynamic, more compelling, more inviting. Have a go at some low-contrast photography. You might surprise yourself with the results.

Balance doesn't mean symmetry; it means an internal consistency and tension within your photos. And it's a vital element of composition.

Great photos might be down to a little bit of luck, but most of that 'luck' you make yourself. Don't believe us? Read on...


I've been to CES quite a few times now, and I can't help but notice that photography is starting to be less and less of a focus for the show. To wit: This year, like many years before, the PMA is hosting... well, in their own words, "Digital Imaging/Photography Exhibits and Sessions, presented by PMA, at 2015 International CES".
If you've ever noticed how beautiful lights can look when they are out of focus, you'll probably already have realised that we're about to enter the high season of everything that's awesome in the field of bokeh-liciousness. That's right - Christmas lights are pretty much the holy grail for gorgeous out of focus light effects. But how do you create the effect?
One of the most important things you're going to need to capture good bokeh, is that you need some great out-of-focus areas to begin with. So: Grab your lens that has the widest aperture (so, the smallest f-stop number). If you've got a prime lens, that's probably your best bet, but it's also possible to use a long zoom lens.
If you're shooting with a zoom lens, you'll want to zoom in, and focus on something close to you to get the maximum depth of field effect you're looking for in this particular case.

The next step is aperture. If I'm shooting exclusively for depth of field, I'll be shooting in Aperture Priority. Start in the biggest aperture you have (the smallest number, remember? If that doesn't make sense, quickly brush up on your skills with our Why is the F-stop scale so weird article).
Don't blindly go for the largest aperture though - it's a good starting point, but I often find that on some of my lenses, that means the foreground is a bit much - experiment to find the best settings!

A big blurry mess can be abstract and interesting, but let's be honest: It isn't storytelling, which - as we know - is one of the most important things about photography. So: In addition to the beautiful blurry mess, you also need to think about what the story is that you're trying to convey. If it's Christmas, it shouldn't be hard - get baubles, presents, kids, or food into the photo as well, and you're probably half-way there.

The world of bokeh is lots of fun - so keep that lens stopped wide open and start pointing it at light sources. Busy cities, gorgeous christmas trees, and even the TV can be a great source of beauty. Have fun, explore, and do share some of your best results in the comments!
Finally, don't forget that bokeh isn't just for the background - if you're feeling brave and adventurous, switch things around and get your background in focus instead - like in this great example from Mikko.
What happens when you take 40 time-lapse photographers, and you give them a mission: Create a love story to London? Well, my team over at Triggertrap decided to try and find out. With incredible success, I might add.
Under the expert guidance of professional timelapse photographer Chad Gordon Higgins and award-winning urban photographer Nicholas Goodden, the gang of eager photographers set out across the city to capture London from their own perspective.
By the end of the day the team of photographers had created clips shot from a whole range of London’s landmarks, from Tower Bridge to Camden Market, Oxford Circus to the Thames Barrier, and even gained access to the BBC Newsroom in full swing. The LapseLondon photographers managed to cover a huge variety of London views and experiences, highlighting the amazing and diverse city it is.
The 80 clips were assembled from well over 35,000 individual photographs, representing a total of over 40 hours spent timelapsing across the capital - all in a single day. The final video is an ode to London, showing the beauty of one random day in December in London through the eyes of 40 photographers.
The Story of LapseLondon from Triggertrap on Vimeo.
LapseLondon from Triggertrap on Vimeo.
Question: How deep can you really take the GoPro camera underwater (the box says 60m)? The way this works, is that any piece of equipment is 'rated' to a particular pressure. In the case of the GoPro Hero 3 underwater case, it will be rated to 7 atmospheres, which works out to 60 metres in freshwater and around 58 metres in salt water.
This is similar to bridges: They'll have a sign saying "Maximum 3 tons" or similar. This doesn't mean that if you are driving a truck that weighs 3 tons, but a kitten sits in your passenger seat, that the bridge will collapse.
There will be variations in each individual casings, too. Some underwater cases will happily go to 80 metres, others might make it to 90 metres, but some might fail at 68 metres. So, in order to keep your equipment safe, stay above 60 metres
For most people, all of this is moot, however, as a GoPro really isn't the right equipment for dives that deep. I'm a Divemaster, and I've dived extensively, both with and without photographic equipment -- and I don't think I've ever taken a half-decent photo at depths deeper than 30 metres or so. The light doesn't penetrate that deep, for one thing, but 40 metres is actually the maximum depth you can safely dive on air (see Recreational diving) -- so if you want to go deeper than 40, you're looking at becoming a 'technical diver' (see Technical diving), which is a different kettle of fish altogether.
Realistically with a camera without additional lighting, like the GoPro Hero 3, you'll probably only get good footage at depths down to about six metres, and usable footage down to about 15.
In the comments of this article (originally published in 2013), a series of divers started posting how deep they've taken the GoPro stock housings, and I was in for a surprise! Have a look at the comments below, but some of the data points are here:
Please do keep the comments coming!
I’m often asked about how much people charge for photography, and then frequently in the context of wedding photography. Honest truth? I don’t really know, but the persistent feeling out there is that wedding photography is really, really expensive. This is, in fact, true – it ain’t cheap to get your wedding photographed – but have you ever thought about why that might be? I decided to find out, and spoke to Randolph Quan, a London-based wedding photograher.
So, without further ado - In Randolph’s own words…
Spring is in full bloom here in the UK, so the hectic summer wedding season is about to arrive. Lately I’ve been getting a lot of couples asking me why wedding photography prices are so expensive. While it may seem like wedding photographers live an amazing life by charging through the roof for a day of work, it’s hardly the case.
It goes without saying that weddings are a costly affair. From the venue to the caterer to the wedding favors, the tab just keeps getting higher, and it often seems that wedding photographers are charging a large chunk of that tab. But have you ever though why wedding photography prices are so high? It’s because of the associated costs of being a wedding photographer.
Being a good photographer is an expensive investment. Sure, you can find cheap wedding photographers out there, but they’re cheap because they’ve possible cut corners on equipment, and insurance. Or they’re just plain stupid (you hired cheap and stupid?) So let’s take a look at what goes into a photographer’s overhead that adds up to the final cost of your wedding photographer.
1. Labour costs. This one is pretty standard across all industries. A photographer’s work doesn’t end when your wedding does. After the 5-10 hours they’ve put in working (on a Saturday, no less) at your nuptials, the photographer spends hours and hours editing your images so you get a wide array of perfect photographs by which to remember your day. Its not uncommon to work a full 3-4 days editing a wedding. Their time is even more valuable when you factor in the limited number of weekends in a year there are for a photographer to work.
2. Staff salaries. If you book a photographer that comes with assistants or second photographers, your cost is going to be higher. In return for getting more images from various places on your day, your photographer is going to have the pay those assistants.
3. Equipment. The pieces of equipment a photographer carries around is not your typical point-and-shoot. High-end lenses and bodies average around £1500 each. Photographers also carry back-up equipment in case their primary equipment fails, which adds to the cost of the wedding photography prices. In case your photographer is living in the Jurassic period and hasn’t switched over to digital (there are a few out there, somewhere), you also have to factor in the cost of film. Good wedding photographers easily can bring over £10,000 worth of equipment to shoot your wedding. Add in the prices of computers and editing programs like photoshop ( you did buy it right?) and costs begin to skyrocket. Luckily, its not always necessary in the UK to own a car so let’s not go there.
4. Insurance. Because cameras and equipment cost so much, photographers are smart to insure them. Just in case your drunk (who your mom insisted on inviting) cousin Jimmy decides he wants to spray champagne all over the wedding photographer’s equipment for a joke.
5. Web site. In this day and age, a photographer has to market himself with a very high-tech, professional Web site, which can cost a lot to design and maintain if the photographer doesn’t have web design skills. Its not unreasonable to spend over £5000 a year on website updates, and online marketing such as the sponsored links on Google.
6. Advertising. In that same vein, photographers also have to spend money on other types of advertising such as ads in the newspaper, business cards and brochures.
7. Photo extras. If you knew how much albums cost you’d have a heart attack. Albums are extraordinarily expensive and are often added into the wedding photography prices. Don’t forget the time it takes to design them as well.
8. Education. The more educated a photographer is, the better techniques and specializations will be used while shooting a wedding. As everything else, that education comes at a cost through instructors, college degrees, extra classes and seminars, etc. Intangibles such as expertise aren’t easy to measure monetarily, although we try!
So while you may be asking, “why does photographer X cost so much more than photographer Y?” the answer might be simple: Photographer X has spent more money developing his or her business into a full-fledged photography service, which ends up costing more money than an inexperienced photographer who moonlights part time on the weekend.
….And those Porsches we drive up to your wedding in just don’t pay for themselves now do they? :-)
Randolph Quan is a London reportage wedding photographer. You can follow Randolph on Twitter and Flickr or contact him via his website if you’d like to get a quote to get him to photograph your wedding.
All images are courtesy of Randolph. This article was originally published in 2009, but was then fully updated and revamped in December 2014
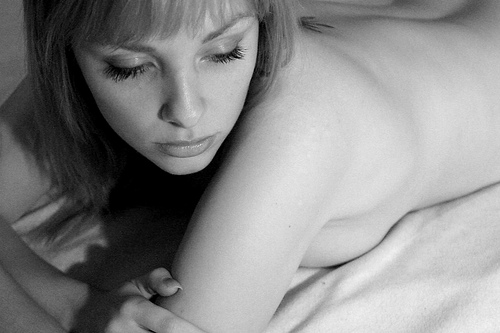
As your photographic interests progress, you are likely to try and take photos of somebody in the nude – It’s a very honest and challenging artform, which allows for a level of intimacy far beyond your regular portraiture. Of course, with the modern world’s paranoia about nudity, it’s not easy to know where to begin, so I’ve written a guide which I hope will come in handy to everyone, and give some insight into the hows and whys.
Needless to say, the photos behind the cut may not be entirely safe for work, but rest assured they are all relatively tasteful.
The problem with the definition is that people seem to attribute different things to nude. The most important part of an nude photo is that the person(s) in the picture is naked – and that this nakedness has a purpose.
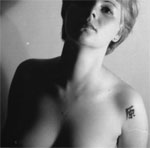
 See Tina Nude II bigger on my Flickr stream.
This is probably going to be your biggest problem. It is difficult to take good nude self portraits, so you will have to find a model. A wife or girlfriend (or husband / boyfriend) might be able to help you out, but the problem here is that you are likely to know this body well already. One of the few exceptions to this Petter Hegre (see the links section below), who has taken an extensive (and very intimate) nude series of his wife – titled “my wife”
My point is that it would be better to take shots of somebody you have never seen naked before. That way, the picture taking process will be as much as an exploration for you (the photographer) as for the viewer
Finding a model can be difficult, especially if you do not have a photo studio or a professional business card (Neither those mean anything, as even people owning both can be psychos, but it helps when talking people into nude modelling). You could, of course, call a professional modelling agency, and offer to do a few nude shoots for new models who need a portfolio, but this is not likely to be cheap. Alternatively, using a online modeling agency such as OneModelPlace, you could find amateur models in your area.
When choosing a model, take somebody who has features that intrigue you. Don’t fall in the trap of picking somebody with a supermodel body – it removes much of the challenge. Instead, you want somebody who is different than average (making somebody who is not automatically associated with “pretty” look gorgeous is a lot more of a challenge than taking pictures of head-turners). A few pounds too much or too little is great.
 When working with nude photography – no matter how much time you spend getting the pictures to look nice, and hiding away everything you would prefer not to show – the models will be moving, and everything will show, to put it that way. What you want to do is to find a reasonably secluded spot to take the pictures. A photo studio is ideal, but outdoors or on location somewhere makes for great pictures.
Make sure that the temperature wherever the pictures will be taken is good though, because remember; Somebody will be naked, and being cold definitely does not help to make people relax!
Before you take the pictures, you will have to have thought about what you will want to do. Make some sketches, or have the model go through some poses with clothing on, to get some ideas as to where the shoot is going. Let the model have some ideas or set a theme to get going (a big black leather couch and a pale model or vice-versa can be very exciting)
When taking the pictures, take lots of pictures. This goes for any style of photographs, but particularly nude photography. If you believe you got a shot right – take two more just to make sure.
This also means that you will run out of film fast. Great. That means you can take frequent breaks while you load new film. Have a chat, take it easy, have a glass of wine (if the model is nervous, this can help LOTS)
 Try new stuff. Combine strange things. Have you seen the picture of Atlas? Recreate this with a big beach ball, or a TV receiver set or something. Use candles as light sources. Take black and white or colour shots (whatever you normally don’t). Use an overhead projector or a slide projector to project shapes onto your model.
Philip Greenspun has an excellent guide to nude photography on Photo.net, complete with lots of examples, practical tips, and interesting pointers. Not to be missed!
About.com has invited Peter Marshall to do A Beginners Guide to Nude Photography, which has a series of articles about nude photos, and how to go about photographing them
 See Tina Nude I bigger on my Flickr stream.
Bodyscapes is a project by Allan Teger: set of photographs where bodies are seen as landscapes. Very clever, very sexy, but not rude.
Petter Hegre is a Norwegian photographer who specialises in nudes. In recent years he's strayed from the subtle to straight-up pornography, but one thing you can't take away from him: The man's got a great eye for a photo, and it's some of the classiest porn around. Is that a weird thing to say? Well, have a look and judge for yourself.
The Art Nudes blog has a daily update of an artistic nude photo – most of them are of world-class standard – sometimes provocative, sometimes a bit strange, but always of very good quality... And they've been going for the best part of 10 years, so there's plenty of content to get through.
Flickr is of course another source of nude photos – the “Tasteful nudes” pool is a great port of call for inspiration, mostly photos taken by amateur models, but a lot of it is rather good... Although it's not always the best moderated collection of photos. Nudes, yes, but 'tasteful' - not always.
A history of nude photography in the inter-war era.
And, of course, my own article 45 inspirational nude photographs
Good luck, and if any of my readers have galleries of tasteful nudes – please do post a comment, I’d love to feature your site!
You are into taking photos, obviously – so what do you do with them? Many of you probably make online galleries, or you create prints to hang on your walls – or perhaps you even sell prints to others. Eventually, as photography progresses from a mild interest via passionate hobby and into the realms of what could be seen as a professional career, you are going to have to create a portfolio of your images, to show to prospective clients.
Heck, even if you have no clients, you will still want to make a portfolio. Imagine how great it’ll be to show the grandkids!
So, you are a photographer, and you want to make a portfolio. I have had to do this a few times, and I have fucked up a few times, so I learned all of this the harshest way possible. Ah well – on with the show
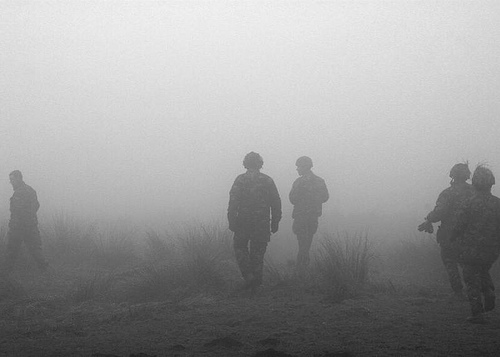 Into the Mist (Territorial Army III) by Photocritic.org, on Flickr
If you want to show your pictures in a gallery, you will need to make a selection of images around a theme of some sort. If you just run around and snap pictures, you will have to scrutinize them, to find out what they really are about. If there is no connection whatsoever between them, you might want to consider not making a portfolio, and rather concentrate on taking more pictures.
Why is a theme important? Well, although single pictures can be interesting, galleries tend to be interested in offering its visitors with a journey. Pick an emotion, and explore it visually, or perhaps a situation or a place. As long as there is some kind of “red thread” tying your images into a whole, you’ll be all right.
Make sure that the images are in a logical order – either cronological, or through mood development. Be prepared that you will probably have to talk the person you are presenting your portfolio to through all the pictures, so if you have some kind of story prepared, all the better. If you decide to mix colour prints and black and white prints, you’d better have a very good explanation as to why.
A good selection of images is 10-20. If you have several themes, make different portfolios, and present them separately.
This type of portfolio is the photographic equivalent of a “Best Of…” album.
Image libraries are the other extreme – here, it is okay to have a large batch of single, non-interconnected images, as this is not what the target audience is looking for. What they are looking for, however, is genericicity and perfection. The more generic the image is, the bigger the chance somebody will use it, as it is adaptable for many different situations.
If your image has a flaw, ditch it. If your image is only slightly out of focus, ditch it. If your image has brand names or visible logos in it, chances are it is worthless in connection with image libraries. If you do not have model releases for the people in your images, get rid of the pictures.
In short: Make sure you only show your very best images. It is better to pitch 3 perfect pictures than 15 good ones, but that don’t stand out from the mass. You should aim for 7-15 great pictures, however.
 Strongly emotive photos can help your portfolio shine
If you are making a commercial portfolio, be prepared to make it focussed. You might need to change your portfolio around depending on who you are pitching it to. If you are pitching fashion work, make sure you have 5-6 pictures from each series you have done, to show that you can consistently take good pictures. If you are doing product photography, make sure that you do the same: Same product from various angles etc.
If you try to pitch your general skills as a photographer, make sure that you make several portfolios. One for portraiture, one for nature, one for product photography, etc. That way, the person reviewing your portfolio can mentally prepare for something else. Also, it allows you to show only the portfolios that are relevant for the job you are doing.
If you have gotten pictures in print (especially viable if you are planning to do freelance news photography), include both prints and newspaper clippings – side by side on adjecent pages is good.
This is what people ask about most: How do you present your portfolio?
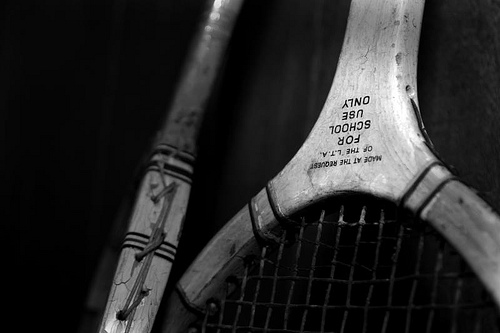 For School Use Only by Photocritic.org, on Flickr
First of all, make sure that your prints are of the best quality possible. This means that they should be of a decent size (approximate A4 / letter size is an ideal tradeoff between presentability and portability)
As for the actual presentation of the portfolio, the answer is difficult to offer. Although a nice leather folder with high-quality plastic inlays to keep your images in offers a good initial impact, it may not be ideal, as the plastic may introduce sheen and / or reflections on the images, making them difficult to see.
In the past, I have seen portfolios that are presented as pictures mounted on cardboard, even loose pictures in a rolodex-style folder. You could consider getting a mini- easel that you can place the images on individually. That allows you and the reviewer to take a few steps away from the images – an especially good bonus if that is how the images are meant to be seen.
Creativity is a big bonus – if you manage to come up with a good way to present your portfolio effectively, it probably means you are doing the right thing. Don’t fall for the temptation to show your images on a computer screen or data projector, however, unless this is how they are meant to be presented. If you only have slides, there is no way around showing it on a slide projector, but if there is any way you won’t have to bring and / or arrange a projector, it is better.
Oh, and it is all in the attitude. Go in there, be sure of yourself, talk, talk, talk, and don’t for a second let up that you had even slightly considered the possibility of them not liking your images. You’d be amazed what difference it makes.
Good luck!
A digital camera sees more infrared than we do, and all you need to do to capture it, is to block out all the visible (non-infrared) light. You can buy filters that do this, but they can be ridiculously expensive – and buying stuff removes all the fun of creating stuff, n’est-ce pas? The trick? In order to be able to withstand the heat on projectors, slide film will be created so it lets through infrared light, even past the portions of the slide that are completely black. In other words: Unexposed, developed slide film can be used as an IR filter!
Top tip: If your camera lens is bigger than 35mm film, why not just buy a roll of 120 slide film? It’s bigger :-)
More information about the hows, the whys, and the wherefores can be found on Wim Wiskerke’s website.
 1) Go into a camera store, buy a roll of slide film. (120 film is great, because it has larger surface area and no sprocket holes). If you can get film that is out of date, it’s cheaper. They may even give you a roll or two for free.
2) Hand the newly acquired roll of film back to the salesperson behind the counter, and tell them to get it developed. If they look at you in a confused way, explain why. Tell them to add a note on the film that yes, you know it is unexposed, and yes, you want it developing anyway.
3) Go back to the store 48 hours later, pick up your now-developed, still-underexposed slide film, which now is ready to be used as IR filter. The whole thing should cost you a fraction of the price of an IR filter!
I was reading through some of my earliest photography articles on this very blog - some of the oldest ones go back to 2004 - and one of the articles I stumbled across was 'how to choose a compact camera'. In it, I'm making a bold claim: "Choose Canon, Nikon, or Olympus, and you can't really go wrong. If I were you, I'd stay away from Sony, however". My argument - made about seven years ago, mind you - is as follows: 'Would you rather go with a camera manufacturer who's turned to electronics, or an electronics manufacturer who's having a go at creating cameras'? Well, let me be the first to announce that I'm currently eating those words, with a nice side-helping of humble pie.
You see, exactly a year ago today, I took delivery of my Sony A7, and a Sony/Zeiss 55mm f/1.8 lens. At first, I was worried. Then, I was elated. And then... I sold all my Canon photography gear. The true fact is that the Sony A7 is one of the best cameras I've ever used - for my particular uses. Yes, there's better cameras for sports, concert, and fashion work... but I rarely shoot any of those. Instead, I'm a frequent traveller, and unless I have a light camera that's capable of taking awesome photographs, I'm in for a disappointment.
In my Travel Photography book, I'm excited about the Canon 550D (the newest entry-level Canon at the time) and Canon's 50mm f/1.4. In fact, in that book, I think I'm making a compelling case for travel photographers shooting with that very combo. If I were writing the book today, I'd have recommended my current setup. The A7 has a full-frame sensor - which doesn't matter nearly as much as you'd think. It also is incredibly good in low light - which does matter - and once you get used to its quirks, it's a fantastic travel camera all-rounder, that is capable of delivering photos that are more than good enough to publish in a book.
Anyway, I'm getting off topic. My point is this: Seven years ago, I wouldn't have dreamed of recommending any Sony camera to anyone. Today, they have created my main, go-to camera for pretty much everything (including video!). Think about that for a second: If that much can change in seven years... What is going to happen in the next seven years?
It's an exciting time to be a photographer, that's for damn sure.
In the run-up to Christmas, the guys from Just Go Do It have a great project lined up: 30 challenges for 30 different days, ranging from self portraits, nature photographs, candid photographs, photographs starting with B... All manner of awesome challenges. Best of all? The challenge is so simple: If you are given 24 hours to photograph Happiness, could you? How about Play? How about 'This Year'? Each of the individual challenges are so eminently... Reachable! So - grab the list, and get snapping.
I'll be giving it a shot (or 30) this year. Keep an eye on my Flickr stream to see how I'm getting on!. Join in the fun!

Oh, and of course, give them some love on Facebook and Twitter, too.
If you're up to date on your photography history, you'll be aware that some of the stuff we used to have to do to get artificial light was basically the same as setting off fireworks next to your camera to capture the photos. Quaint as that feels, this is still the reality for high-speed photographers... If you want a swift way to kill yourself with photography equipment, the high-voltage flashes used to stop fast-moving objects is an easy way to go.
Let me explain. When we're talking about 'high speed' photography, we're not talking about the time it takes to trigger a flash. With a good high-speed flash trigger, you can go from trigger event (say, a laser beam being broken, or a loud enough sound) to strobe flash in a matter of microseconds.
The challenge lies elsewhere: If you're trying to take a photo of something that moves very quickly indeed—say, a bullet—you need a very short burst of light. Now, what photographers traditionally think of as a very short burst of light—like the strobe from your studio flash—is actually a very long burst.
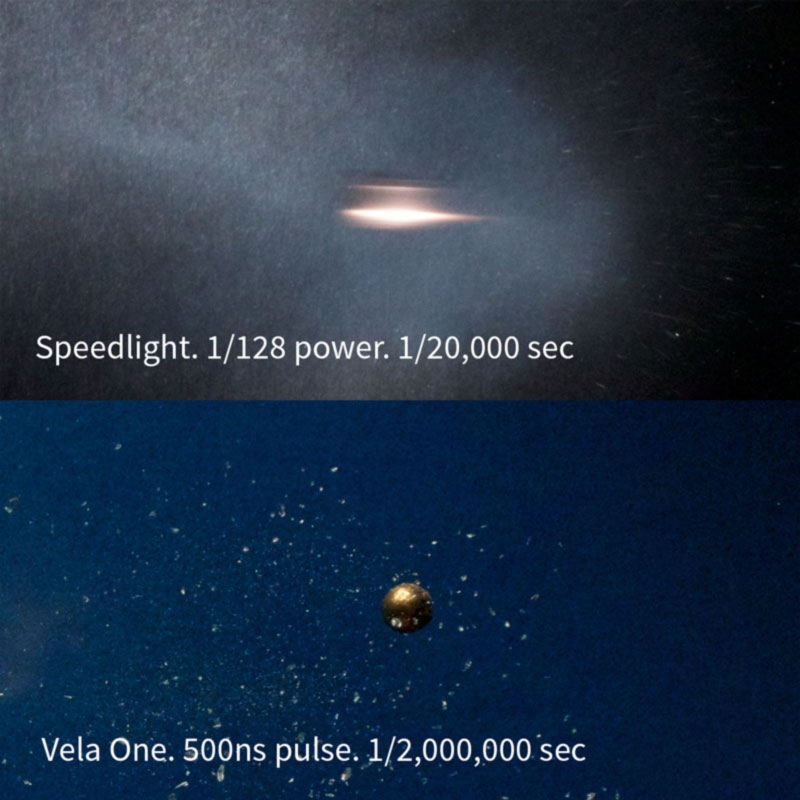
The problem is this: A standard .22 bullet has a muzzle velocity of 340 metres per second. So, if your very high-end camera with a shutter speed of 1/8000 second were to try and capture this bullet in flight, you'd be out of luck. Even at 1/8000 second, your bullet will travel 4.2 cm / 1.6 inches. That means you get a tremendous amount of blur in your photo — you certainly couldn't stop it.
So, what is a poor photographer to do? Well, a flash has a much shorter duration. A PC Buff Einstein (known to have a very short flash duration) will be about 1/13,000 second—but, when translated to our flying bullet, we're left with a blur again—2.6 cm / 1 inch is still a streak of blur. That's no way to stop a bullet, photographicaly speaking.
Even really short-duration strobes—like a Nikon SB-80DX at its lowest power output—has a duration of 1/22,000 second. Impressive, but no match for our trusty bullet — 1.54 cm / 0.6 inches. That's more like it, but still results in a rather blurry image.
So, what's a poor high-speed photographer to do? Well, Harold Edgerton, who was the father of high-speed photography, used an 'air gap flash'. If that sounds fancy, trust me—it really isn't. Imagine an electrode and a cathode, with a spark jumping between the two. In essence, you've got lightning—yes, real lightning—happening in your photography. It isn't difficult—anyone with a basic knowledge of electronics can build one—but it's incredibly dangerous. As in, could-very-well-kill-you-type-dangerous. We're talking at least 20,000 volts to create a spark that's bright enough to use for photography.
There are some slightly-less-likely-to-kill-you solutions out there, but they cost the earth: Upwards of $2,000 for basic short-duration strobes. Interesting, yes, but you'd really have to love high-speed photography to lay down that sort of money to embrace your hobby.
The solution, it seems, might be in technology. The clever lot over at Vela Labs have come up with a device they call the Vela One. It's not available to buy yet, but a Kickstarter campaign is aiming to rectify that situation.
To solve the 'this thing might kill you' and the price-tag issue, they're using LEDs designed for architectural use (i.e. mega-bright LED bulbs), and then they blink them very, very briefly.

By dumping a ton of power (in fact, 2000 times what they are designed for) into the LEDs for a brief period of time, they're able to get a lot of light out of the LEDs, for a very brief burst. How brief? Well, guys at Vela Labs claim it can be done in 1/2,000,000 of a second—which translates to 0.017 cm—or about twice the width of a human hair. To a photographer, this means pin-sharp photos, even of objects of moving at high speed.
Of course, this doesn't come for free: The cost of super-brief flashes of light is brightness. That is true for an air-gap flash, but also for the Vela One; but it looks as if the One offers a pretty good trade-off between flash duration and brightness. The photos speak for themselves.
At £550, it's not cheap, but it's a lot more affordable than some of the other high-speed options out there (although there's a VIP Early Bird offer of £400, but you need to be quick with only ten available)... And at least it's unlikely to kill you as you use it, which I find is always a feature I look for in most of my photographic kit.
The results? Well, let's take a look:

If you want the Vela One to exist, you'll have to head over to Kickstarter, and be quick about it, too. The campaign ends in only 22 days, so get a wriggle on!

Time-lapses? They're awesome photos like this, except slightly more like those new-fangles 'moving pictures' we keep hearing about.
If you're a fan of London and of shooting time-lapse videos, don't miss this: Our good friend Nicholas Goodden (one of the top 100 most socially influential photographers in the world) is taking the helm on an awesome project: A one-day event where we are creating a love story to London, through the medium of time-lapse.
Sure, there's no shortage of time-lapse videos, but how many of those have you been part of? Well, here's your chance. Mark the 6 December in your calendar, and get yourself signed up.
'We've got a dozen photographers already signed up,' says Triggertrap's Head of Happiness Helena Vieira, 'and we'd love to get some more of you involved.'
Well, you heard the woman - sign up here!
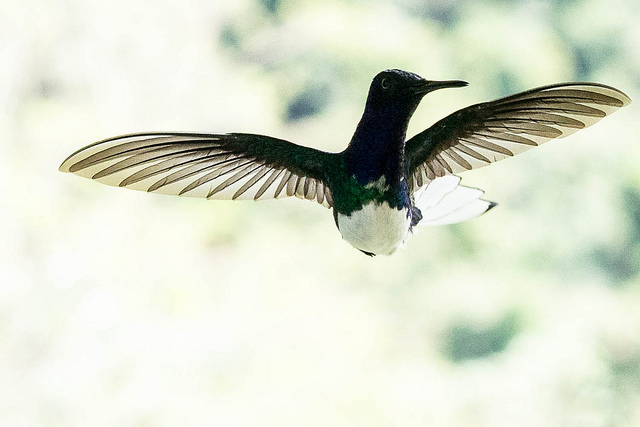
The cool photo at the top of this story is (cc) Stephen Clarkson
Have you ever had someone take a photo of you and a friend, only to find out later that they cut off the tops of your heads? It looks ridiculous, and if someone’s head 'sticks out' of the composition, your photo is ruined. In other words, it’s not hard to imagine where the don’t-crop-people’s-heads rule came from. When you are working with people and portraits you will soon learn that there are good ways to crop people, and others that are not so good. Cropping heads is at the top of the naughty list. Don’t do it!

Except that, sometimes, cropping heads can be highly effective.
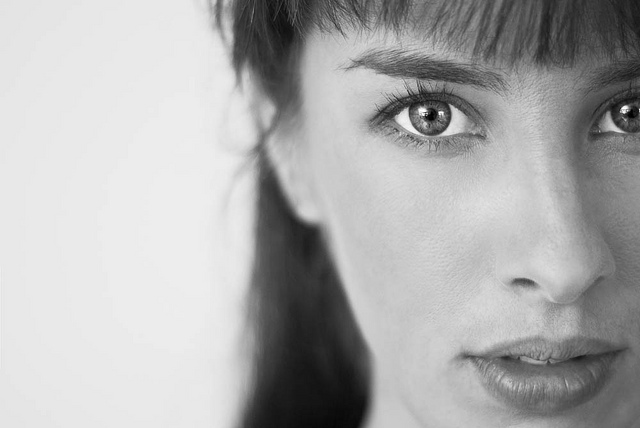
When can you break this rule-of-rules? When you've got in close—really close—to your subject. If your composition is focused only on somebody’s face, it can improve the shot to crop in close.
Don't be afraid to break the rule and crop in close and slice something off of the top, bottom, or sides of the head when the features of the face are the focal point of your composition. The reasoning is this: if you’re going to get in close, get in really close. By filling the frame completely with someone’s face it can make cropping her or his head unavoidable, but it also doesn’t look unnatural.
The key is to decide whether your composition is mainly about the body, upper body (shoulders and above), head, or just the face. Each type of shot has a different purpose, and only the face shots will look natural if you decide to crop the head. Otherwise it merely looks like you failed to plan your shot.
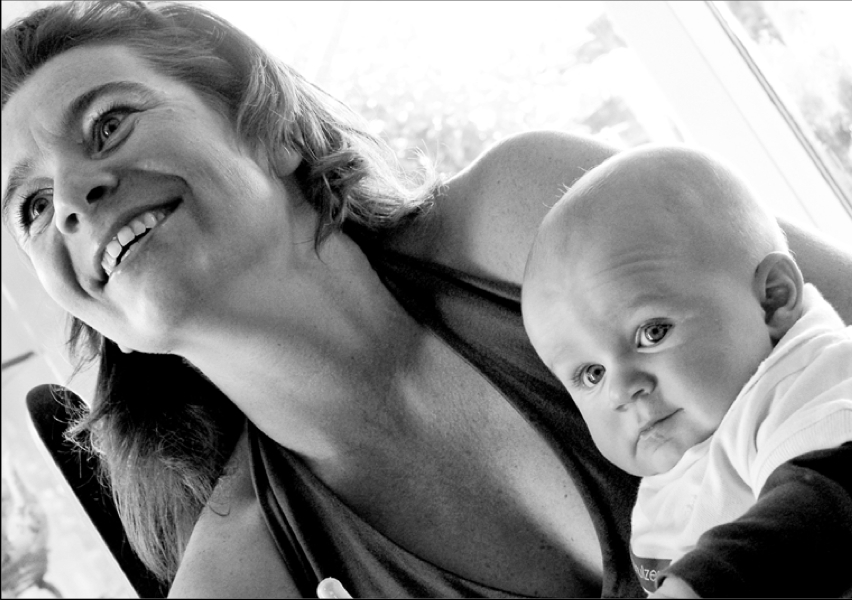
But in-keeping with the adage that if you're going to break the rules, break them properly, if you are going to crop into somebody’s head, make sure that you do it properly. A composition where only a thin sliver of someone’s head is cut off looks accidental. If you go even closer and cut them off across their forehead, the composition looks a lot more powerful, and at least nobody is left wondering whether or not you did it by accident!
Be bold!
 More unusual ways of looking at things, remembering rules, and then breaking those rules, are in my lovely book, The Rules of Photography and When to Break Them. It's available as an e-book and in a dead tree version (UK, US).
When you've been shooting for a while, you might start to notice that as well as being able to handle your camera more deftly, you're also pressing the shutter more instinctively and with a greater degree of conviction that you'll create a good image. Indeed, you are producing a greater number of better photos. While this might seem to be some form of photographic clairvoyance, it's actually rather more prosaic than that. You've actually grown more observant as a photographer and instead of developing some kind of sixth sense, you're learning to look.
First and foremost, and maybe without even realising it, you're becoming more attuned to light, to its quality, to its direction, to its temperature, and to its quantity. You're getting a feel for the type of light that makes for great photography and you're growing a better understanding of where to stand to make the most of it.
If you're still learning about light, start by thinking about from where the light is coming and how it's falling on your subject. Consider what's illuminated, what's in shade, and how where you're positioned will have an imapct on that.
When you understand how a game is played or the schedule of an event, it makes it easy to anticipate how things might go or what should happen next. For example, a tennis player about to receive a serve is likely to stand on the appropriate side of the court; a religious marriage ceremony usually follows a particular format. These are illustrative examples of 'domain knowledge.' By knowing how tennis is played and religious weddings are conducted, it gives you a fighting chance of predicting what’s going to happen next.
That sort of 'domain knowledge' is vital in many aspects of life, but it's also darned useful when it comes to photography, whether it’s nature, landscape, portrait, wedding, or even street photography.
The more familiar we are with our subject matter, the better we become at anticipating its 'movement': its pace, nuance, and rhythm. If you photograph enough sunrises and sunsets, you'll develop an intimate knowledge of how the light changes as the sun sinks beneath the horizon or the impact of clouds on colour. Similarly, if you spend enough time observing people in a particular public place, you’ll become more familiar with the way they interact with one another within that space. Complete enough portrait sessions and you’ll become quicker at noticing how comfortable or otherwise your subjects are in front of the camera, and interact with them so that you are able to capture their essence.
When it comes to sports photography, knowing how the game works and what to expect is a vital element in ensuring that you can get a shot. Understanding the idiosyncracies and routines of animals will help you with your wildlife and your pet photography.
This increased observance, whether of people, environment, or structure, increases your chances of capturing a precise moment because you know what to expect.
It helps then, to be prepared for whatever it is that you're planning on photographing. As well as doing some research, make an effort to actively think about what you see. Even when you're out and about and not especially in a position to be taking photos, train your eye to look for 'moments': for shafts of light, for interactions and reactions, for interesting backgrounds or subjects. Being able to anticipate what comes next will help you to get the shots you want.
Perhaps the most common mistake anyone who's new to photography makes is adopting a 'scatter-gun' approach. All too often when confronted with a scene worthy of photographing, the temptation is to fire away without really thinking about the images we’re capturing. This is partly because it costs nothing to take a photo these days, and partly because we feel that if we take enough shots we’re bound to stumble across the image we want to capture.
This is something that we've covered in depth of Photocritic before now, but it bears repeating. It is much better though to slow down and spend some time observing the subject. This isn’t always possible if you’re photographing a short-lived or unexpected event, but in most cases you do usually have time to consider your subject and assess it for its specific qualities. You can explore a variety of shooting angles, change your point of focus or depth of field, or wait for a change in the light, even shift your subject’s position or posture. You should learn to visualise the image you want to capture and actively seek out that image, rather than reacting to images you’ve shot in the hope that one of them fits the bill.
As a photographer, you're usually aiming to ensure that your photos are well-exposed and have an even tonal distribution. If you were to look at the histograms from these images, the data would be spread across them. Neither the shadows nor the highlights would be 'clipped', or have areas that are so dark or so light, respectively, that they contain no data. If you were to look at these images, they would look 'right', and be pleasing to the eye.

However, that isn't always going to be the kind of story that you want to tell. On occasion, you are going to want to convey a dark and brooding narrative, maybe even so far as to be menacing, that delves into darkness. You will look to shoot a low-key image.
Low-key photography is a style of taking pictures that focuses on producing shots that mostly include dark tones—a person in a dark room with only a tiny bit of light on their face is a good example. You might have noticed how products are often shot using low-key photography, too.
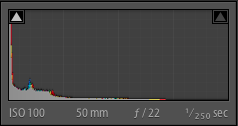 If you were to look at the histogram of a low-key image, you'd see that the majority of the data are pushed towards the left-hand side. Don't worry that your shadows might be clipped: it's a part of the look.
You're aiming for extreme contrast in a low-key shot, with most of the image dark or even fully black with just a little of subject highlighted to draw the viewer's eye. Since a lack of lack is your primary tool in taking a low-key photo, it's actually fairly easy to set up and while you do need extensive control over your light source, don't think that you require an elaborate studio.
One method of getting the low-key feel is to place the subject in a dark room, then turn the light on in an adjacent room. Open the door just enough to get the right amount of light on your subject, but not enough to light up the background.
Another means to getting a low-key feel is with candle-light, which can elicit a suitably gothic feel, or by using a torch. Torches are easy to direct and definitely cheap! If you want to start manipulating light in your photography but don't yet have the means or desire to go the whole hog with flashes or a studio set-up, low-key is a good option.
You will certainly need to be in manual mode in order to achieve a low-key shot. If you leave it to your camera to decide on optimal metering, it will try to over-expose the scene and ruin the effect. Using spot-metering to expose for the sliver of light, wherever it might be, is a good idea, too. This will help to keep that area light but the shadows dark.
The general rule is to keep things dark. Complete blackness around your subject (or even as part of your subject) is perfectly acceptable.
Ideally, the combination of manual control and carefully manipulated light means that you won't need to adjust the exposure beyond the odd tweak to the blacks or the highlights to ensure that they're sufficiently dark or light. It is worth considering converting your low-key images to black and white: initially, this can help you to identify and perfect the contrast in low-key images but over all it can help to increase the drama and mood in the photo.
More unusual ways of looking at things, remembering rules, and then breaking those rules, are in my lovely book, The Rules of Photography and When to Break Them. It's available as an e-book and in a dead tree version (UK, US).
Last month I was invited along to the inaugural EyeEm Festival & Awards. Among other things, I was on a panel on "The Camera of Tomorrow". I do quite a bit of panel-ing (is that a word?) but I'm unable to shake this particular one from my mind, because at some point, the discussion wandered into a topic that I haven't given much thought so far: Who actually consumes photography?
One of the big and scary ideas that came up was that the average photograph - or frames in a video, as may be the case - are no longer primarily for human consumption. As computers and image recognition becomes better, we now live in a world where even though if your photo is seen by 50 of your friends on Facebook, that very same photo will be seen by hundreds, if not thousands, of robots. Image recognition bots, facial recognition bots, localisation calculation bots, Google Images, scientific and statistical analysis bots... Who knows.
If you think about it: say you are a scientist who is trying to map the increase or decrease of water in a particular lake. You could install expensive equipment - but where would you get historical data? Well, if that lake happens to be a popular holiday destination that people tend to share photos of, you could actually do image-driven research: Photos taken on smartphones are tagged in the metadata by time and GPS location; Scrape the internet for photos taken in that particular location, then use image recognition software to estimate the water level in the lake. Science fiction? Nope - perfectly possible, and projects like this are already in action at universities and in commercial settings all around the world.
That's a relatively benign example: What about the data we put out there ourselves? That the trend of taking selfies is an incredibly powerful tool: By posting photos to Twitter, and describing (or even hashtagging) the photo as a 'selfie', it means that over the years, computers can start to map your ageing process, and potentially learn about the way that human faces tend to age. Add a layer of geo-location on top, and perhaps scientists will find that humans living near power stations have, on average, slower hair growth (just to pick an example). To a data scientist / statistician, the possibilities are absolutely mind-boggling.
Of course, there are less salient uses too: By posting selfies online, you're feeding an incredibly powerful facial recognition opportunity: Facial recognition based on a single photograph can be incredibly difficult (think about it: You're just a new pair of glasses, a baseball cap, or a beard away from looking very different from a single photograph). If, instead, one were to collect all the photos I've ever posted of myself online, you've got a huge amount of data: What I look like in different lighting situations, with a hat, with a beard, with glasses on, in the morning, in the evening, smiling, angry, moody... All of this is data that could be used to create a mathematical formula for what "I" look like. Feed that into a network of CCTV cameras (they say that you can travel from anywhere to anywhere else in London without ever stepping out of reach of a CCTV camera), and it's possible to track my every movement through my home city. Scary? Perhaps - but against that lens, it becomes all the much clearer that the chief consumer of imagery is, indeed, computers - and by sharing photos of ourselves, we're making it all a lot easier for whoever wants to track us around.
Ok, so we're being ruled by robotic overlords; what else is new... Is there anything humans can actually do better?
Of course, you can teach a computer to take photographs - it isn't even a very big challenge. A computer could even take some highly proficient photographs, technically: Focus, white balance, depth of field, colour saturation - even triggering the camera at exactly the right point in the process of taking a photo is all describable mathematically, which means that computers are rather good at it. In fact, when you think about it: Most of us heavily rely on computers already: Exposure light meters, automatic focus - they've been the computer-powered helpers in the world of photography for years, and we wouldn't want it any other way.
The other side of photography, however is trickier: The artistic side. This is where a recent XKCD comic hit the nail on the head:

Put simply, whereas a photo can be objectively 'bad' technically (Out of focus, motion blurring, white balance issues, exposure issues, wonky horizons, etc etc etc), deciding what makes a good photograph creatively can be very difficult to ascertain even to humans (Go on, give it a shot: See if you like / admire / understand why each of the top 10 photographs picked by Time magazine to be the best of 2013 were chosen. There is a recurring theme; more about that below).
Of course, what makes a 'good' photo is partially down to taste and cultural convention, but also down to a very difficult to answer question in general: What makes a good photograph? There are a few technologies that already exist to help people determine which photo in a burst of shots is 'best' tends to be limited to technical elements (From a set of 10 photos, pick the photo with the least camera blur, the least motion blur, and where people aren't blinking), rather than the aesthetic side of things.

The other - and perhaps most important part - of photography is where machines truly fall short: Computers may one day be able to create photographs that are technically proficient and aesthetically pleasing, but the most powerful photographs are the ones that have a third layer: A story that's worth telling; a story worth listening to, and thinking about.
Every photograph that ever tugged at your heart-strings will have done so because it tells (part of) a story. In fact, the photo doesn't even have to be particularly creative or technically perfect - a slightly blurry photograph of your recently deceased grandmother could move you to tears - not because of the photograph, but because of the story it tells.
Ultimately, the story is all that matters; A technically perfect photo of a person is a photographic rarity, and may be interesting for that reason. If the lighting and setting is also great, you may be on to a good artistic photograph too. But the reason we identify with portraits is the stories they tell: Either because we (think we) know the person in the photo, or because we, as human beings, relate to something about the person in the photograph.
It may very well be the case that machines have overtaken humans as consumers of photography, but machines have a different purpose than humans: Computers see photographs as datapoints in an almost unfathomably large matrix of data. Humans see photographs as stories and memories. Maybe that's a thought worth taking with you into your next photo shoot - I certainly will.
I'm not known for my physical exercising prowess - in fact, thinking of going to the gym sends me into cold sweats, which means that I felt I've exercised, so I don't go. When I realised I was going to have to spend six days straight at Photokina, on my feet, demoing demoing my little heart out for my day job, it served as a great reminder for why I stopped carrying a full-size SLR camera: Less weight = less exercise. Perfect. At Photo Plus back in October, I first saw the Sony A7, and I fell a little bit in love. I traded in my Canon 6D in favour of a Sony A7, and I haven't looked back - to my particular photography needs (I travel a lot, I want high quality photos, I don't really do sports, and I don't need fast auto-focus), the A7 is a perfect camera.
However the A7 is still an expensive piece of kit, and carrying it around safely for six days straight was always going to be a challenge: I need it to be easily available for demoing Triggertrap to people, but I also need it to be safely stashed away. That's where Cosyspeed Camslinger 160 comes in.

Cosyspeed is a relatively new company, and they're focusing on making product especially for mirrorless cameras (hence the name - Cosy, I'm going to guess, is short for Compact System, which is one of the names that didn't quite stick for mirrorless cameras, alongside 'EVIL' - short for Electronic Viewfinder, Interchangeable Lens). The camera bag comes in two sizes, the slightly smaller 105, and the larger 160. Both of them are designed to wear at the hip - and it does make you feel a little bit like a cowboy wearing them.
I've tried a great many carrying systems in my life; some of them - especially Peak Design's offerings - are fantastic for large SLR cameras with honking great lenses attached. But the one problem all other carrying systems have, is that you have to keep your camera exposed to the world: Unprotected from rain or bumps. Of course, with a full-size camera, you don't really have the option of protecting it - but surely, these kinds of innovations are precisely why we are looking at more compact cameras in the first place?
I was amazed by the Cosyspeed Camslinger bag - I wore it for 6 days, 12-16 hours per day, and I was constantly demoing, so I found myself accessing the bag hundreds of time per day. It's a great quick-draw solution, meaning that your camera can stay protected whenever you don't need it - and easily available when you do need it.
At this point, I briefly have to sing the praises of the closing mechanism...

I've never seen these kind of pushbuttons used on a camera bag before, but they're brilliant. To close it, you simply push down, but at that point, the bag is securely closed (you can also use the bungee cord to add a second layer of security on top). It takes a little bit of time to get used to, but it's a fantastic system, meaning I can have my hands free, then suddenly just magic my camera out of the bag to show someone something (or to take a photo, of course).
With the bag, it doesn't really make sense to use a camera strap - good job, then, that the guys have also created a finger-strap. I think in the longer term perhaps a proper hand-strap might be a better way go to, but in the couple of weeks I've used the fingerstrap, I've grown to love it - it's small and simple, and just means you have a second chance in case someone bumps into you and you drop the camera - another advantage of the mirrorless cameras, of course: Try trying to save a full-size camera with one finger!
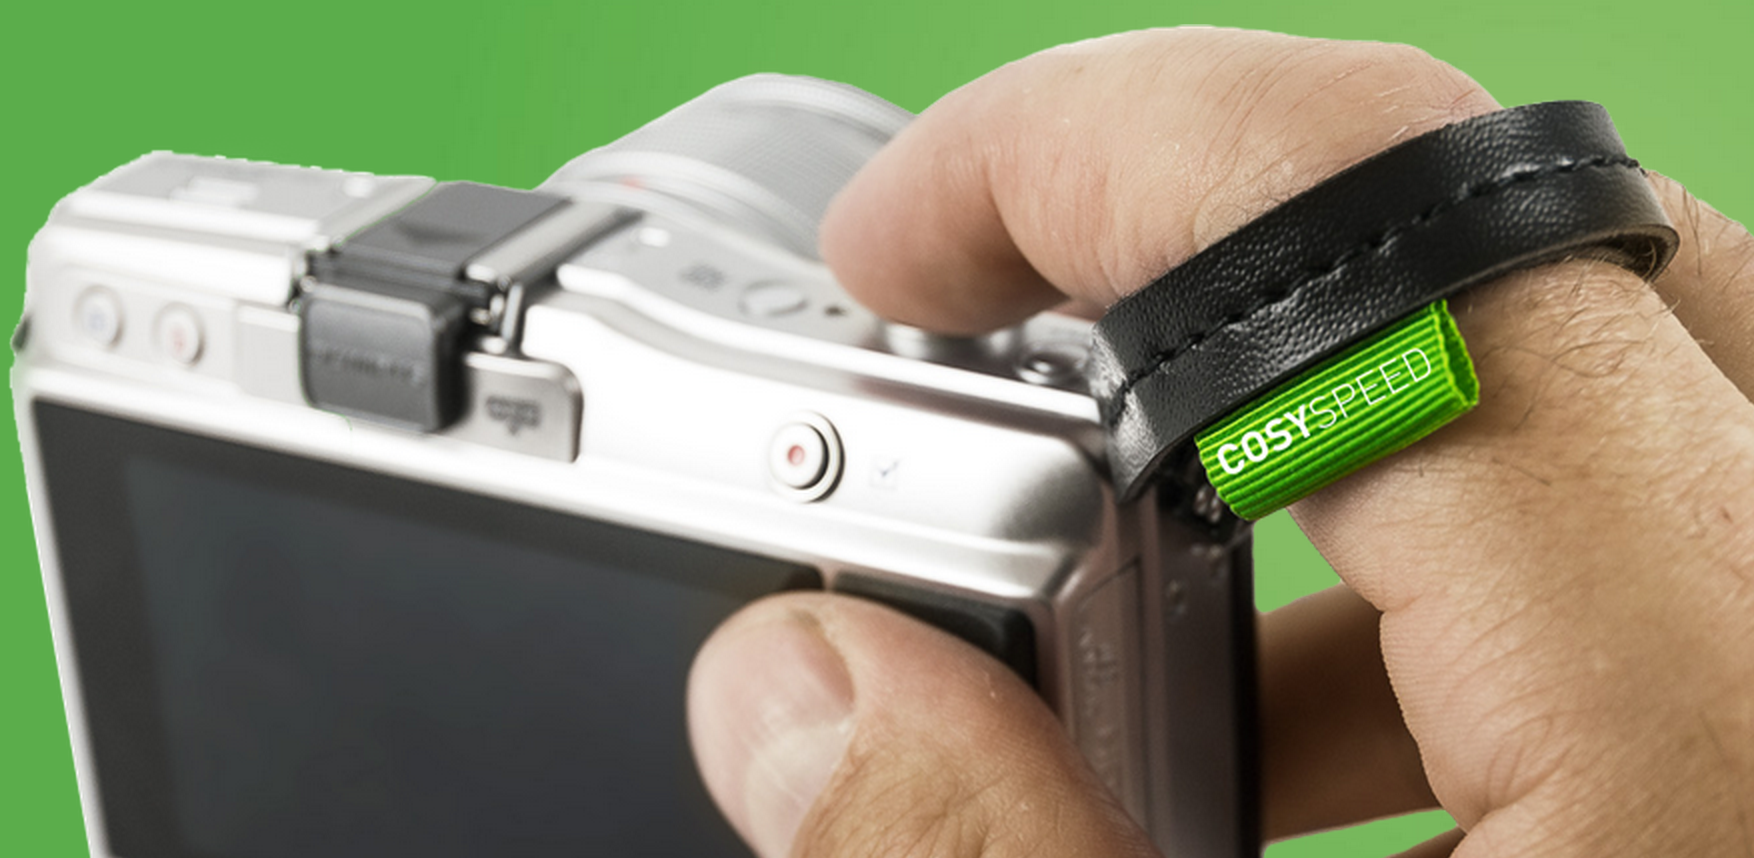
All in all - if you shoot with a compact SLR or a mirrorless camera, I think it's very much worth giving the Cosyspeed bags a closer look - They are by far the best camera bags for mirrorless cameras out there - They're well designed, well made, and I'll certainly be using mine for many years to come - it's a perfect match with my Sony A7 and the way I like to shoot.

There are three things that affect an exposure: speed, aperture, and ISO. They work in a triangle to achieve an exposure.
When you give with one you take with another to ensure that you don't over- or under-expose your shot. In your early days of setting your exposure manually, it can be a bit tricky to remember how they fit together. But if you think of exposure as a glass being filled by water from a tap, it might help. Here's how it works.
Think of aperture as how much you open the tap. The wider you open it, the more water flows into the glass. Open the aperture wider and you let more light into the camera.
If aperture is how far you open the tap, shutter speed is how long you open the tap for. If you open it for a long time, a lot of water comes out. If you open it only briefly, just a little water comes out.
The final control in the exposure triangle is ISO. From the perspective of our water-glass analogy, ISO could be described as the size of the glass. At a low ISO, the glass is a large one. At a higher ISO, the glass is smaller. In effect, if you are shooting with a high ISO, you need less water to fill the glass.
Much like filling a glass with water, getting an exposure can be achieved quickly or slowly, but you'll get there in the end. You can use a trickle of water—so that would be a small aperture—for a very long time, and the glass will eventually be filled. Alternatively, you can open the tap all the way—the equivalent of a large aperture—very briefly, and the glass will be filled.
The same is true in photography. Two different exposure settings can result in the same amount of light being recorded inside the camera.
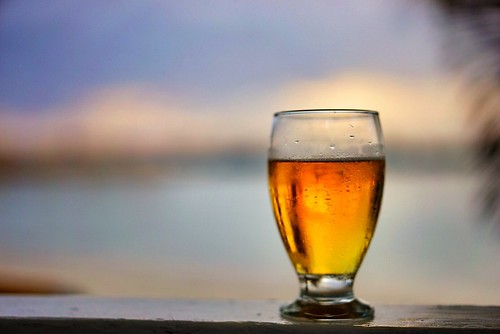
Okay, it's a glass of beer. But that's much more fun than water.
How, then, do you put this into practice? It depends on what you want to achieve with your photo. If you're looking to secure a particular depth-of-field you'll set your aperture accordingly and then adjust the shutter speed and ISO to complete the exposure. For a long exposure shot you'll need to think about whether it needs a small or a large aperture and a low or a high sensitivity.
Drink up!
So, you're ready to do a photo shoot? No, seriously, are you really ready for your shoot?
A while ago, I was challenged with creating a pre-shoot checklist for photographers - I figured it'd be rude not to, so I gave it a whirl.
Best of all, if you want a handy, keep-in-your-pocket version of this checklist, it's printed on the back of my super-handy Photocritic Grey Cards. Spiffing.