The 1% club of amazing photos

earthshots-thumb

Today, it’s exactly 1,000 days ago since my good friend Will started a little website called Earth Shots. Its concept is pretty simple; invite people to submit some of the best photos in the world, and let them stand as a glowing beacon of inspiration for other photographers to aspire to, one image per day. A couple of years ago, I did a run-down of some of the best photos that had come in so far, and it was fantastic.

I still visit Earthshots frequently, and if you’re a photographer who hopes to improve your work and your eye for a good photo, you could do a whole lot worse than doing the same. Why? Well, I’ve 10 excellent reasons (or 10,000, if we are going to agree that each photo is worth a thousand words) for you right here… That’s right, out of the past 1,000 day’s worth of photos, we’ve picked the 1% we think are the most amazing, the funniest, and the ones we think will make you reach for your camera and go “Hells bells, time I took some photos this good”.

Oh, and before you scroll down, you might want to put a pillow on your desk, otherwise you might get injured when your jaw smacks open against it…

10 of the best from the first 1000 days

Descending Mt Rainier by Joel Schenk

Will says: I really love this image! It captures the spirit of adventure and the solitude of the climber. Looking out over the sea of beautiful white clouds, it is easy to imagine that heaven might look a little like this!

Haje says: There is something really awesome about photographs depicting an epic battle between man and natur – the clouds threatening to engulf them where they stand, plus the hint of colour along the horizon – a fantastic capture. Not so sure if it’s about solitude though; someone was there to take the photo after all :-)

Turtle by Thomas Vignaud »
Turtle by Thomas Vignaud

Will says: This was one of the most popular Earth Shots winners ever and it is easy to see why; the jaunty angle, the expression of the turtle, the vibrant colours and the palm in the corner ñ all the elements come together to create a wonderfully engaging and striking animal portrait.

Haje says: Wow. Just wow. I have no idea if this is a HDR shot, if this is even a real turtle, or what in the world is going on here, but one thing’s for sure: it’s a stunning photograph. Such a truly fantastic detail and clarity, coupled with great colours and fantastic framing… An obvious winner

Salmon Netting by Fiona Halliday »
Salmon Netting by Fiona Halliday

Will says: The composition of this image breaks all the rules… but that’s why I like it! With two thirds of the frame filled by tumultuous, black water, the viewer becomes totally immersed in this Scottish salmon farmer’s unforgiving world.

Haje says: This photograph is purely and exclusively about the action: The water streaming against him, the fish fighting in the net, the quick-flowing water. He’s wearing a hat, so it’s easy to understand it’s cold, and you can just see the wet, cold rawness on his hands – an ususual framing, that’s for sure, but I’m feeling the struggle, here. Great stuff.

In The Beginning by Stephen Oachs »
In The Beginning by Stephen Oachs

Will says: This is an incredibly atmospheric image, reminiscent of the dawn of time. The abstract shapes, blurred spewing water and wonderful dawn light all contribute to the primordial, otherworldly sense of place.

Haje says: I have no idea what is going on here – but it looks as if someone broke into China Mieville’s world, and took some photos while they were there. It happens quite rarely that you’re able to capture pure magic, but I think that might very well be what you’re looking at here, folks.

Fields of Gold by Allard Schager »
Fields of Gold by Allard Schager

Will says: This is possibly the most vibrant photo ever to have appeared on Earth Shots! The strong colours and straight lines are very sticking and the people in the background give you a great appreciation for the scale of this incredible Dutch tulip field.

Haje says: I think the people in the background are what really make this photo – I’ve seen these tulip fields before, and they’re stunning, but notoriously difficult to photograph in such a way that you get a feeling for what you’re looking at – the people add a little bit of a break from the monotony of colour – and it’s bloody awesome to boot.

Highway to Heaven by Santi Banon »
Highway to Heaven by Santi Banon

Will says: This is another image that is reminiscent of heaven (assuming there are cars in heaven)! The warm light, flowing clouds and strong composition make this a beautiful and very unusual image.

Haje says: This is just fantastic – the light, the clouds, the mountains; the way the clouds seem to be welling up against the motorway without actually breaching across it in the foreground, while completely engulfing it in clouds and light towards the end. The title might be called ‘highway to heaven’, but if Tolkien had written Lord of the Rings set in the modern age, that’s what I envision the highway to Mordor to look like.

Taj Mahal by Thamer Al-Tassan »
Taj Mahal by Thamer Al-Tassan

Will says: As travel photos go, this is a pretty good one; we have all seen a million photographs of the Taj Mahal so it is quite an achievement to get a picture that makes you go wow! There are several elements that come together to make this image so good – the textures accentuated by the choice of black & white, the different shapes all mirroring each other and the lonely figure in the doorway.

Haje says: The Taj is a very, very stressful place to visit, and it happens incredibly rarely that you see it devoid of ten billion tourists; it’s easy to forget that it’s a spiritual place to many, and the person sitting here, seemingly meditating on its beauty is a gorgeous reminder of how that is still the case. I love the contrasts, the framing, and its subtlety.

Cold Morning by Kevin McNeal »
Cold Morning by Kevin McNeal

Will says: The expanse of ice, the blue tones and jagged mountains in the distance are so cold they almost make you want to shiver! However, it is the luminous ice-fissure in the foreground that makes this image so interesting and striking.

Haje says: This is such a contrast-rich photo that I scarcely know where to begin – it’s the peaceful skies vs the dramatic ice. The cold tones of the blues and whites at the bottom vs the warm reds and yellows and pinks of the sky. The rounded shapes of the ice vs the pointy mountains. Fab.

Bee-Eaters by Edri Shimon »
Bee-Eaters by Edri Shimon

Will says: We see many bird images submitted to Earth Shots but this one really stands out from the crowd. It is not just that these bee-eaters are ridiculously colourful, it is their poses and expressions that make this photograph so engaging and comical!

Haje says:This photo would make for a great entry for a caption competition: The dude on the left saying something outrageous, whilst the fellow on the right goes ‘well, I don’t really know, my good man’. I love the diagonal composition, the strong colours, and the hazy background which contrasts so well with the action in the foreground. Great stuff.

Climbing During Sunset by Lukasz Warzecha »
Climbing During Sunset by Lukasz Warzecha

Will says: I have saved one of my all time favourites for last… where do you even start with this image?! The sense of isolation, scale and drama – it really is jaw-dropping!

Haje says: … (what can I possibly add to this?)

Go on, you know you want to…

For more fantastic images of our planet, check out the current photo of the day or have a look through the EarthShots.org archive.

This post was co-written by Will Burrard-Lucas – checkout his blog or follow him on twitter.

All photographs are strictly © their respective owners, and are used here by permission of Earthshots.


Do you enjoy a smattering of random photography links? Well, squire, I welcome thee to join me on Twitter -

© Kamps Consulting Ltd. This article is licenced for use on Pixiq only. Please do not reproduce wholly or in part without a license. More info.

Self-Portrait Friday

3628446539_731ddcf644

I’ll be perfectly honest with you: I feel a bit sad. Here I am, a world-famous blogger (well, I can’t but hope. And my sister lives in Vietnam at the moment, so between London and Hanoi, that covers most of the world, right?), but I haven’t yet created any internet memes, so I figured I’d start one right now, along with a cause I get behind fully. It’s simple: 1) Take a photo of yourself. A good one. 2) Post a link to it on Twitter, using the #selfportraitfriday hash-tag.

Apart from making me super-famous (which is, believe it or not, not my chief objective with this project), getting into the rhythm of taking at least one self-portrait every week is great practice.

But why should you bother with self portraits, and why am I so strongly in favour of ‘em? Read on, fellow shutter-soldier, for my 10 tips to better self portraits, along with the whats, whens and wherefores of onanistic photography fun.  

Why bother with self-portraits?

Self with HairInspiration hits at the strangest of times – sometimes, all it takes is to see the light fall in a special way, a reflection, or just the sudden, uncontrollable urge to hear that sweet, sweet mechanical noise of the shutter going “kerr-chunk” (or “…” if you’re one of those smug, whisper-quiet Leica rangefinder owners). There’s nothing quite as annoying as not having a willing accomplice around to help you fulfill your photographic ideas – so perhaps you should turn to the only model you’re guaranteed to have around at any time: yourself!

Self portraiture is a tried-and-tested tradition among snappers and MySpace-camwhores alike; but it’s actually an incredibly useful exercise for photographers: Directing models is difficult enough as it is (unless you’re working with particularly talented models, but that’s a different post altogether), and the only person who is guaranteed to be as patient as you when you’re fiddling with lighting is yourself.

So; why not make it a habit to force yourself to take a self-portrait at least every week? It’s an interesting and frequently illuminating thing to do; how often do you get a chance to think about how you would like to project yourself to the world, who you really are, and how you’d like the world to see you?

10 Top Tips for better self portraits

Serenity is overrated1 - If you’re taking photos in a studio, use a mannequin for light testing: Much easier than guesstimating!

2 - Think about your motivation and emotions: Blankly staring at the camera rarely gets good results. Be silly, don’t be afraid to over-act. The worst that can happen is that you fill up your memory card with useless photos; but you might also find yourself with a proper gold-nugget of a self portrait.

3 - If you’ve got a remote trigger, that’s usually a better and more controllable than trying to use the self-timer.

4 - If you can, hook up your camera directly to your computer (or, for extra-fancy bonus points, your TV) so you can see your pictures come up as you take ‘em. It’s a lot easier to iterate and to make gradual improvements to your photos that way.

5 - Use a tripod. Seriously. While it’s possible to get good photos while you’re hanging on to your camera at arms-length, it’s a lot easier if you’ve got the freedom to move around a bit.

Self portrait with Socialism6 - Focussing is easier if you use a smaller aperture; My favourite lens at the moment is the Canon EF 50mm f/1.4, (hence the abundance of photos taken with it on Flickr, I suppose) but I’d probably not use it wide-open when taking self portraits; It’s tricky enough to get the focus right when you’re behind the camera – when you’re on the wrong side of the lens, having a slightly deeper DOF is a lot easier!

7 - Don’t be afraid to do a bit of photoshop jiggery pokery – you can do a lot of cool stuff by ensuring you’re in the photo multiple times, for example. Here’s how – and the Self-Kiss gallery on Trendhunter has some wicked ideas :)

8 - Use a mirror! It seems so obvious, but how to use mirrors is important, too – take it down from the wall, and experiment! Here’s a couple of examples to get you started: ValpoHB, Could it be a mirror on the floor?, Reflection of Myself, Alive and Her Reflection.

screen_shot_2012_07_10_at_110239.jpg9 - Use props! Are you a dad and a rocker? Bring your kid and your guitar. Are you a photographer? Add camera gear. Painter? Paint. Poet? Words. Make-up artist? Guess… You get the idea.

10 - Have fun with it. Be sexy. Be yourself. Be awesome. Be different. Be creative. Whatever you do, have fun with it. That’s part of the point, after all.

BONUS TIP: Finally, a controversial tip which not everyone will agree with: If you set up the shot and you decide on the lighting and camera position and what you are doing, but get someone else to push the shutter, it’s still a self portrait (the other person is basically acting as your remote control) – so don’t be shy about asking for some help with your self-portraits. As Scott suggested: “I let my young daughter have the shutter release – means it stays random and I’m relaxed!” – brilliant idea!

(thanks to @rchristopher, @netlenka, @markbrosnan78, @scottmliddell and @LaPetiteMort for input and tips above)

Show it off!

The Photocritic in RedThe best thing to do with self-portraits is to get them out there – sure, they’re great for learning, and good fun to take ‘em, but as a side-effect, you get some bloody great photographs of yourself, so why not just flaunt it ‘cos you’ve got it?

Post your best self-portraits to Flickr (remember to tag them with ‘Self Portrait’ so people can find’em more easily), update your FaceBook profile picture, or post to your blog with the details of your photo.

Then, if you’re one of these Twitterati-type people, post a link to your photo on Twitter using the #selfportraitfriday hash-tag – this allows other Twitter users to easily find other self portraits; a great way to get to know the people you’re following better, and to get a load of inspiration for your next batch of self-portraits. Oh, and it’s sort of cool to be part of something like that, don’t you think?

It’s example-o-clock!

The past few days, I’ve been gathering a wide variety of really random examples of self-portraits. If you’re stuck for ideas… You could do a lot worse than trying to emulate some of these ;-)


Week Four by LPM on Flickr (@LaPetiteMort)


133 of 365 by Andy C on Flickr (@andyctwit).


Hatman By Roger the Dodger on Flickr (@rogermcnally)


Untitled by kukkurovaca on Flickr (@kukkurovaca)


Selfportrait by netlenka on Flickr (@netlenka)


Just Me by HilaryQuinn on Flickr (@proximowebs)


Dual Umbrellas by Baggage494 on Flickr (@baggage494)


Film Noir 3 by Taurec on Flickr (@taurec)


We are Cats by CiaoChessa on Flickr (@CiaoChessa)


The Teacher Needs Two Glasses of Wine by Jess on Flickr (@veraciousjess) – see also the rest of her 365 day favourites, there are some really good photos in there!


1st self portrait by Mark Brosnan on Flickr (@markbrosnan78)


120 / 356 by John on Flickr

Odda, Hordaland, Norway
And finally, a self-portrait by, well, me. With my lovely Kawasaki Versys motorcycle, half-way on my recent 3,500-mile motorbike trip around Scandinavia

Finally, there are a few photographers who’ve been running some pretty awesome projects dealing exclusively with self portraits – the Self By Christy Marie (@ChristyMarie) website is an excellent example, but quite a few people are doing ’364 projects’ as well – one photo a day for some, one self-portrait a day for others – a quick search for 365 on Flickr throws up loads of interesting results. Happy browsing!

Laser-engraving my MacBook

blackbook

Those of you who follow my Flickr feed will have seen a couple of photos of my Black Macbook (affectionally known as BlackBook the Second), as it’s going through the process of getting the Photocritic.org URL engraved on the back – WITH LASERS! Obviously, everything to do with lasers has to be in all caps. Those are the rules.

Sadly, it seems as if something Bad Happened when I had my laptop engraved – luckily, the technician who did it has a solution: Why not colour it in with a Sharpie?


Back story

I’ve had my BlackBook for quite a while now, and I was considering replacing it in favour of one of those rather tasty-tastic new 13" Macbook Pro computers… One of my friends recently bought one, and my credit card has been sizzling in my pocket ever since. On the other hand, my current BlackBook is still relatively current, and it’s been upgraded to the max (I don’t remember what it started its life as, but it’s now a 2.0Ghz/4GB RAM/250GB HDD monster, which is perfectly adequate for most task, and still has reasonable battery life). So instead of plunging £1300 on the 13-inch MacBook Pro I’m lusting after, I decided to keep the BlackBook for another few months – or at least until the Apple Care runs out in March 2010.

To celebrate potentially saving £1300, I decided to spend £100 on getting the BlackBook laser engraved, because, well, lasers are reason enough in themselves.

BlackBook Laser Engraving 8: The original designI did a bit of Googling, and settled on using RazorLab; For one thing, if it’s good enough for Apple, it’s good enough for me, but also, they were among the first to get back in touch with me with a coherent response, and they’re based only a 10-minute motorbike ride from my house.

I drafted in a good friend of mine to try and help me design the logo; and while his design was absolutely wicked, it was a little bit too complicated. Instead, I ended up getting a vector graphic off istockphoto, and using that as the basis of my design.

At Razorlab

BlackBook Laser Engraving 2: Preparing the printSo, I booked my appointment, and went to see the lovely Soner who runs RazorLAB – he’s a true inspiration of a man; some of his product designs that were kicking around his office were positively brilliant. He took a look at my mock-up design, and discarded it out of hand; turns out that the machine can only handle vector graphics – luckily, I had also sent him the font I use on the logo and the vector, so we re-created it on his computer.

Then, a whole lot of precise measuring, placing the laptop inside what is, essentially, a fancy laser-printer (literally! It even uses printer drivers, which really amused me for some geeky reason) which can burn through all sorts of material. Thankfully, the engraving on the laptop was done at 30% power; I didn’t fancy having ‘photocritic.org’ permanently etched into my motherboard either.

About 45 minutes, a lot of interesting discussions about lasers, product design, Life as a Laser Etcher and £95 later, I was back on the street outside of RazorLab, with a freshly engraved MacBook and a renewed spring in my step.

The results

BlackBook Laser Engraving 6: The whole laptopWhen we were doing the etching, Soner did warn me that engraving large surfaces could cause some streaking; he also showed me an aluminium casing which had some slight streaking on it – not so much that I would be worried about it; it still looked pretty awesome. On my laptop, there was some white on some of the engraving, which Soner said was dust – so when I got home, I tried to clean it off, but to my surprise, it was going nowhere – whereas half of the laptop is very subtle (in fact, it looked bloody awesome – you can tell something is engraved on there, but you have to look quite closely to see what is engraved; it looks brilliant), the other half is streaked and milky white.

I tried cleaning it a couple of times, but the streakyness continued – so I e-mailed Soner to find out what I should do. Not much, as it happens: He said that “The problem with engraving big areas is that as the laser head moves away from the origin point (in this case top-left), the engraving results in different streak patterns -because of acceleration and speed changes at far corners”. It seems as if the problems are quite rare, too: “so far, we did not have any complaints with regards to this issue as people usually treat this as part of the process -it is within laser engraving’s nature to do these kind of effects.”

Of course, I knew I was going to be writing this review, so I tried to find out if there was any way to solve the issue – To be honest, and as I told Soner, I don’t mind the streak patterns, I actually think they are sort of cool, the issue is that they aren’t really even across the whole back of the laptop – the other thing that confuses me is that when you do a quick search on Flickr for ‘blackbook laser engraving’, you’ll see that there’s loads of people who have quite elaborate engravings on the back of their laptops – both with big areas and smaller areas – and while streaking is evident in some of the photos, it’s never uneven from one side of the laptop to the other; also most blackbooks seem to go a bright white when they are engraved (see this one, this one, this one, this one and this one, just to get a feel for it).

I spoke to Soner about trying to find a solution, and he said that while it would be possible, in theory, to re-do the engraving; in practice it’s impossible to line-up the laser with the previous engraving, so there wasn’t much that could be done.

What to do, then? “The only suggestion I could give is to paint the white areas with a permanent black marker. That should help to get rid of the gray gradient.”

So there we have it, I guess – As high tech as laser engraving is, if something goes wrong, the only thing you can do, it seems, is to break out your Sharpie.

Needless to say, I’m not particularly happy with the final outcome of the laser engraving, but as you can see from the Flickr links posted above, it’s possible to get gorgeous results. If anyone know what went wrong here, feel free to post a comment below – in the meantime, I’d probably recommend thinking twice about getting your expensive equipment laser engraved.

Photos!

For the photo gallery, check out these here pics on Flickr; or keep on scrollin’:

BlackBook Laser Engraving 8: The original design
The original design I came up with, before we had to re-create it as a vector

BlackBook Laser Engraving 1: preparations
The design is ready!

BlackBook Laser Engraving 2: Preparing the print
Soner preparing the LASER

BlackBook Laser Engraving 3: Close-up of the results
Results close-up

BlackBook Laser Engraving 4: URL close-up
Results close-up: the URL

BlackBook Laser Engraving 5: Back of the Laptop
The back of the laptop

BlackBook Laser Engraving 6: The whole laptop
I completely love the subtlety of the left-hand side of the laptop – just such a shame about the white streaky mess on the right-hand side of the lappy, where the logo is :(

BlackBook Laser Engraving 7: Good(ish) PR when I'm working in a cafe!
Looks pretty good when I’m working in a cafe – shame the logo is a bit lower than I had hoped (it is not really visible when the laptop is standing on a table – I’d hoped it was about 2 cm higher)

Featured on the Consumerist!

Seems as if one of my favourite publications – The Consumerist picked up on this story and did a short feature on it – which in turn attracted some good advice from Shane (see comment #2, below). Thanks for your help everyone!


Do you enjoy a smattering of random photography links? Well, squire, I welcome thee to join me on Twitter -

© Kamps Consulting Ltd. This article is licenced for use on Pixiq only. Please do not reproduce wholly or in part without a license. More info.

The 25 best of urban decay

udecay

I’ve got a guilty pleasure which I’d like to share with you guys – I love urban decay photography; I can spend hours on end browsing Flickr galleries tagged with Urban Decay… Brilliant stuff. I was talking about this particular style/subgenre of photography with my good friend Dave Feltenberger a few months ago, and he was enthused about collecting some of his favourite photographers and sites.

So, if you’re still left wondering what this whole ‘urban decay’ thing is all about… Here’s your chance to be flabberghasted!

Take it away Dave ‘Seinberg’ Feltenberger:

What is Urban Decay, and why bother with it?

Although it’s unfortunately becoming somewhat of a hip buzzword in certain areas of the photography community, Urban Decay remains a powerful subject matter for almost any medium. There’s something irresistible about these scenes, whether they’re urban, rural, industrial, or any human institution. Who lived there? What sequence of events led to the failure of this endeavor and to such a state of disrepair? The stories these places have—imagined or real—lead us to ask more questions and to be amazed by the smallest things. With age, decay, and a certain anonymity, something as simple as a reception desk at a hospital suddenly assumes gravity not matched by many feelings in our everyday experience. You wonder what the receptionist was like; the person’s feelings, ambitions, fears; finding a cheesy romance novel in the desk drawer blows your mind and you think, “Wow! Someone was actually here reading this!”

Well, so what? So somebody was sitting at a desk reading a book 50 years ago — why is a fleeting moment from an insignificant receptionist desk 50 years ago interesting? It seems like it shouldn’t matter, but these are feelings and thoughts that occur on encountering scenes of Urban Decay! What is it that makes Urban Decay so fascinating?

There’s simply the element of age, of course, just as pictures of New York in the roaring ’20s or Paris at the turn of the century are interesting. But Urban Decay is different: it has the age element and something else. I think at the heart of it is the jolt we get when we see human endeavors fail. Not in the way the Germans use the word schadenfreude—to delight in the failure or misfortune of others—but in fact the opposite of that. (I wonder: do the Germans have an antonym for schadenfreude?). In seeing Urban Decay, we have the gut understanding that we’re all in the same boat, and that everything ultimately decays. It takes constant effort to fend off the tendency of things to decay—but we know in our bones what our fate is, and the entropy of Urban Decay puts us face to face with it.

Whatever the feeling is for you, I hope the images collected below evoke some interesting feelings or if nothing else have a certain type of beauty that you enjoy. Oh, and the ordering is incidental; not meant to signify rank or importance; and similarly, there are surely other great examples out on the web, so this is to whet your appetite. Enjoy!

The 25 best of urban decay

1.) Ray Mortenson, Untitled

Urban Decay

Ray Mortenson is sort of an Old Master when it comes to Urban Decay. He doesn’t own a computer and still shoots film (never shot digital). The image below is in a show of 1980s Bronx Urban Decay photography he’s having at the Museum of the City of New York right now.

I love the image here: a bull’s eye saying, “Here. This is where it’s happening.” It’s perfect as a political statement, too.

2.) John Feckner, Broken Promises

John Feckner is probably more well-known than Mortenson, and he photographed the same subject matter: Bronx Urban Decay in the ‘70s and ‘80s. But while Mortenson quietly sat on most of his photos for years, Feckner made it a political issue and created images that struck a chord with more than just art school kids. And he’s still doing it.

Urban Decay

3.) Richard Nickel, Jr., Untitled

Okay, okay. I promise that not everyone will be from New York. But, uh, Richard Nickel Jr. is another New York photographer. There isn’t a lot of information available on him other than a short article from the New York Daily News, and his name is probably a pseudonym based on an early Urban Decay photographer named Richard Nickel, but Jr’s photography is certainly top-knotch. This photo is great in lots of ways; the framing is clearly meticulous: everything lines up perfectly. The light falling off to the left of the frame, the completely dark room ahead of us begging us to peek our head in. Beautiful.

Urban Decay

4.) Troy Pavia, Posts

I’m personally not the biggest fan of the other-worldly colors Troy uses his flash and a gel to make, as I think it can distract from his great photography that stands on its own, but no matter what way you look at it his photos are excellent. Others tend to love the colors so he’s a must on a list of great Urban Decay photos. Oh yeah, except he doesn’t shoot Urban scenes all that often—it’s usually some secluded town, highway stop, military base, or junk yard out in the California or Nevada desert—but Urban or Rural, the feeling that ties this subject matter together isn’t the dense population!

Urban Decay

5.) Mike O’Hara at Phattire.net, Sleeping

Full-disclosure on two fronts: first, Mike is also a New York photographer. And second, he’s also a close friend. His being a friend doesn’t change the fact that Mike’s a top-notch photographer, and incidentally one of the hardest working photographers I’ve encountered. Mike tends to be the brave one when shooting in (sometimes dangerous) abandoned spots, too—climbing fences, through asbestos-filled underground tunnels, slipping into small holes in windows…then yelling from the inside how to get in.

This image is titled perfectly: we see some machinery laying on top of rubble as if resting its head; the light is dim and fades off to the left. It’s literally like a hunk of metal is resting. Industrial decay at its finest.

Urban Decay

6.) Erik van Hannen, The Master Bedroom

Erik is a Flickr’r, although thankfully not a New Yorker; he’s a compatriot of The Photocritic and from the Netherlands. This photo was taken in an abandoned house somewhere in France. I love how the blinds are still up, blankets are on the bed, a lamp is on the side table, and there’s only a minor amount of chaos. It’s as if whoever was living there decided one day, “I’m leaving” and left everything behind. You can practically feel the presence of the prior inhabitants. I wonder if there’s a trashy romance novel next to the desk lamp? ;-)

Urban Decay

7.) Scott Haefner, The Thomspons

Scott is a photographer who shoots in California and some of his work is similar to Troy Pavia’s. This photo is a great example of leading the eye: the steps take us up a rickety path to a rickety porch where there’s a light waiting for us at the front door. Great stuff, and a good use of artificial lighting.

Urban Decay

8.) SolusPharus, Last Smile

Another aptly titled image, this shows windows that are seemingly peering out at the viewer from the rubble of its decaying walls.

Urban Decay

9.) Evan Helfrich, Untitled

Evan takes great abstract Urban Decay photography. Often you understand that it’s something decaying, but you can’t tell exactly what it is. And that’s the point: to grok it aesthetically, not intellectually.

Urban Decay

10.) “ste-peg“, The last second before darkness

“ste-peg” is from Italy and has some really great industrial decay in addition to more unique photos as in the image below. Since he’s in Italy, he has access to some incredible abandoned sites that don’t even exist in places like the US: ancient churches!

Urban Decay

11.) Andy Ilachinski, Untitled

Andy’s photography from his website is almost exclusively Black and White, and almost all of it is absolutely fantastic. His Decay photos tend to be simple compositions and high contrast, while expressing a loneliness that is very hard to capture.

Urban Decay

12.) Patrick Joust, Hardware

Patrick is a Baltimore, Maryland photographer who captures the moments of Baltimore’s often depressingly decaying urban environment. His Flickr stream tends to focus less on abandoned buildings and more on the areas of decay that are still in use. His photo here is an all-too-common sight in Baltimore: a deceptively lonely area that feels abandoned but is in fact actively inhabited by people.

Urban Decay

13.) Ben Borgman, Untitled

Ben doesn’t have much information about himself in his Flickr profile, but this snap of Winnie the Pooh forgotten next to a harsh concrete stairwell struck a chord. Pooh looks innocent, lonely, and concerned—or am I anthropomorphizing?

Urban Decay

14.) sisms, House Print

This image has great contrast and composition, showing the only remains of a house that was removed from the side of a building.

Urban Decay

15.) Hours of Darkness, Windows of the Past

Hours of Darkness is a good site for information about abandonments and documentary photography. This photo rises above most of the rest artistically, however, in its great night shot of moving clouds in front of an imposing building that’s now harmless and abandoned.

Urban Decay

16.) DetroitYES, Untitled

DetroitYES might need a little help with site design, but the writing is good and there are fascinating documentary photos of important decaying historic buildings related to American industrialism. Detroit is a case study in Urban Decay: once the center of the universe for the automobile industry and American industrial might, but now bleeding population (and tax-payer money!) out all pores while the memory of its greatness rapidly fades. This image is a perfect metaphor for what’s happening to the city.

Urban Decay

17.) Eric Gustafson

Eric’s site is filled with great photography (really—check it out!), including this one of an old truck that seems to still be holding its own against the forces of decay.

Urban Decay

18.) Eric Hart, Standing Figure

This was taken in a nearly-abandoned town in the middle of Pennsylvania in the US. The town is Centralia, and that steam is coming from an enormous underground coal fire that’s been burning for decades, not the subway. This is very good treatment of the subject.

Urban Decay

19.) Pascal Pollei, The final resting place!

Pascal has a whole Flickr set of Beelitz Heilstatten, an abandoned Soviet military hospital in what used to be East Berlin. This photo is a good disorienting composition of what must have been a disorienting place to be.

Urban Decay

20.) Andrew Qzmn, “Байки из Склепа” отдыхают

Thanks to my great girlfriend and her father for the translation of the title from Russian: Nothing Compared to Tales From the Crypt. And I agree – out in rural Russia, a beautiful abandoned house like this has to have a pretty bizarre story attached to it.

Urban Decay

21.) Ride My Pony, Sanvean

HDR can easily be overdone, and this teeters dangerously on that line, but the framing is exceptional and the content is also very interesting. Apparently the last person who used the computer wasn’t happy with his boss…

Urban Decay

22.) Sleepy City, MIG

SleepyCity.net is filled with great adventures and photos. This is from an abandoned Soviet military base in Mongolia. How cool!

Urban Decay

23.) Abandoned Japanese Bowling Alley

I can’t read Japanese, so perhaps a reader can translate the site, but those aren’t cannon balls: they’re bowling balls in an abandoned bowling alley in Japan. Here I thought it was all neon lights, cell phones, and top of the line DSLRs…who knew Japan had Urban Decay?

Urban Decay

24.) Guillermo, Muro I

This is a good offset composition of what seems to be a door or shutter on a decaying building.

Urban Decay

25.) Timothy Neesam, Broadway

Last, but not least, some God Beams as they’re sometimes called. It’s magical to see this type of thing in an abandonment: it shows signs of life and light in an otherwise dreary atmosphere.

Urban Decay

A big thank you to Dave!

Dave has a photography exhibition of his own Urban Decay photography, titled Traces, in Rockville, Maryland (a Washington, DC suburb). Traces is a collection of images of institutional decay taken over the past several years along the East Coast of the US.

The exhibition is on the second floor at the Glenview Mansion Art Gallery; It started at the beginning of July and finishes on July 28th. Directions
to the Art Gallery can be found here – why not swing by and take a look if you’re in the area, or check out the exhibition online at Dave’s own website.

Finally, if you’re in a stalking mood anyway, why not check out Dave’s Flickr stream – and especially everything tagged ‘urban decay’, of course…

Got your own favourite urban decay photographs or photographers? Leave a comment with a link, I’d love to take a look!

A note on copyright

These images are all © their respective creators. They are being used in low resolution under the “criticism and [...] news reporting” portion of UK Fair Dealing law. If you like the photos above, please click on the links to see the full versions on the respective photographer’s sites. If you are the copyright owner to any of the above photos, and you prefer for your photographs not to be featured in such a manner, please send me an e-mail, and I will see to that they are removed.


Do you enjoy a smattering of random photography links? Well, squire, I welcome thee to join me on Twitter -

© Kamps Consulting Ltd. This article is licenced for use on Pixiq only. Please do not reproduce wholly or in part without a license. More info.

The best camera is one you actually use

blurry-haje

Those of you who are following @photocritic on Twitter (or, in fact, if you were paying attention to the RSS feed), can’t have failed to notice that I was out on the road. If you’re making a particularly good job of stalking me, you’ll also have noted a load of photos posted to my Flickr stream, most of which were taken with my iPhone, and some of ‘em were taken with my little Canon Digital Ixus camera.

Yes, that’s right, I was out globetrotting – on a motorcycle, to be precise. Due to the extremely limited space I had available to me, I didn’t bring my full assortment of lenses with me. In fact, I only brought a single lens; My mighty fine Canon 50mm f/1.4 prime lens (I know I keep banging on about it, but you need a prime lens). Then, as I was traveling around, something very, very interesting happened; I didn’t use my SLR camera at all.  


What? No SLR?! You call yourself a photographer?!

I know, it surprised me, too; I brought my little Canon digital IXUS camera with me as a back-up camera, in case something happened with my big camera. And in case I was planning on going out drinking, in which case I consider the IXUS to be as close to you get as a disposable digital camera (have you noticed that you never lose anything you don’t really worry about losing, and always lose or drop your expensive stuff? Exactly…)

So anyway, I was riding along, and the first 1,500 miles, it was raining, and I had my Canon EOS 450D in the top box of my motorcycle. Which means that in order to actually get to it, I would have to:

  • Spot something awesome
  • Get on the brakes, nearly causing an accident with the car driving behind me
  • Park the bike
  • Put the bike on its side-stand
  • Take the key out of the ignition
  • Unlock and open the back box
  • Take the camera out of the back-box
  • Take off my gloves and helmet (can’t use the SLR with my helmet on)
  • Point the camera, take the photo
  • Put the camera back in the back-box
  • Close and lock the back-box
  • Get back on the bike
  • Start the bike
  • Ride off into the sunset

By comparison, taking pictures with my Digital Ixus was much easier; I was less worried about it getting wet, so I just carried it in the inside pocket of my leather motorcycle jacket. That means it’s protected from the rain by my outter rain layer and the jacket itself. As it turned out, this was more than a-plenty: The camera came out perfectly dry every time. Because of this, it was a lot easier to take photos:

  • Spot something awesome
  • Get on the brakes, still nearly getting myself killed because cage-drivers never pay attention, and because my motorcycle brakes are an order of magnitude better than any car brakes
  • Find somewhere safe to stop, and hold the bike upright with my thighs
  • Reach in my inner pocket
  • Point the camera, take the photo
  • Put camera back in inner pocket
  • Ride off into the sunset

All about the opportunism and impulsivity

Now, the fact that I was able to stop on a whim, fish out a camera without having to stop the motorcycle’s engine, without having to lock and unlock the suitcase strapped to the back of the bike, and without having to take my gloves and helmet off, meant that I started the trip taking photos with the Ixus…

… And then never stopped. Sure, at one point (after it stopped raining, of course) I moved the 450D into the tank bag, so it would be easily accessible, but even then, the hassle of taking my helmet off (you’d be surprised: I have to take my gloves off, take my glasses off, then undo the buckle, pull it off of my head, put it somewhere safe so it doesn’t fall off. Then when I want to put it back on, I have to put my ear-plugs (or headphones, if I’m in a music-kind-of-mood) back in, because they invariably get unsettled by taking my helmet off) seemed like too much of an obstacle to bother.

So, despite riding 3500 miles through some of the most amazing landscapes known to man (Seriously, if you’ve never been to Norway, I highly recommend riding or driving from Oslo to Bergen via the Hardangervidda road over the mountain pass, and then follow the coast around all the way to Kristiansand. You’ll be awestruck in the original sense of the word), I never really felt inclined to dig out my SLR camera. In fact, of all the things I brought with me in my (admittedly very limited-spaced) luggage, there were only three things I didn’t use: My long underwear (It never got cold enough to warrant putting them on), my Tyreweld kit (because I didn’t have any punctures) and my Canon EOS 450D.

Needless to say, when you’re on the road for 3 weeks, it gives you a lot of time to think. In the last week, I spent a lot of time wondering if perhaps I should dig out my SLR camera and try taking some photos. And yet, I never did. Which made me think; am I really so lazy that I’m willing to pass up the opportunity for some awesome photos, just because I can’t be arsed digging out a proper camera?

But… Why?!

Part of the reason, I think, is that this tour was never really meant to be a photo tour – if it were, I think I would have taken the time. This trip was meant to act as punctuation between my previous job (which I hated with the passion of an iberian street argument), and my my new job as a writer. But ultimately, I’m still a photographer at heart… So why?

Then it dawned on me; the very same argument for not being bothered to dig out a proper camera is the precise reason why the Apple iPhone is topping the lists for most uploaded photos on Flickr, and why camera phones are so incredibly popular: Phones, by their very nature, have to be very accessible: It’s no good having a telephone which needs to be locked out of a case, taken out of a protective pouch, and pampered into life before you can answer a call. It rings, you fish it out of your hand-bag or pocket, you answer it. This accessibility – and expectation of accessibility – is what makes camera phones such great photography tools; reaching for your mobile phone has become a well-trained movement, whereas most of us are more careful with our cameras. When going out on the lash for a night, you do bring your phone, but you might not bring a camera, for example.

I know I have been slightly schizophrenic in my reaction to camera phones; my hatred of their poor quality optics and results is stemmed by their accessibility (‘everyone’ has a mobile phone, and I defy you to find a mobile phone which doesn’t have a camera on it these days) and ubiquitous presence. Formally, and officially: Camera phones are a good thing. I’ll tell you why:

On this trip, I discovered that having a compact camera which I use is infinitely better than a SLR camera that I don’t use, even if the latter has has the potential for much better photos than the former.

The best camera you own is the one you actually end up using… and that’s worth keeping in mind when you pack for a trip, I think…


Do you enjoy a smattering of random photography links? Well, squire, I welcome thee to join me on Twitter -

© Kamps Consulting Ltd. This article is licenced for use on Pixiq only. Please do not reproduce wholly or in part without a license. More info.

King of the Road!

picture-1

As some of you will have caught via Twitter or Facebook, I’ve recently left my job as a Senior Producer at Channel Five, and am about to set up on my own, as an editorial consultant. Sounds posh, means very little indeed, beyond the fact that I’ll be spending a lot of time writing books, and being a freelance journalist / writer / busybody and MAN OF LEISURE.

Before I embark on my new career as the boss of the freshly minted Kamps Consulting Ltd, however, I’m going to ride my rather awesome yellow Kawasaki Versys (FAQ: No, they don’t come in yellow. Yes, I painted it myself. No, it’s the kind of paint they use to paint lines on the roads with. Yes, I did paint it with paint rollers. Well, if you don’t come too closely, it looks quite good) all around northern Europe.

I’m setting off in exactly a week (the 10th of June), and will be gone the rest of the month, so there won’t be too many tweets or Photocritic updates in June – apart from this page, of course, where you can keep track of my progress! 


Where are you right now?

Self with Bike IIBy the power of the rather awesome BrightKite, you can keep track of my journey as it goes down.

I’m hoping to post some photos, updates, and – of course, my location so you can keep track.

If you’re particularly curious, subscribe to the RSS feed, or you can follow my progress on Twitter – I’ve set up @3500miles as a special account for this trip.

On the map below, you can to click ‘next’ and ‘previous’ to see how the trip has been progressing!

(Update: The map below only shows the 20 most recent updates – I’ll try to figure out how to make it show all of them, but for now, to read back in time properly, check out the BrightKite page for this trip)


Photos from the trip

These are the photos I’ve added to the Grand European Tour set on my Flickr stream:


Itinerary

Put simply: London – Dover – Dunkirk – Netherlands – Germany – ferry to Gothenburg – Oslo – Bergen – Kristiansand – Oslo again – Roskilde – Den Helder – Dunkirk – London… With a whole load of breaks and stops in between to visit friends, visit sights, and do whatever catches my fancy. I reckon it’ll be about 3500 miles (hence being able to follow me on @3500miles on Twitter, you see).

You can look at it below or open it up in Google Maps.

View Larger Map

So… When are you back?

I should be back in the beginning of July – so until then, have a very lovely summer, and stay awesome, everyone!


Do you enjoy a smattering of random photography links? Well, squire, I welcome thee to join me on Twitter -

© Kamps Consulting Ltd. This article is licenced for use on Pixiq only. Please do not reproduce wholly or in part without a license. More info.

Photographers on Twitter Database

twitter-logo

Sorry about the twitter-focussed posts as of late; I have been very busy with work (I have to wrap a lot of things up before I’m leaving there to look after Photocritic and being a writer), and I haven’t had much time or energy to do a lot of photography writing.

On the bright side, after the ‘twitter on photography’ thing became so popular, I decided to do a bit of PHP/MySQL magic, and I’ve integrated the list with Twitter itself.  


On The fancy automatic version of my ‘photographers on twitter’ page, you’ll find loads of photographers who use Twitter – and the list is your chance to tap into an exciting, active community of some very talented photographers indeed. And the occasional talentless snapper, too, I guess, but I’ll leave it to you to separate the wheat from the chaff.

So, check out the new twitter photographers page here on Twitter. If you check back often, you’ll be glad to know that I’ve given you the option of sorting by most recent, which should make it easier to find only the photographers who’ve been added to the list since the last time you did a sweep.

Finally, if you want to be added to the list, all you need to do is to follow @TwitTogs – within a few hours, the little robot will do its little robot thing, and you’ll appear on the list :)

Follow me!

You can check the latest of my posts in my sidebar, on Twitter, as an RSS feed, or you can follow me by clicking ‘follow’ on the @photocritic page.


Do you enjoy a smattering of random photography links? Well, squire, I welcome thee to join me on Twitter -

© Kamps Consulting Ltd. This article is licenced for use on Pixiq only. Please do not reproduce wholly or in part without a license. More info.

Name your Dream Assignment - Winners!

name-your-dream

If you can remember back to mid February, I did a post called If you can dream it, you can do it – which, among other things, called out for entries for the Name Your Dream Assignment competitions.

I was one of the judges, and Christ with a jetpack, if people didn’t come up with some absolutely awesome ideas…

The winner, Picture Hope is a well put together bid for a photographic project full of hopes, ideas, and more than a little bit of passion for a cause – and a well-deserved winner, in my opinion. Also check out the two runners-ups!

Incidentally, the Lenovo laptop the 3 winners win is pretty damn awesome – a huge 17-inch screen and a built-in Wacom tablet to do your photo editing on might actually be enough to (gasp) make me consider having a closer look. Now if only I could run Mac OS X on it somehow, I’d be a very happy bunny indeed…

Anyway, a huge congratulations to the winners, and if you didn’t win – go ahead and fulfill your dream assignment anyway. Especially you, Doubletrax – your Changes in Latitude project deserves a special mention here, because it was the one I found myself telling people about in the pub!


Do you enjoy a smattering of random photography links? Well, squire, I welcome thee to join me on Twitter -

© Kamps Consulting Ltd. This article is licenced for use on Pixiq only. Please do not reproduce wholly or in part without a license. More info.

Photocritic Logo: The Making Of

clicked-all

I’ve had a lot of great, very nice comments about my new logo, and a few questions – Oliver, who made the logo, kindly agreed to talk about it a little bit.

If you don’t care much about design or logos, feel free to skip this post :)  


Oliver, do your thing:

It starts off pretty simple. I lean back in my rocking chair and wait until things come to mind which are related to “photography”.

A lens, eyes, a finger pushing the shutter release button, aperture, light, photos, my DSLR, photographic history, the photo development process and other things. Then i pick up my pen and throw all this on
paper.

While doing this I might start with quite complex shapes, but I keep simplifying over and over again if I like an idea and follow it.

For the Photocritic logo I first thought of the people that make photos. I used simplified shapes of a finger pushing a button, a person holding a camera, a human head which contained a camera… but
this was a dead end.

Then i focused on the photos. I drew a piece of paper with a stylized glow, a polaroid and some more paper-like items that didn’t work as well. Here you get a bit of frustration. On the 2nd idea already!

But the ideas will not stop flowing through my mind. Some results looked rather weird and totally out of context: Film rolls, crippled fingers, human heads with lenses as eyes, some alien hand holding a
head… that’s enough!

Then I drew a stylized eye just for fun and started modifying it… suddenly it clicked!

clicked-all

CLICK! I remembered my focusing screen I bought a few weeks ago. I wanted it because of the grid lines which makes composition a lot easier. Bam! I thought of my first camera and the focusing screen that
was inside. Those were the times… looking into the viewfinder and then match the two half circles to get a sharp image. High Tech!

I sticked to that idea pretty quickly and liked it from the start. I was sure that the “distortion” inside the focusing screen could add a nice element, but won’t be very easy on the eye on first glance. At this point I turned to Photoshop and started the design in there. The design was already done in my head (after looking up what those focusing screens actually looked like haha).

And then there was the word “Photocritic”. Hmm. What should I do with it? I just used “PC” and put it inside my design. It didnt work. Changing fonts. Hmm. Another font. This one is good! The font was the hardest part. But luckily I had hundreds to choose from. I was still a bit sceptic if people would misunderstand the letters as “PC = Personal Computer”. But hey, people are not stupid – they are one a photo blog and will make the connection quickly.

Then I was satisfied and started on the colour palette. I picked the colours from the photocritic site and made variations of the surrounding circle, the PC letters and the other elements. Its just a matter of finding a good contrast, I have no specific rule when I like a certain colour combination. Haje liked one combination in particular and me too. So I sticked to it and submitted the final design.

Haje then spent quite a bit of time fiddling with the logo, but ultimately decided that it worked very well as it originally was: After a few emails it was agreed that the logo worked fine. Nothing was really changed afterwards. I hope you like it too ;-)

Thank you!

Check out Oliver’s work on Flickr, stalk him on Twitter, and check out his website while you’re at it!


Do you enjoy a smattering of random photography links? Well, squire, I welcome thee to join me on Twitter -

© Kamps Consulting Ltd. This article is licenced for use on Pixiq only. Please do not reproduce wholly or in part without a license. More info.

Photographing dancers

dance-photography

A couple of months ago, I had to eat my pride after my first foray into dance photography went terribly awry.

Since, I’ve spoken to Laurie, who is a friend, Ruby on Rails coder, dancer, and fellow photographer, who offered to write me an article explaining how to get dance photography done The Right Way™. His top tip: Learning about dancing makes you a better dance photographer!


Take it away Laurie…

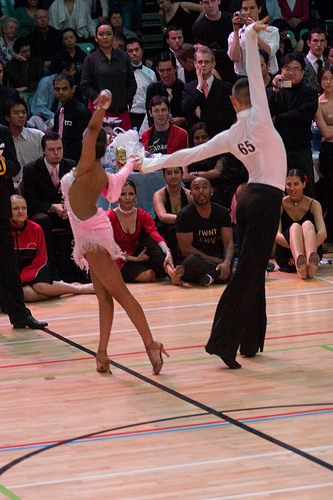
DancersBallroom dancing is the hardest photographic challenge I have personally come across. It seems everything is set up to make it hard, and nothing makes it easy. Everyone moves too fast, the lighting is horrible, and getting a spot to stand can be a challenge in itself. None the less, after years of working on it. I finally think I know enough to pass on some advice.

Photo on the right © Laurie Young – see it bigger on Laurie’s Flickr stream!

The first thing, as with any photographic trip is to know what you want to get. For me there are three different goals I can be thinking of. The first is to try and great stunning photos. The sort that i want to frame and maybe even sell as art. Secondly I want to document the dancing, including all the bits that don’t look so good, the mistakes and the moments in between the rehearsed lines. Surprisingly this is what most dancers are looking for when they ask to see my photos, as it helps them improve. Finally I want to capture the emotion of the day, the excitement and nerves before the competition, the release after coming off the floor, and the joy or disappointment that any competition brings. I’m not going to talk about this one today, as technically its similar to portraiture, and so off topic.

Like any demanding field of photography, the equipment you have really makes a difference. You are just not going to get really good photos with anything less than a semi-professional DSLR.

The biggest single leap I took was getting my hands on a camera with no shutter lag. If you are waiting between when you press the shutter and when it takes the photo, you have no chance of getting anything, dancing is ALL about timing, and so is dance photography. Hand in hand with this is a camera with fast autofocus. More than anything else you can spend your money on, no lag, and instant AF will improve your pictures.

Dancers

For the choice of lenses, I like to go for the extremes, either a telephoto, or a wide-angle. Standard lenses have little to no place in my kit bag. Having said that, I use the telephoto to pick out just one couple or dancer, and if the competition is in a small room, then this job is done best by a slightly longer than standard lens like 70mm.

Either way, the lighting is going to be low, so the fastest lens is going to pay dividends. Personally I use a Sigma HSM 70-200 f/2.8, and this seems to be the lens of choice among the other photographers. For wide angle I like about 20mm, which i use mainly for the Standard (ballroom) dances from right up close.

Photo on the right © Laurie Young – see it bigger on Laurie’s Flickr stream!

Flash is a good next addition to your kit. You are going to be taking a LOT of photos, so it needs to recharge really fast. In a dark room you are going to be dumping a lot of charge with each flash. I use a Metz Hotshoe Mounted gun, charged from a Quantum battery pack, and even then can easily go through 2-3 full charges of it in a day.

The last thing you need is memory cards. Lots. If your shooting an all day competition, you are probably looking at between 1000 and 5000 photos. At full quality thats a lot of GB, so stock up, or bring a laptop to download onto.

When I arrive at the competition the first thing I do is get a feel for the light levels. Competitions are held in lots of different venues, from community halls with lots of windows and ample natural light, to the Winter Gardens in Blackpool, a massive hall with quite dim lighting. If you are lucky there will be some spots of lights from down-lighters, or even follow spots, which can make for some great photos. Personally I prefer not needing to use flash, it is hard to avoid flash shadows, but its not always an option.

I tend to meter manually, taking some sample shots till I am happy with the ambient light, then setting the flash on auto, (use the most advanced form of auto your camera supports) which will generally do a nice fill in. Because the dancers are moving so fast, and because the background at competitions is typically horrible, a wide aperture and really fast shutter speed is the best. Autofocus should be on, but if your camera can’t focus fast enough, then pre-focus on a specific part of the floor, and only take photos when people dance on that spot.

Dancers in the DarkNext decide where to position yourself. My two favorite spots are on the balcony, looking down with a telephoto, or right on the edge of the floor, close enough to get hit by the girls dresses as they go past.

Photo on the left © Laurie Young – see it bigger on Laurie’s Flickr stream!

If you do this, be nice to the judges. They are competing for the same floor space, and often have to stand right in front of you to get their job done. It can often feel like part of the judge’s training is learning how to stand right in front of photographers, but I have been assured this is not true. Annoying as it is, its something you have to accept. If you are at the floor edge, then kneel down. Your camera should be at or below the dancers waist height. Otherwise you are going to foreshorten their legs, and no girl, and pretty much no dancing guy is going to be happy with that look. The lower the camera is the nicer the legs will look. Just don’t get so low you get accused of trying to take photos up the girls skirts!

Now its time to take photos. This is where your biggest problems are going to begin. At first it will feel like lots of random motion is going on, and you only ever see a good photo after you have missed the chance to capture it. To fix this, you need to learn more about dancing, and learn the individual couples routines. Here Latin and ballroom start to differ. Ballroom is all about motion, so still photos are always going to be difficult. Add that to the fact that each couple is effectively embracing each other for the whole dance, you will always get the back of one persons head.

Except in the “lines”, those moments when the dancers stay on the same part of the floor for a bar, and show how they can stretch, and create impressive shapes. Learn the routines. If you watch them for a lap or two of the floor you can start to see that they repeat the same steps each time. This lets you predict when such a line is about to happen.

In the Latin dances, there are lots of accents. Highlights in the music where the dances do something dynamic, powerful, or sudden. As you learn more about the music these become more predictable. In Cha Cha, its normally on count 1, in Rumba, its on 4. In Paso there are two specific highlights. Learn the music and you can tell when these accents are coming. If you have learnt the couples routines, you can know when they are about to go into a line, if not, assume they are going to do something that hits the accent. You will be surprised how often you are right.

You really have to listen to the music, and be as aware of it as the dancers are. Its the only way to get good photos of dancing.

Thank you!

Thank you, Laurie, for writing up your guide for us. If you liked Laurie’s writing, check out his website, and of course, give his Flickr stream some love, too.

Inspiration

As with so many other things in life, Flickr is great for inspiration for finding great dance photography. Plug in the name of the dance and search by most interesting, get a feel for what can be done!

Can’t be bothered searching yourself? Can’t blame you – here, let me help: Tango, Paso Doble, cha cha, Rumba, Salsa, Merengue

Other searches worth trying: Latin dance and dance, of course.


Do you enjoy a smattering of random photography links? Well, squire, I welcome thee to join me on Twitter -

© Kamps Consulting Ltd. This article is licenced for use on Pixiq only. Please do not reproduce wholly or in part without a license. More info.

Taking fantastic photos with an iPhone

Back when I was doing my Top 100 amazing iPhone photographs, a few photographers’ names kept returning again and again – one of them was the amazing Sion Fullana, whose Flickr photography stream is full of absolutely fantastic street photography; mostly in New York, all taken by iPhone.

After gawping at his photos in incomprehension, I just had to ask him if I could interview him about his technique, and see if I could get some tricks of the trade out of him – luckily, Sion was happy to oblige.

So, if you have an iPhone and want to learn how to put its camera to good use, or if you just want to find out how you can take incredibly moving photographs even with inferior equipment, you’re in for a proper treat…

King of the Castle
King of the Castle by Sion Fullana on Flickr

1) Why do you take photos with your iPhone? What other cameras do you
have, and why don’t you use them?

There are various reasons why I love using the iPhone for photography. I guess the most basic is that you carry it on your pocket all the time so you have a photographic device always ready if the opportunity shows, instead of having to wear a big bag with a heavier camera.

Secondly, even though I know the 2MP lens of the phone is not too much for quality, I am convinced that under the appropriate amount of light and holding the iPhone very still, you can get images that would put to shame some great SLR cameras. It’s something about the colors and the light that the iPhone captures beautifully, and it allows you to go for certain type of shots that may be less perfect but with a very special and distinct signature.

Last but not least, since I do mostly street photography, the iPhone certainly allows me to get some good “sneaky” shots of people without them noticing. Something that with my bigger camera I couldn’t be able to do.

When I don’t shoot with my 3G iPhone, I take out my Panasonic Lumix DMC-FZ50, a camera that despite being considered a point and shoot still, has all controls and zoom manual, like an SLR. I use that one mostly when I cover journalistic events, or when I’m exploring a new area in the city where I want to take some wider shots or some street portraits from a bit further, zooming in.

Gentleman on a rainy day
Gentleman on a rainy day by Sion Fullana on Flickr

2) How long have you been using camera phones for photography?

Well, my iPhone was my last birthday’s gift from my boyfriend, on July 2008. So I’ve been using iPhone for 8 months, and taken around three thousand pictures with it. Almost 400 per month. Not bad, i guess.

3) Your work is quite amazing – your iPhone photos (despite all the limitations of the iPhone) are better than many people would be able to do with a DSLR – can you pick one of your favourites and talk us through your process step by step, from fishing the camera out of your pocket to people being able to see it on Flickr?

Oh, thank you very much!! Let me actually use for this the last photo I have uploaded on Flickr, as I really like it.

So here’s the story: I was on my way Uptown for a birthday dinner and I take the subway towards Times Square. In front of me, on the platform, I see this beautiful, elegant girl with her boyfriend. They both look awesome and I decide to take their picture, using the Camera Bag application, Helga Style (my favorite!). Unfortunately, the app decides it’s one of those times when it will crash and force you to restart the phone, losing your good image.

A bit down, we all enter the train, super packed in rush hour. The girl is sitting right in front of me, while I stand up. And suddenly, even with the movement of the train running, I see her using her pocket mirror to put some make-up on, and I’m fascinated. So I quickly snap the photo and off we go, Times Square…

Hours later, back home, I download the photos to my MAC, I see and like the image of the girl, and I go straight to Picnik, my favorite processing software. I tweak the image a bit by using the Cross Processing and the Orton-ish effects, and I upload it to Flickr and start spreading it around in my favorite groups.

before-after-sion-fullana

So you can see here the original image and the final result (which you can also see (and comment on / favourite etc) on Flickr, as “Paint my eyes in blue“). I love post-processing and what you can achieve sometimes with it. It’s a fascinating part of the process of taking photos, for me.

4) What are your top tips for people trying to wrangle some sense out of the iPhone as a camera?

I would say “Don’t stop trying”. Shoot, shoot, shoot. Experiment. Look for reflections, seek for rays of light in the hours after lunch on a sunny day, stay quiet for a while in a corner and hold your iPhone very still and snap at everything that crosses your path. Try movement effects. And also, do not hesitate about using photo applications.

My truly favorite had been VINT B&W, that allows you to get some beautiful black and white images, with the right contrast and tone… until I have recently tried and fallen in love with the CAMERA BAG app, specially the Helga and 1962 styles.

5) What would you improve about the iPhone to make it a better camera?

Obviously, there are things that could improve the experience of iPhoneography, indeed. Giving it some extra resolution wouldn’t be bad at all (more Megapixels for better quality). Some settings straight from camera (some control of shutter speed, or white balance) would be great too.


Woman on Heels by Sion Fullana on Flickr

6) Are you a professional photographer? Tell us about yourself!

Mirror of Soul by Sion FullanaWell, when do you get to call yourself a professional photographer? When you work exclusively taking photos? When you have made any money with them? When you are famous because of your images? :-)

Right: Mirror of Soul (Self Portrait) by Sion Fullana on Flickr

Let’s just say for now that I have become more serious about photography in the last year and that I love documenting the world through my lens, and that I have been selling my first images recently. My greatest goal with photography is try to raise awareness of the small details and the special moments in daily life that surround us but we tend to overlook in our rushed lifestyle.

When people have told me that this is one of my strengths, I feel I’m on the right path. Whatever the future may bring me with photography, let it be welcome!

The Yellow Line will Take you Home
The Yellow Line will take you home by Sion Fullana on Flickr

As for my background, I am originally from Majorca (Spain). But I have also lived eight years in Barcelona, two in Cuba (where I graduated in filmmaking) and now I reside in New York, where I am currently since 2006. I am a journalist, writer and filmmaker.

I work freelance as a reporter / photographer, and I’m currently in the very early steps of investigating a documentary film project about GLBT homeless kids in New York. You can see some of my previous work on my Youtube page and -if interested- purchase some of my photos on my website.

Thank you!

Thanks for helping us along and explaining your work, Sion! you’re a star!

If you liked this article, why not take a closer look at Sion’s work on YouTube, Flickr, or his own website?


Do you enjoy a smattering of random photography links? Well, squire, I welcome thee to join me on Twitter -

© Kamps Consulting Ltd. This article is licenced for use on Pixiq only. Please do not reproduce wholly or in part without a license. More info.

When the media steals your photos

cardiff-at-night

The story of a photographer whose photos went astray – and got re-published by one of the UK’s biggest newspapers without permission

There’s something really difficult about looking after your copyright on the internet. Every single word I’ve ever typed in this blog, for example, is duplicated at least a couple of times around the web. The problem is that words are easy to find. Pictures, on the other hand, are a different tumbler of guppies… As Maciej Dakowicz found out, when his photographs suddenly surfaced on the Telegraph’s online edition… 


Photos going astray…

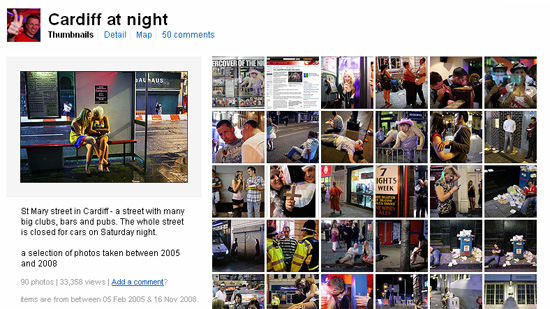
What had happened in this case is that someone found his rather awesome Flickr set called Cardiff at Night. Go look at it. Maciej is a brave, brave man for taking a Canon 5D out on the streets of Cardiff. It’s not the roughest city in the world, but, well, look at the photos; I did a photo project like this in Liverpool once, and people tried to mug me on several occasions. As for Maciej’s set, see Be Blessed, Night Calling, Cold Night and Police Car. In fact, look at the whole set, it’s a rather fine collection of night-time photography.

I’m digressing like a drunken prostitute in a snowstorm. Let me try to start that sentence again. What happened in this case is that someone found his rather awesome Flickr set, and posted it on an Hungarian site, probably with a title along the lines of ‘lol look at thz drnk english twats’, which would be largely incorrect, because the spelling hurts my eyes, and Cardiff is, in fact in Wales, so it’d be more fair to assume that the bulk of people in the photos are Welsh. I digress again.

cardiff-at-night
Facsimile of Maciej’s Cardiff at Night Flickr set. (screenshot used under Fair Dealing)

After suffering the injustice of having his photos nicked once, someone at the Telegraph came across the photos, hashed them into a photo gallery, and published them. A lot of people – myself included - were impressed by the photo gallery, and ended up linking to it via blogs, Twitter, etc.

I shan’t speculate as to what sort of procedures the Telegraph have for checking copyright and reimbursing the photographers involved, but it’s pretty safe to say that whoever they got permission from didn’t have authority to give such permission. Someone subsequently recognised some of Maciej’s photos, and notified him. Understandably, he was pretty damn pissed off, grabbed a screen-shot, and e-mailed the Telegraph.

The Telegraph apologised and took the gallery down, offered their ‘usual fee they pay for online galleries’, says Maciej, which comes to £125. Nice of them, and I guess they’re making some sort of effort to solve the situation. My personal opinion is that offering up £125 for having stolen a gallery of photos is an insult, and that Maciej should get in touch with a solicitor to get suitable compensation, but that’s not the point of this article.

The point is, however, that this could have happened to just about anybody – .

So, what do you do when this happens to you?

First off, calm down.

No, really. Calm down. Flying off the handle is not going to do anyone any good – lot of people (yours truly very much included) get very indignant and angry about things like this, but naming and shaming (or ranting and raving, for that matter) is generally not the right thing to do – there are systems in place for dealing with copyright infringement, so use them…

If the people using your photos are a professional outfit (like a company, as opposed to, say, some random blog), your steps should be as follows: First off, immediately send a NTD – Notice and Take Down. This is a legal request in which you’re demanding the website in question removes your images immediately. In effect, they’ll have to remove them as quickly as possible, which normally means within 24 hours. For a publication (websites, newspapers etc), send the request to the photo editor – if the photo editor’s contact details aren’t on the website, give them a bell and ask for their details. CC the editor of the publication.

Now, hopefully, they’ve taken down your copyrighted material (if they haven’t, contact a solicitor, because they are now knowingly infringing on your copyright, which raises the stakes all around), and it’s up to you what you want to do. Personally, I’ve on occasion guilt-tripped the photo editor in buying other photography work from me in the future (with the idea that if my work is good enough to steal, it must be good enough to pay for), and in effect, I still supply photographs to one publication which stole my images by accident.

Alternatively, you can send them a bill (see how much shoudl I charge for a photo for an indication of how big that bill shoudl be) for unauthorised used. If they don’t pay, then file a small claims court judgement (this normally costs £25). What normally happens when you do that is that they’ll get in touch with you and settle well before it ends up in court. If you billed them £1,000 for a set of photos, and they offer you £600, I’d go for it, it’s more money than nothing, and it saves you the hassle of going through the legal system.

What if you can’t get in touch with them?

Some times, it’s nearly impossible to find out who is actually responsible for the copyright infringement – if someone posts your photos as their own on Flickr, you contact Flickr and they’ll deal with it for you. If it’s a hosted blog (like wordpress.com or blogger), you can report them to the host, and they’ll deal with it. If, however, it turns out that it’s someone running on a foreign domain, without any contact details (or, say, whenever you call the phone number on the domain registrar you get through to someone who only speaks Chinese – which happened to me once), you might find yourself in a spot of bother. This thread from 2004, for example, outlines what happened when someone nicked around 100 photos and placed them on a Russian site.

Lots more advice is available from the UK Copyright Service (like their Copyright Infringement Fact Sheet or the very useful 10 copyright myths). The Publishers Association Infringing Websites helps with some terminology which may come in useful.

Finally, it’s actually possible to go after the ISPs of the people hosting your content – which only helps if you can actually contact them, of course. If any part of the hosting business is based in the UK or USA, you have a case for going to them directly – they can then shut down the entire site if necessary – but only if they are co-operative, of course.

Finally, you can ensure that the enfringing site gets de-listed from Google by filing a Google Digital Millennium Copyright Act Infringement Notification, which takes a while, but might at least mean that the site hosting your copyrighted content gets less traffic than they normally would.

Further reading

I’ve done a lot of writing on this general topic recently – check, for example, Photo Licencing and the Law, Be careful what you sign, Can I use the photos I’ve taken? and how much should I charge for a photo?.

Finally, please note that I’m not a solicitor, and nothing posted in this blog may be construed as legal advice. Contact a solicitor for advice.


Do you enjoy a smattering of random photography links? Well, squire, I welcome thee to join me on Twitter -

© Kamps Consulting Ltd. This article is licenced for use on Pixiq only. Please do not reproduce wholly or in part without a license. More info.

Painting with light

sculpture_by_sea

You’ve probably seen the effect of camera blur (moving your camera, giving a fuzzy, streaky effect), zoom blur (by zooming during an exposure, I have a modest example here), and motion blur (something moving on camera). But what do you reckon would happen if your scene isn’t moving, your camera is firmly locked down on a tripod, but your light-source moves?

Well, if you can imagine such a thing, you’ve just imagined the bright art of painting with light. I’ve spoken to my good friend Brent Pearson who is ‘a bit good’ at this light painting malarkey, in the same way that Pele is a bit handy with a Football, and Antonio Lucio Vivaldi knew a thing or two about chord progressions.  


“I have enjoyed landscape photography for almost 30 years”, Pearson told me in a recent interview. “However over the past few years my landscape photography has evolved and I’ve started doing more and more long-exposure photography.”

sculpture_by_sea

It was as part of this long-exposure work that I first ‘discovered’ Pearson – he has an amazing way of combining the zen-like peace of landscapes with the chaos of motion and light.

Getting into light painting

“I enjoyed capturing the movement in landscapes and the abstraction that long exposures introduced to my images allowing me to simplify my compositions.”, Pearson explains. Night-time landscape photography was the natural extension of that work

middle_head_bunker

Of course, landscapes are tricky enough when they’re done during the day – take away the sunlight, and you’re up against a whole new set of challenges. “Composing and focusing when you can’t see through the viewfinder is tricky”, Pearson laughs, but obviously there are issues beyond merely not being able to see what the hell you’re doing, like the challenge of calculating your exposure at night without the aid of a light meter, and managing noise of long exposures with a digital SLR.

“With a reasonable amount of experimentation and trial and error I started understanding the techniques that would give me consistent results at night and wanted to continue exploring and experimenting with night photography.”, Pearson explains “… And that is how I was introduced into the world of light painting.”

Light painting is a term that often associated with the creation of light trails in an image, however there is a totally different type of light painting that offers the landscape photographer unprecedented levels of creativity – the painting of landscape images using light sources that are not visible to the camera.

malabar_bunker

“By photographic standards, this is the Wild West!”, Pearson claims, “There are new frontiers to explore and new trails to blaze. There aren’t many photographers doing this type of photography… perhaps because of the technical challenges associated with photographing at night, or perhaps because there are not a lot of comprehensive guides or manuals to help photographers climb the learning curve without becoming frustrated. ”

The Benefits of Landscape Lightpainting

By having control over the light, light painting is like unleashing the control and creativity of studio photography into the outdoors. With the long exposures that are associated with night photography, you are not limited to lights being statically positioned; “free to wander around a scene with various light sources literally painting landscape features with light means you get a completely different level of creative control.”, Pearson says, and lists off some of the extra control you’re granted by taking the camera outside in the dead of night:

You get the chance to control the direction and intensity of light, the quality (by changing your light sources) of the light, and the focus and colour as well, by using light painting techniques, coloured gels, ‘barn doors’, etc

In post-production you also have incredible control to blend your light painted images together with the control of a lighting director using a light mixer.

forrester_rocks

Getting started with light painting

Probably the most important component of light painting is the light source(s) that you use.

“Over the past 12 months I have been trialling a variety of light sources from the humble house torch through to home-built high powered light sources that emit a very even high-quality light”, Pearson says. “My light painting kit now includes three light painting tools: My workhorse light which is a high powered fluorescent light, my camera flash unit, which is great for lighting interiors with colour, and my high-powered head torch LED that can light objects up to 80m away.”

Learn from the master

Pearson has been noticed, and is often approached by people who want to learn the tricks of the trade. “I’ve had numerous photographers ask me how they can learn how to light paint landscapes.”, Pearson says. Like any good teacher, he decided to seize the opportunity and run with it: “I have finally put together a comprehensive step-by-step guide to night photography and landscape light painting” – which is available on his Night Photography Guide website.

caught_in_act

“If you feel like your ready for the next photographic challenge”, Pearson concludes, “then I urge you to get out at night and start discovering a new photographic world!” – and I couldn’t agree with him more! Get over to Brent Pearson’s site and grab a copy of his eBook – it’s well worth the cash, I reckon!

If you’ve taken any light-painted landscapes (or any other style of photography for that matter), do post a comment with the URL in the comments below – I’d love to have a look!


Do you enjoy a smattering of random photography links? Well, squire, I welcome thee to join me on Twitter -

© Kamps Consulting Ltd. This article is licenced for use on Pixiq only. Please do not reproduce wholly or in part without a license. More info.

Digital Schizophrenia

schizo-progress-cutout.jpg

One of the first things I started doing when I started shooting digital images, was thinking of ways of doing digital double exposures – adding one part of an image to another – for a greater impact of my digital shots. It turned out to be relatively simple, but carrying high impact. All it takes is suitable photos, a copy of Photoshop (or the Gimp, which is sort-of nearly as good as Photoshop, but free), and a bucket full of time…

Have you made any cool images using this method? Post them somewhere on the internet – your blog, perhaps – and add a link to the comments, so we can admire the photos! 


Starting with a series of photographs taken with the camera on a tripod, to ensure that the angle doesn’t change:

schizo-progress-5.jpg

schizo-progress-4.jpg

schizo-progress-2.jpg

schizo-progress-1.jpg

I loaded all of them into Photoshop, and copied them to the same document in different layers. When doing this type of editing, it makes sense to arrange the images in a way that allows you to work from top to bottom, or from left to right. So the first thing you need to do is arrange the layers in a way where they have a logical progression. In the case of the images above, I layered them in the order 4 – 5 – 2 – 1, with 1 on the bottom

The easiest way of doing these photos is by doing it in a way that the character doesn’t interact with itself, but on the other hand it is a lot more believable if they occupy the same field of view (i.e overlap) or interact in some way – getting them to hand things to each other, or similar, is an additional layer of messing with your readers’ brains.

Now, in the top image, carefully cut out the area you don’t need. The trick is to cut off as little as possible. For the sake of example, I’ll show you what I would do if I were to add another photo all the way to the right of this montage:

schizo-progress-cutout.jpg

By leaving as much of the image intact as possible, chances of getting the cut-out wrong are limited. In this case, because the right side of the girl isn’t cut out at all, there are no mistakes to be made!

Hide this layer, and move on to the next one, and the next one, etc.

Finally, you’ll probably spend a bit of time carefully polishing your cut-outs. You may also need to darken some areas to ensure that the shadows look genuine – do you remember what we said about that in How to spot Photoshopped Images? Exactly.

Now, when you’ve put all the photos together, you get a result that looks like it could happen, if it hadn’t been for the fact that this lady doesn’t have any siblings, much less quaduplets…

schizo-finished.jpg

Couple of examples

Do you like this stuff? Well, have a go at it yourself! And just to get you on your way, why don’t we add some more examples? The following three were taken free-hand, with quick series of five shots for each photo. In case you recognise the background: Yes, it’s taken in Vigerlandsparken, in Oslo, Norway. I think it was around 2003 or so.

Skatezophrenia
Photo: Skatezophrenia by Photocritic.org on Flickr

Skate-zo-phrenia-104.jpg
Photo: Skate-zo-phrenia 104 by Photocritic.org on Flickr

Skate-zo-phrenia
Photo: Skate-zo-phrenia by Photocritic.org on Flickr

So, what do you reckon? Can you do better? Of course you can! Get cracking, and post the results in the comments – I’m curious!

Couple of other examples

Self portrait with self
Photo: Self portrait with self by Photocritic.org on Flickr

Jonathan Squared
Photo: Jonathan Squared by Photocritic.org on Flickr

Finally, if you like these, you can get loads more inspiration on the Multiple Exposure group on Flickr!

This post was originally posted in 2006 (which is why the observant among you will notice a couple of old comments on this post – so no, you’re not going loopy:). I’ve updated it and added a few more photos, hence the re-publish.


Do you enjoy a smattering of random photography links? Well, squire, I welcome thee to join me on Twitter -

© Kamps Consulting Ltd. This article is licenced for use on Pixiq only. Please do not reproduce wholly or in part without a license. More info.

A shot at street photography

london-street-2009-03023

Recently, I realised that while I do an awful lot of writing about photography, I’m not actually spending all that much time actually taking pictures myself anymore.

A sad state of affairs – especially as I recently bought a gorgeous Canon 50mm f/1.4 prime lens. (I could rant about prime lenses for hours, but I’ve done so in a previous post, which (if I may nest my parantheses and be so bold as to recommend one of my own articles) is well worth a read), and I have a fabulous city right on my doorstep.

Anyway, so I have never really done that much street photography before, but I figured it’d be a crying shame not to have a go at it…

For someone who hasn’t done much (read: any) street photography before, I think I did pretty well – these are some of my favourites:

Mean Fiddler

Mean Fiddler

This photo, Mean Fiddler by Photocritic.org on Flickr, was a lucky one indeed. Shot from the hip just as he was finishing playing a song, the colours came out magnificently, and I got quite lucky with the focussing as well – Seeing as how I was shooting from the hip at f/1.4, it wasn’t as if I had a lot of leeway with my depth of field.

Technical Details: Canon EOS 450D with a Canon 50mm f/1.4 prime lens. 1/320 second at f/1.4 and ISO 100, metered in Aperture-priority AE with a -2/3 stop EV bias. More tech info here.

"Is he taking a picture of me?"

"Is he taking a picture of me?"
This photo, "Is he taking a picture of me?" by Photocritic.org on Flickr, was taken in the midst of a St Patrick’s day parade on Trafalgar square. She was hanging out with some of her friends in front of a fountain, and the light kept catching her, so I figured I’d try and capture that. The back-lighting was quite tricky (and, considering that all of these photos were taken on a single attempt, with one shot at getting it right, I think I got lucky), and I’m happy that I was shooting this in RAW, because I needed to do a few adjustments to make the photo come out well.

Technical Details: Canon EOS 450D with a Canon 50mm f/1.4 prime lens. 1/1250 second at f/1.4 and ISO 100, metered in Aperture-priority AE with a -2/3 stop EV bias. More tech info here.

Dreaming over Coffee

Dreaming over Coffee
This particular shot, Dreaming over Coffee by Photocritic.org on Flickr, came about right at the beginning of the walkabout in London – I was in line for the queue at Nero coffee, and spotted this girl, who was sitting there, enjoying her coffee, and being rather blase about checking out the cute guys walking by – what is more summerly than that? When the moment came, I simply lifted the camera to my face, snapped the shot, and paid for my coffee. Simples.

Technical Details: Canon EOS 450D with a Canon 50mm f/1.4 prime lens. 1/200 second at f/1.4 and ISO 100, metered in Aperture-priority AE without EV bias. More tech info here.

Me too, brother. Me too.

Me to, brother. Me too.
This one, Me to, brother. Me too. by Photocritic.org on Flickr, was taken immediately after the girl above. We were sitting on the statue in the middle of Seven Sisters, and were watching the world go by. This fellow just showed up, stopped right next to me, and stared at the sky for a bit – His T-shirt made me laugh, so I couldn’t not take the shot.

Technical Details: Canon EOS 450D with a Canon 50mm f/1.4 prime lens. 1/200 second at f/2.8 and ISO 100, metered in Program-mode AE with a -2/3 stop EV bias. More tech info here.

MOAR!

If you want to se more, you can see the whole set on Flickr.

Also, if you haven’t seen many updates from me recently, it’s because I’m out of the country for a while, doing a load of photography and eating a lot of lovely food while visiting my parents in Mumbai, to be precise. When I come back, I’m finally moving back to London again – if I can find myself a place to stay, that is.

Enough with the megapixels already

new-road-iphone

I’m all for camera phones – for a photography nut such as myself, there’s nothing quite as awesome as always having a camera in my pocket – but things are getting a little bit silly now. Earlier this month, Sony Ericsson showed off a prototype of a 12 megapixel camera phone, and apparently the Swedes are planning to have 20 mpx crammed into phones in time for the 2012 olympic games.

So why am I being whiney? Well, just like horsepower isn’t everything on a car (a Mazda MX-5 would trash a 1000 horsepower drag racing car on a twisty race track) and clock frequency isn’t everything on computer processors (a 2 Ghz current-generation processor wipes the floor with a 4Ghz Pentium 4), Megapixels by themselves mean absolutely nothing.  


The first prosumer-grade dSLR – the Canon EOS D30 – only has 3.1 megapixels, but the photos it was capable of taking is a world of difference from even the best current camera phones.

“Three megapixels”, I hear you cry, “That is laughable in a world where you are buried in a deluge of 5- and 6 megapixel chattersticks the second you step into a Carphone For You!”. And you’d be right. Nonetheless, the fact that the D30 takes high-quality glass means that the photos it delivers is sharper than any camera phone (and most compact cameras, for that matter).

What happened to the Old One?
What happened to the Old One? by Photocritic.org on Flickr

The point is that even though it’s possible to take some fantastic photos with a simple camera phone (I recently wrote about the amazing stuff people are doing with the comparatively inferior iPhone camera, for example), the phone manufacturers need to get their priorities straight: Megapixels only affect the size you can show (or print) a photograph. Most of us post our photos on Facebook, Flickr or send them to our mates, so size clearly doesn’t matter – but quality does.

Most photographers would much rather have a 2-megapixel camera with a good lens than a 20 megapixel camera with poor glass at the front.

So Sony Ericsson, LG, Apple, Nokia and the rest of the gang; if you are reading this: give us proper auto-focus, faster and higher-quality lenses, flashes, proper shutters, and the possibility to manually override the automatic exposure.

This article was originally published on FiveFWD.


Do you enjoy a smattering of random photography links? Well, squire, I welcome thee to join me on Twitter -

© Kamps Consulting Ltd. This article is licenced for use on Pixiq only. Please do not reproduce wholly or in part without a license. More info.

Photocritic Greatest Hits vol.2

building

Early last year, I did an article titled ‘Photocritic Greatest Hits‘ – which basically just listed the most popular articles on this site.

The reason for repeating it is down to a comment by Sharon on Twitter, who mentioned that she loved Strobist, but hadn’t really gone through much of its backlog – which is a shame, really, since the Strobist blog is positively awesome. While I’m no Strobist, I’d like to think that Photocritic also has some articles in its history that are worth visiting – so hereby, a list of ‘if you read nothing else, read this’

Most commented, most viewed, and most awesome – all for you!

Most popular in 2008

Hayley in the 1950s
Photo: Hayley in the 1950s by Photocritic.org, on Flickr

Missy in Liverpool1 – Extreme Macro Photography on a budget
2 – The dirty tricks of food photographers
3 – Nude Photography 101: Photographing your Girlfriend
4 – Try nude photography
5 – Top 50 Photography Websites
6 – The top 15 digital SLR cameras
7 – Concert photography
8 – Creating a photography portfolio
9 – Nude photography Avec Renoux
10 – The Ultimate guide to HDR

Above right: Missy in Liverpool by Photocritic.org on Flickr

Most popular of all time

Glass, wood, brick, sky and lens flare
Glass, wood, brick, sky and lens flare by Photocritic.org on Flickr

The Darkness in concert1 – Extreme Macro Photography on a budget
2 – Photographing Smoke
3 – Try nude photography
4 – Concert photography
5 – 100 amazing iPhone photos
6 – How to win a photography contest
7 – The dirty tricks of food photographers
8 – The 12 best photos of 2007
9 – Top 50 Photography Websites
10 – Your Photos, 300-style

Above right: The Darkness in concert by Photocritic.org, on Flickr

Haje’s favourites not in the above list

Freedom in Black and White
Photo: Freedom in Black and White by Photocritic.org, on Flickr

Just because an article is popular doesn’t mean it’s necessarily best. You’ll notice there’s a lot of nude photography stuff in the list above, so it’s obvious what kind of things people were searching for to find it :-) I have some more ones that are worth reading, though, if you fancy it.

In general, I turn my favourite articles into ‘featured’ articles, which means that they get ‘featured’ on the Photocritic home page that you can see all of them by checking out the Featured category. If you can’t be bothered, though, then check out these 10:

A Very Sharp Photo1 – Creating your own photography blog
2 – Teaching yourself photography
3 – Lens Flare and how to avoid it
4 – The return of Street Photography
5 – White balance explained
6 – Prime Lenses and why you need one
7 – Dealing with Negative Critique
8 – Expose for the highlights
9 – Teaching photography to a 5-year-old
10 – How to do a photo critique

Above right: A Very Sharp Photo by Photocritic.org, on Flickr


Do you enjoy a smattering of random photography links? Well, squire, I welcome thee to join me on Twitter -

© Kamps Consulting Ltd. This article is licenced for use on Pixiq only. Please do not reproduce wholly or in part without a license. More info.

Photocritic's new logo

pc-new-logo

If you’re a regular to the Photocritic site, you’ll notice that this page looks a little bit different than usual – well, if you’re reading this on the page, that is. If you’re reading it in a feed reader, then it’ll look perfectly normal, but in that case, just this once, come have a look, because I’d like to show you something I’m a little bit proud of; the new Photocritic logo.


It’s a while ago since I asked now, but after I redesigned this site in the beginning of February (Yup, everything you’re looking at here is my heavily modified design-hack based on the B Social theme for wordpress), I’ve been meaning to get a new logo. I haven’t had one for quite a while, actually, and I figured it was time to change that.

Trickier than it looks…

The problem is that it’s actually damn tricky to design a logo which screams ‘Photocritic’. What does a photo critic look like? Is this site even about photo criticism anymore? It started off as a DIY blog – but that was mostly because the first article I posted on here was about DIY stuff. pc-new-logo

Since, as you’ve been able to tell, Photocritic has been a lot less about equipment (although we do have a lot of articles about equipment – if you’re curious, check out the equipment category list), and a lot more about doing fun things with photography.

In trying to design a logo, then, I was stuck with the ‘how the hell do you illustrate ‘fun with photography’. I had some ideas, tried them out, and subsequently threw them all out. I don’t know if you’ve noticed this, but I’m not much of a designer (I’m not much of a photographer either – for proof, check out my Flickr account), so finally I gave in and asked for help via Twitter, which got me a few responses, including one response from the amazing Oliver Ruehl.

Logo concept

His idea was to get a lot more abstract with the logo – moving away from the idea of ‘pictures’, and towards the idea of ‘taking photos’, which was a shrewd idea. From here, he came up with some interesting concepts, including the idea of using a split-image focussing screen as the main element of the logo.

This has a couple of benefits: If you have no idea what one of those things is, then the logo still looks distinctive and recognisable. If you do, you’ll probably be overcome with nostalgia and reach for your analogue SLR camera, just to re-experience the brilliance of manual focussing without the guesswork.

Applause!

Check out Oliver’s work on Flickr, stalk him on Twitter, and check out his website while you’re at it – he’s a legend and a gentleman. Hereby publically; Thanks for making me an awesome logo, Oliver!


Do you enjoy a smattering of random photography links? Well, squire, I welcome thee to join me on Twitter -

© Kamps Consulting Ltd. This article is licenced for use on Pixiq only. Please do not reproduce wholly or in part without a license. More info.

Manual Exposure week

rusty

For the coming week, here’s a challenge for you: Abandon the safety of Program (P) mode. Shy away from Aperture priority (Av) or Shutter priority (Tv) modes, and reach for the holy grail of photography: The M of Miracles, Magic and other alliterative phrases. Yes, kids, it’s time to stop letting the machine do the thinking for you, and do all the hard work yourself.

I admit it; I’m as bad as the next man. “Hell, I’ve earned this”, I tell myself. “I paid a lot of money for a camera that has a good light meter, who am I to second-guess it”? And I’m right of course – Programme mode is great for snapshots. I use Aperture priority mode frequently when I want the fastest possible shutter time. And I override the light meter too, by setting a -2/3 Exposure value, because I’m petrified of over-exposures.

Rusty
Rusty by boliston (Creative Commons) on Flickr

But here’s how the boys are separated from the men, and the girls from the women: Unless you have an instinctive feeling for how shutter times and apertures work in perfect harmony, you’ll be struggling to really realise your visions as a photographer. Opinion? Fact? Who knows, but what have you got to lose? Go on, go manual, and add your photos to the Manual group on Flickr while you are at it. (Or you could, y’know, start the manual mondays challenge!)

For one week only, set your camera to Manual, and take photos only like that. Don’t cheat even once. At the end of the week, if you still don’t like it, then you’re welcome to switch back.

But I bet a good few of you would benefit greatly from making the switch, if but temporarily. I know I will.

Good luck!

Big thanks to @Patryk for the idea, and to boliston for the illustration image.


Do you enjoy a smattering of random photography links? Well, squire, I welcome thee to join me on Twitter -

© Kamps Consulting Ltd. This article is licenced for use on Pixiq only. Please do not reproduce wholly or in part without a license. More info.

Wedding photography 101

twicky-fave

If everything goes to plan (what with the ‘until death do us part’ bit, and all), most people only get married once. And even if someone gets married multiple times, a wedding day is a pretty big deal. A lot of people spend a frankly ridiculous amount of money on getting married too, so they are keen to be able to re-live the moments as often as they like to.

Every reasonably enthusiastic photographer eventually gets asked if they wouldn’t mind photographing a wedding. That, my good friends, should be your cue to run. Run for the hills, run for the bus, run for you life, just get the hell out of there. Leave it to the professionals or those with worse judgement than yourselves. Just don’t do it.

Ah, what am I saying, as if any of you were going to take my advice on that point anyway. Right – so if you really have to do a set of wedding photos, remember rule number 1: Get it right. No, seriously. Get it right the first time. Don’t screw it up. It’s a big deal.

To help me convey quite how big a deal it is, I’ve got some help from the amazing Tom Wicky, who has taken some mighty fine wedding photos in his time.  


Isn’t it just portraiture on steroids?

Signing the RegisterWell, yes, sort of – Wedding photography is a lot like most portraiture: Your job as a photographer is to capture people. Capture the spirit of the events, the tears and laughter, and the raw, sheer emotion that comes bubbling to the top whenever two people get married.

It’s more complicated than that, though.. “Wedding photography is different than most types of photography because there are no retakes.”, Wicky explains. “Sports photographers know the pressure I’m talking about. In fact, wedding photography gets me in to a very similar state as sports. As a former swimmer, I get the same butterflies/nervousness in the church as I did on the starting blocks.”

And he’s not wrong – there’s something magical and awesome about wedding photography: you get to see people at their most intimate (okay, perhaps they get more intimate later in the evening. About as intimate as they’ll get with their clothes on), but the moments are very, very short indeed, and if you miss them, they’re done.

When I photographed my very first wedding, I was absolutely bricking it, never been so nervous in my life. What if my camera fails? (I brought a spare). What if my autofocus didn’t work? (I shot the whole thing on manual focus). What if my memory cards got corrupted? (I went out and bought some very expensive SanDisk Extreme cards to safeguard against that). What if… What if… I couldn’t sleep the night before.

Stealing a glance
Stealing a glance by Photocritic.org on Flickr

In advance, I’d met the bride, who was a friend of my then girlfriend, and seemed nice enough. Then I met the groom, who was a friendly guy indeed. But then I met the parents, who were intimidating, including a mother who, during the 20 minute introduction, managed to ram home ‘this is a once in a lifetime experience, you know, I’m very worried that you’ve never photographed a wedding before’ about seventy eight times.

Wicky experiences weddings much in the same way: “I even have a pre-shoot ritual like in swimming that I do to get ready for the event to get my mind clear and focused. It sounds nuts, but if you’ve every been lead on a wedding gig, you know the butterflies and sweaty palms I’m talking about.”

But don’t let me scare you out of it, because – as with every other harsh test of reality you’re likely to come across – there’s gold at the end of the rainbow. “Funny thing about weddings is – and here’s the good part – when all is said and done, all the wonderful food, dresses, the location, the atmosphere, the huge budget… it will all slowly fade over time… only the pictures will remain”, Wicky explains, and summarises in a few words how I feel about wedding photography: “I’m proud and honored that people trust me to record these memories for them.”

Formal wedding photography

If you get over the first hurdle, and you’ve decided that, yes, it’s worth going through all of this, then you’ve got another barrier to scale: There’s a lot of etiquette and expectations around wedding photography. I’ve shot one formal shot where I was asked to reproduce the bride’s parents’ wedding photo from the early 70s – both of them standing on a stairway, one step up from each other, in glorious 1970s dresses. It sounds god-awful, but the result was bloody awesome, because it meant something, and they both wanted to nail this one particular shot. I’ve done other photo shoots (thankfully not as part of wedding shoots) where the well-meaning art director had a brilliant idea which Just Didn’t Work – because one of the models was too tall, and another model was wearing a skirt where (I’m sorry there’s no truly polite way of saying this) there was no way of photographing her without showing off her girly bits.

Till death do you part
Till death do you part by Photocritic.org on Flickr

Anyway, do excuse my rambling – the point is, as Wicky points out, that “at first glance it appears that the photographer is limited in creativity. Every has seen the stereotypical bossy obtrusive wedding photographer, who all get the same shots. It’s like getting your picture taken for your high school yearbook – but you don’t have the text or your senior quote to set yourself apart.”

As for myself, for one of the weddings I photographed, I was approached by the bride’s mother, who had a neat Excel spreadsheet with a list of the shots she wanted – 45 of them. Of which 30 were various combinations of ‘bride, groom, family member A who doesn’t like family member B’, followed swiftly afterwards by “… and family member B and C who can’t be seen in the same photo as A”. I got through it (and subsequently – most unprofessionally, I admit – drank a prodigious amount of strong brandy from the free bar to get over the ordeal), and vowed never again.

Don’t get me wrong – wedding photography can be lucrative business, a lot of fun, and perhaps even both – but your biggest strength as a photographer will always be to know your weaknesses. Me, I’m not much for patience, and I much prefer doing things my own way, so I can’t give much advice on the formal shots.

Stolen kisses
Stolen kisses by Photocritic.org on Flickr

But seriously – think about it this way: you were asked, chosen, or blackmailed into doing wedding photos for a reason, right? That reason is probably that they like your photos, not that they want you to operate as a technician. The key thing is to be clear, frank, and upfront about this with the bride and groom: Tell them clearly what you can and can’t do (and what you will and won’t do, even if you can), and then it’s up to them to decide whether you’re the right photographer.

As my favourite wedding photographer Wicky puts it: “I think as photographers, all this parity in the marketplace is the opportunity to set yourself apart”. Amen.

Documentary style wedding photography

Trash the Dress by TufferMost of the weddings I’ve photographed have been 90% documentary style (as in – everyone, please get on with what you’re doing, and please ignore the camera altogether). I guess perhaps that’s why I was drawn towards Wicky’s style as well, as it’s similar in philosophy (As he puts it: “I like to think of my photography as natural and intimate. My best shots are emotive with a journalistic, street photography edge to them.”), yet quite dramatically different in execution.

Right: Trash the Dress by Tuffer on Flickr

So, how do you shoot ‘documentary style’? I find that it’s useful to let everyone know what you’re doing, and why you’re there: That you’re taking photos, but that you just want people to ignore you. At first, this is a little bit tricky for people to accept, but the trick is to shoot a lot of photos in the beginning of the event – even if you don’t see anything worth photographing. Once the initial edge wears off, people become more off-guard, they get used to the incessant clicking, and you are able to blend in much better.

Once people are used to your presence, the time has come to do what you do best: Observe.

The Bridesmaids
The Bridesmaids by Photocritic.org on Flickr

Wicky explains it best: “I get my best photos by looking for things and observing things that most people miss. Whether that is a pattern in the audience, a background hiding somewhere, interesting lights sources or color arrangements – I try to exploit these differences so my work stands out from other photographers.”

Wedding photography, like portraiture, is a constantly changing landscape where people are the chief ingredient. Observe, and you’ll find the most amazing pieces of theatre playing out right in front of you – all you have to do is to catch a sixtieth-of-a-second slice of the action.

The key is uniqueness – every wedding is different, and so every set of wedding photos will be special, unique, and exciting. But you’d be amazed at how much of the photographer you see in the photos. “It is very hard to get shots that truly differentiate themselves from my competitors”, Wicky muses, “but that, make no mistake, is the goal.”

twicky-1
Photo by Tom Wicky

Play to your strengths – I, for example, have a lot of experience with doing live gig photography, and so I feel most at home with a long, fast zoom lens (my preferred weapon is a 70-200 f/2.8) or a fast prime (I’ve been using a cheap-as-chips 50mm f/1.8 so far, and can’t wait to put my new 50mm f/1.4 in use, if I’m ever invited back to photograph anyone’s wedding, but that’s a story for later in this article)

In short, if you’re used to working in a studio, then set up a makeshift studio. If you prefer high-ISO, tricky-light situation shots, then stick to that. By all means, get creative and explore, but ultimately, someone else’s wedding is probably not the right place to try out a new lens. As Wick illustrates: “I wouldn’t know what to do with a softbox or an umbrella if you gave them to me – besides the obvious.”, and so he has the wisdom to just leave them be.

twicky-5
Photo by Tom Wicky

Is that a Canon in your pocket…

When it comes to equipment, you have to be quite clever, but ultimately, if you’re comfortable shooting street-style with a Leica M-series, if you love shooting film instead of digital, if you think it’s a wise idea to shoot a wedding with a Lomo (and, I guess, if your bride and groom agree), then have at it, and knock yourself out.

The most important thing is comfort: You don’t want to pick up a hired top-of-the-line Canon digital SLR only to discover that it’s too heavy for you to operate comfortably, or set out to take a set of photos with a lens that turns out to be too wide (or too much of a tele, for that matter).

Father and Bride
Father and Bride by Photocritic.org on Flickr

Personally, I shoot weddings – as already mentioned – with whatever Canon EOS dSLR body I’m currently using (right now, a 450D because I’m not working professionally at the moment and my 30D wasn’t too fond of being dropped from a great height), my 70-200mm f/2.8 lens and a fast prime. I’m itching to photograph a wedding where the starring pair are willing to let me experiment with a Lensbaby – which could cause some absolutely awesome photographs, but may also end up with a load of photos that are a little bit too wacky to be useful, and I haven’t been brave / stupid enough to try.

Wicky shoots with a Canon 5D MarkII and a Canon 450D, with a variety of Canon L-series lenses.

Top 10 wedding photography tips

Tom, who has far more experience than me in all of this wedding photography lark, helped me put together Photocritic’s top 10 tips of type absolute golddust – if you take away nothing else from this article, go ahead and memorise these – they’ll come in handy some day, I promise:

1 – Create your own style

Be yourself. Post authentically. Don’t try and be someone you are not. Find a style and vision that is your own. Make sure it matches what you believe in and stick to it. Study others but let that influence translate into your work and push your work to a new level.

If you don’t have a style yet – keep shooting! Following on the sports metaphors, the more at-bats you get, the more time you spend on the range, the better you know your equipment, the better your results will be.

Make a Wish
Make a Wish by Photocritic.org on Flickr

2 – Build your portfolio

When starting out it is vital to gain experience, so build your portfolio carefully. It is a bit of chicken or egg dilemma but eventually someone will let you shoot their wedding for free. Once you have one, use that work to get another one.

At first, look for unique weddings (e.g, exotic locations, ethnic weddings, unique style of wedding, etc.) to shoot – this will allow you to distinguish your work more easily. Be prepared to shoot many wedding for free as you build your portfolio. When you have enough excellent shots, put together your portfolio and begin telling your story.

Dance little sister by katialo
Dance little sister by katialo on Flickr

3 – Use color

Many ‘experts’ insist on B&W and many clients will tell you they only want B&W – I don’t buy it. At times will B&W give a better feel? Sure. But not always. Use color as an additional element in your work. Watch how the light hits colors in your frame and capture it. Look for patterns in colors or color sequences and see let them work for you…you can convert to B&W anytime.

Touched
Touched by Photocritic.org on Flickr

4 – Use the internet

I can’t imagine building a wedding photography business without it. The internet is a great equalizer. it let’s you broadcast your message, your style, and your work just as wide and far as the other professionals in your field.

Leverage Twitter, Facebook and weddings sites where potential customers hang out online. Build a blog and update it often with valuable information. Spend time and energy in building your online portfolio – this is your virtual handshake and look in the eye. It better make a good first impression.

A Bride (HDR)5 – Use a Second Photographer

As there are no timeouts and no retakes, consider using a second photographer. Be sure you can work with him before jumping into a partnership. It is very important his style meshes; if his style is highly post-processed with studio lighting and equipment – probably won’t mix well with your handheld photojournalistic style.

Right: A Bride by Neona on Flickr

6 – 3 G’s – Get Good Glass

Lenses – buy the best glass possible. Digital cameras might be the biggest marketing hoax in the history of marketing – buy the glass. Going from standard kit lenses to professional series lenses is a watershed change in quality. Forget megapixels, forget sensor size – it’s all in the glass boys and girls…

If you can’t afford Canon L-series (or whatever Nikon’s top-of-the-line equivalent is), try using high-end Sigma or Tamron lenses (their cheap lenses are even worse than Canon’s own kit lenses, but the top-end stuff is 90% as good as L-series glass at 40% of the cost). Failing that, buy yourself a couple of nice prime lenses.

7 – Be Ready

Adrenaline junkies apply here. You’ll love shooting weddings. You should always be ready to shot – keep your finger on the trigger – you never know when the shot of the wedding is coming. Without fail, the shots that are the best are never the ones you think they are or going to be. I almost always find them when searching through pics afterwards….

8 – Know your bride

Well, yes, and the groom as well. Getting to know your bride/groom/wedding party is critical. The better you know them, the more comfortable they will be with you and the easier time you will have make them at ease and getting your shots. As you get to know them, you will feel more and more comfortable moving them around and asking them to try different things.

Most importantly you will be more likely to get authentic, true emotion. Like here:

twicky-2
Photo by Tom Wicky

If I had not been on good terms with this wedding party – I never could have gotten them to light up like this. That emotion makes the shot.

9 – Be Prepared

Go to the venue(s) ahead of the big day, get them to provide you with a brief about who the key people are (Bride and Groom are obvious, but can you tell the groom’s mother from the groom’s mother’s best friend?), and find out if there’s any issues or frictions you should be aware of. I (Haje) once screwed up really badly in one wedding by asking the groom’s mother to pose with the groom’s father – only to discover that they hadn’t been married for 20 years, had gone through a deeply acrimonious break-up, and scarcely were able to stay in the same room together. Needless to say, the photo didn’t come out very well.

The last wedding I did – for a good friend of mine – I didn’t actually make it to the wedding ceremony in time. I blame my satellite navigation system, London Traffic, and the weather, but nonetheless: If you think it may take you 5 hours to get somewhere, plan 10 hours. There’s absolutely no excuse for not showing up at least an hour in advance – in fact, I’m damn lucky they’re still talking to me.

10 – Visualise

Would you let you shoot your own wedding? If the answer is ‘no’, then don’t even embark on this particular adventure – but if it’s ‘yes’ – how would you shoot it? What would you want to have photographed? Which of your guests would you definitely want to appear in the photos somewhere?

Go on, storyboard the top 10 photos you’d like of your own wedding – and then do the same for the wedding you’re about to do. Whatever you do, don’t show these storyboards to anyone, but the process of putting them together will go a long way towards thinking up new ideas ahead of a photo shoot.

Walking down the aisle
Walking down the aisle by Photocritic.org, on Flickr

Recent favourites

So, of course, between Tom and myself, we’ve got a couple of favourites up our sleeves.

Tom knows what his recent top shot was… “My favourite has got to be this one from the mountains in Austria. We were in a little village in the middle of the Austrian Alps. The church we were in had no heating and was poorly lit. Outside, the fog rolled in the morning of the wedding and was thick as soup. I was worried I might not get 10 ‘keepers’ from the entire job. But about 10 minutes after the church ceremony ended, a crack of sun broke through the clouds. The ray of sun was there for literally 5 minutes. I quickly got the bride and wedding party out behind the church in the snow and the outcome was magical. The white dress on pure white snow with a peek of sun through mysterious clouds was truly a once in a lifetime shot. The bride and groom were thrilled.”

twicky-fave

My shot has a similar story behind it – this is by far my most favourite wedding shot I’ve ever taken. They wanted some photos done in a field with sheep (they’re both from Texel in the Netherlands, which is famous for sheepswool). All the way at the end of the shoot I had an idea – which came perfectly true in this shot. Needless to say, they loved it.

I pronounce you...
I pronounce you… by Photocritic.org on Flickr

About Tom Wicky

Tom’s love for the lens developed in 2001 over a six-month trip through Europe when his Canon 2-megapixel beauty was his only currency. His days consisted of documenting his travels and finding creative ways to offload images from his 128MB CF card in remote places that had never seen a digital camera before.

Tom is the publisher of popular photoblog ZoomVienna - a photoblog detailing his life as an expatriate living in Vienna, Austria. In 2005, Tom captured an image a day for a year documenting a year in his life on the road. Since then his works have appeared in various travel books and magazines, music CD covers, textbooks, and in United Nations brochures. National Geographic considered ZoomVienna a top photo resource on Vienna in its November 2008 issue.

Tom brings his vibrant street photography style to weddings which allows him to cover different angles than those typically seen from other traditional wedding photographers. Although happy to shoot the compulsory ‘formals’ of the wedding party, he prefers to blend in with the guests letting his photojournalistic style document the action as it unfolds. Check out his website – Tom Wicky Photography, or find him on Tom can also be found at tomwicky.com, zoomvienna.com and on twitter!


Do you enjoy a smattering of random photography links? Well, squire, I welcome thee to join me on Twitter -

© Kamps Consulting Ltd. This article is licenced for use on Pixiq only. Please do not reproduce wholly or in part without a license. More info.