viewfinder

An auto-focusing modes primer

Autofocus is such a wonder-tool in our cameras that I'm sure quite a few of us have no idea how we ever managed to take tack-sharp photos without it. But how many of us actually use it to its full potential? There's a bit more to auto-focus than the single or one shot default. Without further ado, here's a quick primer into the different auto-focusing modes you're likely to find on your camera, and when best to make use of them.

One or Single shot

This is probably what you think of as 'auto-focus'. You point your camera at your subject, you line up your auto-focusing points over it, you half-depress the shutter button, and the camera attempts to focus on the subject. When it finds focus, it 'locks' onto it until you complete the depression of the shutter button or release it and re-focus your shot. This mode is great for most subjects that don’t move a lot.

The apples weren't going anywhere; one shot was just fine

Canon calls this mode 'One shot'; you'll see it marked as 'AF-S' on Nikon, Fujifilm, and Sony cameras; Olympus refers to it as S-AF and Pentax as AF.S.

Continuous or Servo mode

When you're shooting fast-moving subjects and want to keep them in focus, try using continuous or servo mode. While you half-depress the shutter release button, the camera will repeat the auto-focusing operation in order to keep your subject sharp as it moves across the frame.

Tracking something fast moving? Try AI Servo or AF-C mode.

Canon reckons its servo mode can track subjects approaching or receding at upto 50 kilometres per hour, making it good for capturing plenty of sports.

Nikon, Fujifilm, and Sony refer to this mode as AF-C; it's marked as AI Servo on Canon cameras; on a Pentax you'll see it as AF.C; and it's C-AF on an Olympus camera.

Intelligent or Automatic auto-focus

'Intelligent' focus is a half-way house between single shot and continuous auto-focus. When you half-depress the shutter button, the camera is set to recognise movement in the subject. For subjects that don't move, the camera will use one shot auto-focusing. Should it detect movement from the subject, it will automatically switch to continuous auto-focus and start to track the subject.

Animals (and children) often favour AF-A mode

While this mode might seem like the best of both worlds, and it can be very handy particularly if you're photographing children or animals, it can sometimes be a bit of a let-down and isn't quite fast enough to deliver the results you want.

Canon calls this mode AI Focus AF. It's AF-A on Nikon and Sony cameras, while Pentax refers to it as AF.A.

Manual focus

It was learning to align the focusing markers in an SLR that first got me hooked on photography, almost 30 years ago. Back in the early 80s, auto-focus was only just beginning to make its way into cameras. Now we often wonder how we cope without it. But still, there are times when auto-focus simply won't do and you need to switch to manual focus, maybe for macro shots or some landscapes. If there's no obvious manual focus option on your camera, try looking on your lens: there's likely a switch to be flicked there.

Macro shots can benefit from manual focus (Image by Haje)

Often, but not always, your camera will help you by beeping or flashing when it thinks that you might have achieved focus on your subject. If you're using live view rather than through the lens, try using the manual focus assist option that lots of cameras have now. Rather than displaying the full frame, it zooms in on the area where you've focused, making it easier to hone in with precision on your subject. It's a useful tool to demonstrate just how big a difference a small adjustment can make to your focusing, too.

Exploiting your camera's capabilities

Your camera is gifted with heaps of different tools to help you get the shots that you envisage; there's more to it than exposure and metering. Don't forget to make use of them - that's why they're there!

Camera Exotica: the Pellicle mirror


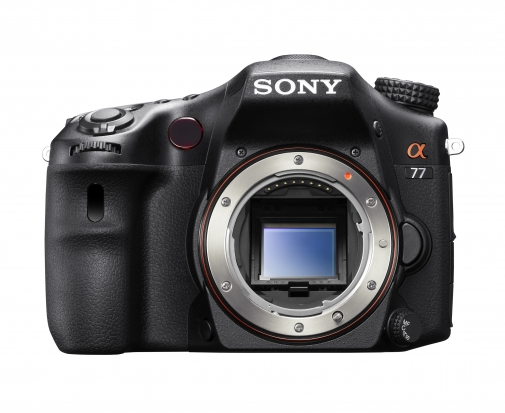
Sony's new Alpha SLT 77 uses ancient tech in a new way. Nifty stuff.

A pellicle mirror is a semi-translucent mirror used in a few very rare and far-between cameras - until recently, when Sony re-introduced the technology in a few of their compact system cameras. So why are Sony reaching into photography history to make new cameras?

Let's take a look at the technology...

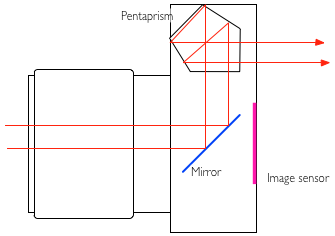
The idea of a pellicle mirror is that it takes the place of a moveable SLR mirror. In traditional SLR cameras, the tech looks something like this:

penta_1.png

The lens focuses the image and flips it upside-down in the process. It then reflects off the mirror, into the pentaprism. The pentaprism flips the image rightside-up again, so you're looking at the world as you're used to seeing it.

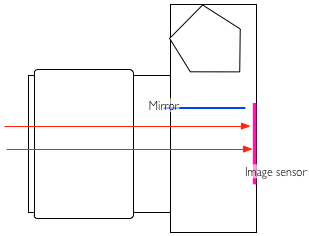
When you are taking a photo, the mirror flips out of the way, so the light reaches the sensor, enabling you to take your photograph:

penta_2.png

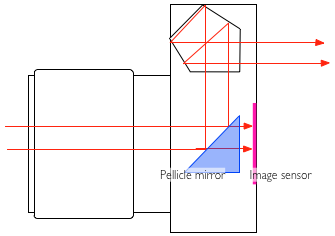
A pellicle mirror does things differently; it is, in fact, a semi-translucent mirror, which lets some light through to the imaging sensor, and some light through to whatever else needs to see the light: In Pellicle mirror SLR cameras, it sends part of the light into the pentaprism so you can view it through the viewfinder:

penta_3.png

Why use a pellicle mirror?

The advantages of using a pellicle mirror are many: The viewfinder never goes dark, so you can see what happens all the time. There's no mirror slap - this is good for macro photography, where even the slightest shake of the camera can cause a blurred image - and it makes the camera significantly quieter as well.

Finally, back when pellicle mirrors were first introduced back in 1965, it was the only way to get high-speed photography done, enabling pictures to be taken at a faster continuous rate. Why? well, because the mirror does not have to go up and down for every image.

The EOS 1N RS (RS stands for Rapid Shooting), for example, can take 10 pictures every second

There are a few disadvantages to using a pellicle mirror - traditionally, pellicle mirrors caused about a 1/3 stop of light loss. (Some light has to go to the viewfinder). In addition,   The mirror has to be kept perfectly clean, or else the light sensor and other electronics (as well as the image quality, obviously) will suffer, but cleaning a pellicle mirror is a bit of a specialised job.

The reason why a pellicle mirror has to be kept so much cleaner than a 'normal' mirror, is that a normal mirror isn't part of the optical path to the film or sensor: If you have a dirty mirror in your SLR, that's annoying when you're using your viewfinder, but it flips out of the way before a photo is taken, which means that it doesn't really matter. In addition, when you change lenses, the mirror offers a little bit of protection for the shutters whilst the innards are exposed. On a pellicle-mirror camera, what you see is what you get: It's the front-most element of the camera, and if it gets dirty, your images will degrade in quality.

Pellicle mirrors have been used in the Canon Pellix QL (1965), the Canon F-1 High Speed (a limited edition camera introduced for the 1972 Olympics), the Canon EOS RT (1989), and the Canon EOS 1N RS (1994). On the Nikon side, pellicle mirrors were used in the Nikon F2 HS and the Nikon F3 HS; the latter was introduced for the 1998 Nagano Olympics.

Pellicle mirrors in the digital age

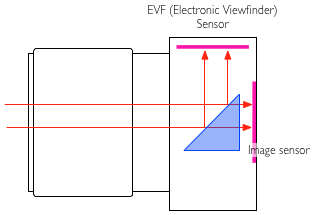
Sony have re-embraced the technology in a couple of new launches, including the top-of-the-line Sony SLT Alpha 77, and the Sony SLT Alpha 65:

penta_4.png

The advantages of using a pellicle mirror in this case are many; Using the image sensor for the EVF causes it to slowly heat up, which degrades image quality through the addition of extra noise. By using a dedicated (presumably lower-power-consumption) secondary sensor for the image preview, you can get better battery life, and higher quality photographs to boot.