Our photo competition winner takes flight!


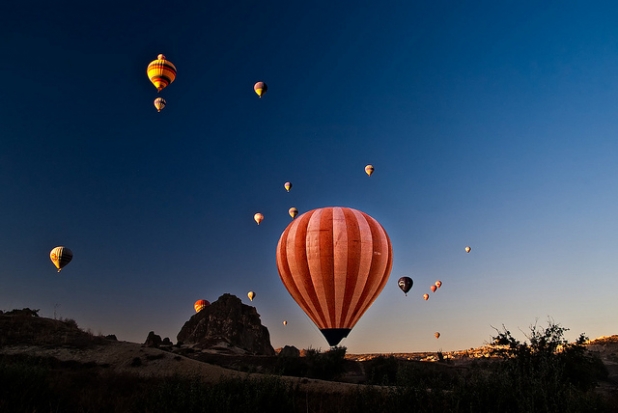
Almost Like a Lightbulb, by Giuseppe Maria Galasso

The theme for February was 'flight'. We had some amazing entries, and some of them were very original takes on the theme, so as always, picking a victor was a complete pleasure. But our winner really stood out from the crowd with its gorgeous colours and capture of a moment, so many congratulations are due to Giuseppe Maria Galasso for his Almost Like a Lightbulb.

He's won himself a 12" Fracture.

The theme for March will be going up soon, so keep an eye out for that one. And don't forget that you can keep up to date with our competitions - and other photographic news - if you follow @SmallAperture on Twitter, too!

New issue of Photographer's i out now!


Issue 2 of Photographer’s i Magazine—an interactive, multimedia magazine for photographers—is now available on the iTunes Newsstand.

Yes, it is so chock full of informative and entertaining multimedia content—if wasn’t on an iPad, you would indeed need a wheelbarrow. This exciting issue—available for US $5.99 after downloading the free app—serves up over 150 full “pages” of text, photography, audio and video from internationally acclaimed professional shooters such as: Michael Yamashita, Douglas Dubler, Gregory Heisler, Lucas Gilman, Michael Freeman, Heather Angel and many more!

Try tackling our fully interactive compositional lesson with Michael Freemen and learn about composition. Then explore lighting and other master techniques from pros who are at the top of their game. Watch Jesse Coombs go over a 100-foot waterfall in a kayak and see the backstory about getting the shot in hazardous conditions. Journey to Japan to photograph snow monkeys, and follow Marco Polo’s travels to China. Hear the stories behind the stories, visit photographers in their studio or on the road, and watch and listen as they talk about their most memorable minutes from a lifetime of professional shooting. Discover what inspires them to create, learn how they solve problems on a shoot, and hear their war stories from their many years behind the lens.

There's a preview on the website, and you can download it for iPad or for Android.

There is no photography magazine like this, so fire up your iPad and take a closer look!

Photographer's i Magazine is published bi-monthly. The Pilot issue is still available at the introductory promo ($1.99 / £1.49). Issue 2 is available for $5.99 / £4.49 or on a cheaper subscription offer.

Bouncing around with the BeetleCam


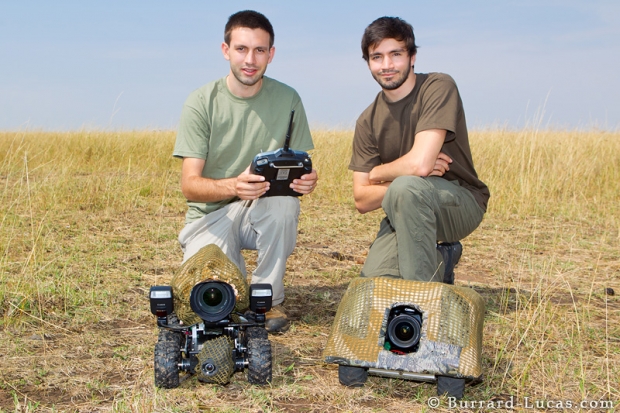
Will Burrard-Lucas (left) and Matt Burrard-Lucas (right) with two BeetleCams. Masai Mara, Kenya.

Back in 2009, The Brothers Burrard-Lucas - Will and Matt, an ingenious duo of wildlife photographers - set off to Tanzania to test out their home-made camera buggy, the BeetleCam. The idea was that a camera mounted on a small remote-controlled vehicle would allow them to capture close-up shots of animals in the wild that they wouldn't be able to achive with their cameras firmly in their hands or mounted on tripods. And it worked. Up to a point. Unfortunately they lost a camera in the process, and BeetleCam came off far worse in its single encounter with a lion.

However, the photos that the original BeetleCam had managed to help capture convinced Will and Matt that they really were onto something; the BeetleCam would allow them to take ground-breaking photos of wildlife. So undeterred, Will proceeded to rebuild and modify BeetleCam in 2011. He came up with two new versions: one with more advanced capabilities and the other with an amoured shell that should be able to withstand the inquisitive approaches of big cats.

With their modified BeetleCams, they set off to the Masai Mara to test them out again. And this time, they returned whole - if battered - and with a host of super-impressive photos. Take a look for yourself up there, or head to the BeetleCam site to see even more.

Flush with success, they've decided not to keep BeetleCam all to themselves, either. If you'd like your own one, they start at £1,250 for the basic unit and then increase with all the exciting optional extras that you can build in to them. Interested? Get in touch with them and they'll see what they can do.

Then it'll be your turn!

How to do time-lapse photography

photocriticorg_gizmodo_20110103_img_4377_0_620x3491.jpg

Sunrises make for glorious time-lapse scenes

If you've ever seen the sun come up quickly over the city in CSI, or that fox decomposing in the title credits of True Blood, you've seen time-lapse in action. Here's how to do it...

Time-lapse is where photography meets video. Essentially, all you do is that you take a load of photos, and then play them quickly after each other–like a flip-book cartoon–and watch the frames come to life. Taking a photo every second compresses half a minute into a single second; with glorious results.

All you need to create your first time-lapse masterpiece is a tripod, a camera, an intervalometer, and a good idea.

In order to create your first time-lapse photographic movie, first you will need to think of an idea that you want to convey. Sunsets in the desert, a flower wilting, or (if you're really ambitious) a human being going from cradle to grave - it's all possible.

Taking the photos

So, to begin taking photos, set your camera on your tripod and make sure it stays in the same position throughout the whole process. Next, you can start taking your photos. You can do this by hand, but to get the timings smooth and your video looking better, try using an intervalometer. There's many different types of 'em out there - including ones you can buy for about £15-20 or $20-$30 from Amazon, and, of course, the Triggertrap, which comes with time-lapse features built in.

As a general rule, the more photos you take, the longer your final movie will be. Make sure that you also keep your camera on the same settings while you are photographing your scenes, otherwise there will be a noticeable difference in many of your photos in the final product–I find that Aperture Priority (Av/A) and manual focus works well; that way, the depth of field stays the same, but the camera will compensate for any fluctuations in lighting.

Stringing them together

Once you are done taking your photos, then you can upload them to your computer and lace them together by using a video editing software. Choose a video editing software that you are comfortable with and import the photos into the program. The photos will import in the order that you took them and each photo will automatically be assigned a time per frame. The time per frame is the amount of time that each photo will appear in your video. You can go to your tools and manually enter times that work for your video's concept. Most videos play at around 30 fps, but you don't have to play your video at full speed; you can choose to let each frame last two or three frames of your video, for example.

Overall, time-lapse photography can be a beautiful form of photography. It can be a simple process at first, but as you up your skills, your movies will take longer to produce, and they will become more complex. You can start introducing camera movement during the timelapse, for example, or come up with other cool effects.

If you are feeling adventurous this weekend, then grab your camera and try your hand at time-lapse photography. It is a fun way to spend a few hours, plus your final product will be a video that you can share with your friends and family. Keep practising–it's a lot harder than it sounds!

Need some inspiration?

Earth | Time Lapse View from Space, Fly Over | NASA, ISS from Michael König on Vimeo.

Life of flowers (Жизнь цветов) from VOROBYOFF PRODUCTION on Vimeo.

Good luck!

Olympus' new board - in the shadow of the old one?

Finally, the scandal-ridden board of Olympus has resigned. Their situations were pretty much untenable, and they had said that they would go. But only when they were ready and only after they'd appointed the new board. They made their new appointments this week, and have duly stepped down.

Picking up the poisoned chalice of president will be Hiroyuki Sasa, who steps over from the medical equipment marketing arm. The new chairman will be Yasuyuki Kimoto, who was previously an executive for the Olympus-connected Sumitomo Mitsui Banking Corp.

The appointments, are, however, dependent on shareholder approval at a meeting on 20 April.

Sasa has stated publicly that his primary concern is to win back consumer confidence in Olympus and to implement structural reforms across the compacy to prevent the kind of fairy-tale book-keeping that got into such a dire mess in the first place. But really, what else is he going to say in this situation?

What he says and what he will be able to do are different things, however. Olympus is desperate for reform and everyone knows this. But the old board's insistence on naming its successors somehow casts a pall on the new board, however compentent and determined it is. I can't help but feel it would have been better for them to have stepped away entirely and allowed for the appointment of a caretaker board before a permanent one was named. This would allowed for a completely clean slate, and would have reduced the insinuations that someone, the old guard still retains some form of control, whether it is because of patronage, or because they picked their own men. Neither of these scenarios is necessarily the case, but the circumstances, Caesar's wife really does need to be above suspicion.

10 ways to improve your photography


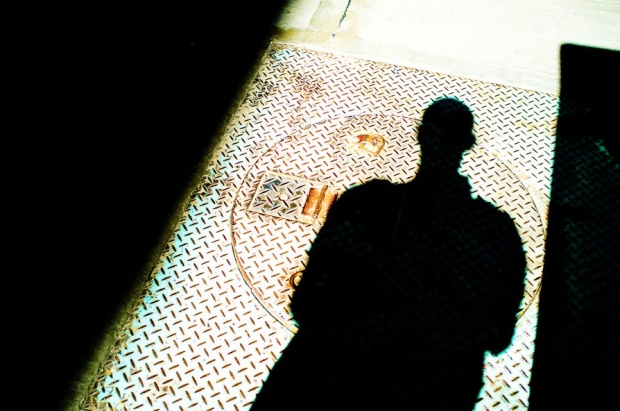
Think outside the, er, manhole cover.

One of my favourite things about photography is that it's so accessible as an artform. To create a painting, you can't expect to be able to deliver anything if you go and buy some canvases, brushes, and some paint without any training or idea what you're trying to do (although, to be fair, some modern art does give that impression)... In photography, you can take your very first photo, and it'll come out well-exposed, and it'll be of roughly whatever you pointed your camera at. Cool beans, now let's take a look at how we can get better...

1. Invest in Good Equipment

The photographer makes the photo, not the camera, but there's nothing wrong with considering some new equipment every now and again. For some people, upgrading to the latest and greatest is all the inspiration they need to get out there and take better snaps. You don't have to buy a fancy DSLR, but really research your next camera and find one that truly fits your needs.

Nowadays there are hundreds of different types of cameras that you can choose from, so really put some thought into what you will be using your camera for before you invest in one.

2. Learn how to Use your Equipment

Another great tip is to read your camera's manual. Reading the manual will give you the edge; it will allow you to know your camera inside and out and in turn you'll understand the mechanics of a camera.

After reading the manual, play with it; try taking photos in every photography modes, and try setting youself little challenges - like "only taking photos at ISO 1,000 today" or "this week, I'm using manual focus only" or similar. Your photos may not necessarily come out better, but inventing games to help you understand your camera better is a huge step forward. Want some more fun exercises? Try 10 ways to break photographer's block

3. Take a Photography Course

Community colleges or community centers often offer fairly inexpensive photography classes. It could be to your advantage to take one of these courses and learn a few tips and tricks from your fellow classmates and from your teacher about the technical aspects of photography. Alternatively, there's plenty of books out there that could help you along - perhaps one of mine? ;-)

4. Try Something New

Don't be afraid to try something new in your photos. For example, if you normally take photos of your family and friends, then you can try out new lighting, or new settings on your camera. You could also try shooting at different times of the day. Night photography is a whole new world compared to day time photography, so don't be afraid to try something new and experimental in your photos.

5. Find your Niche

Find what you like to take photos of the most, and specifically work on that aspect of photography. Many people gravitate towards portrait photography, but give other branches of photography a chance as well. You never know, you could fall in love with architectural photography or pet photography.

Whatever you find you like best, try to become really really good at it - it won't be easy, and it'll be a lot of hard work - after all, if you love doing it already, it won't feel like work!

6. Take your Camera Everywhere

Always carry your camera! You never know when the perfect photo-op will arise, so it is a good idea to always have your camera close. Also, if you keep your camera with you, then you will be able to practice your photography more and more each day.

7. Be adventurous

Be adventurous in your photos. You can travel with your camera and go on many adventures with your camera in order to learn more about photography.

Going on adventures are fun, normally inexpensive, and can be fun getaways from the stresses of everyday life; they also make great photo memories. So, grab your family and go on a mini adventure one weekend. Whatever you do,  don't forget your camera!

8. Join an Internet Photography Community

Online photography communities are abundant and are super supportive. Photography communities are home to photographers who are beginners all the way to professional photographers. Joining a community can help you get the feedback you need to take your photos to the next level.

9. Look through Magazines and Photo Books

Researching photo techniques is a great way to create higher quality photos, and there is no better way to do so than to look through magazines and photography books. By looking at the photos in these publications, you can learn all about certain qualities of photography such as point of view, framing and color balance.

Lacking inspiration? Try my lust of 50 must-read photography books!

10. Have Fun!

The best advice for taking better photos in 2012 is to have fun! If you aren't having fun with your photography, then it will show in your photos. Photography is a fun form of art, so don't be shy and have as much fun as you can with your camera.


ISO: the biggest change in photography the past 10 years!

We all know that the triumvirate of exposure are shutter speeds, aperture, and ISO. It's this dastardly trio that operates like security guards to photons, standing there, ear-piece in their ears, saying "Oi, if you're name's not down, you ain't coming in". The head security guard, Mr Aperture is restricting the flow of how many photons can come in at the same time. Dr Shutter Speed is opening and closing the doors to the club for various amounts of times - if he opens the door for a long time, lots of people get in. If he throws the door open and kicks it shut again, only a few people get in. Professor ISO is the allegory-wrecker who just stands there, scratching his head, wondering how the hell he fits into this whole 'club' scenario.

The ISO game-changer.

The point I was going to make, however, is that something has changed over the past ten years, and ISO has taken over power impressively quickly...

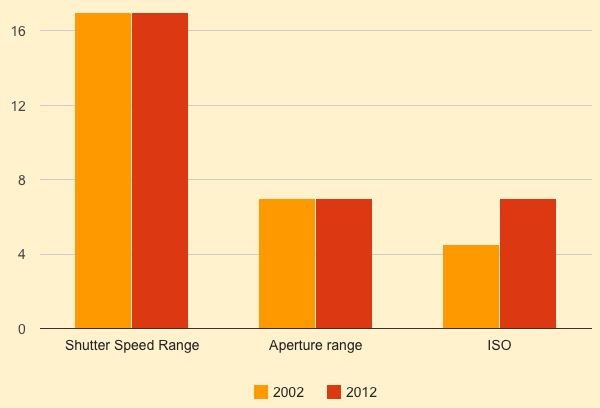
Shutter speed has remained stable; typical shutter speeds on a SLR camera range from 30 seconds to 1/4000th of a second. That's 17 stops of difference.

Apertures remain unchanged; typical aperture ranges for a standard prime lens go from f/1.8 to around f/19 or thereabouts. That's about 7 stops of difference.

However, the biggest change comes from ISO-land. Only 10 years ago, you'd be nuts to use films slower than 3200 or so (don't get me wrong, I loved my ISO 3200 T-Max... But that bad boy was grainy.). On digital cameras, ISO 1,000 was merely 'manageable' in 2002... That's only ~4.5 stops - a lot less than the range of light adjustments you get out of your ISO settings.

Compare that with the shots that are coming out of the current generation cameras. The Sony NEX-7, for example, was determined to have "quite useable results"at ISO's up to 6400, and the same verdict fell for the Nikon D3 camera:

screen_shot_2012_01_19_at_141944.jpg

That, ladies and gentlemen, is huge. It means that whilst the aperture and shutter speed range has essentially stood still for ten years, useful ISO ranges have increased from 1000 to 6400 - or from about 4.5 stops to 7 stops of useable range, which means that ISO now matches your aperture control when it comes to being able to control the brightness of your photos.

It might sound pretty subtle, but if you think about it, it's quite the revolution: It means that ISO, which used to be merely a fine-adjustment tool only 10 years ago, can now be used as a major component in your exposure decisions...

When more than just the horizon splits your frame

Horizon on the upper third; shoreline on the lower third. Perfect!

I'm doing quite a bit of landscape photography at the moment; it was my photographic resolution for 2012, and seeing as I'm travelling right now, felt like a sensible choice. This of course means that you'll be subjected to a hefty quotient of landscape articles for the foreseeable future. I'm sorry if that doesn't float your boat, but I'll do my best to keep them entertaining and informative.

So there I was, at the top of Rangitoto, a volcanic island just off of Auckland, snapping away at some landscapes, when it occurred to me: it's a cardinal rule of photography that horizons shouldn't run through the middle of photos, you should apply the rule of thirds. If you want more emphasis on the area above the skyline, you place the horizon on the lower of the two imaginary lines dividing your frame into thirds. Should you prefer that more attention to rest on the foreground, place the horizon on the upper third dividing line. That we know.

What, though, should you do when there's more than one dividing line in an image? For example, if you've a series of islands in your frame. Or a shore line and a skyline right in front of you. Yes, the horizon is the horizon, but these strong lines can also have a nasty impact on your photos if you manage to get one of them smack-bang in the middle of your frame, too.

If you've two dividing lines running through your image, ideally one would go closer to the upper third and the other towards the lower third, with both avoiding the middle. That should keep things dynamic, and prevent your image from looking flat and dull. The first image up there does just that: the shoreline is on the lower third, the horizon is on the upper third. Bingo! But, geography isn't always that accommodating towards geometry - and let's face it, it's why photographing landscapes can be so inspiring - so sometimes you will need to get a bit creative with your cropping.

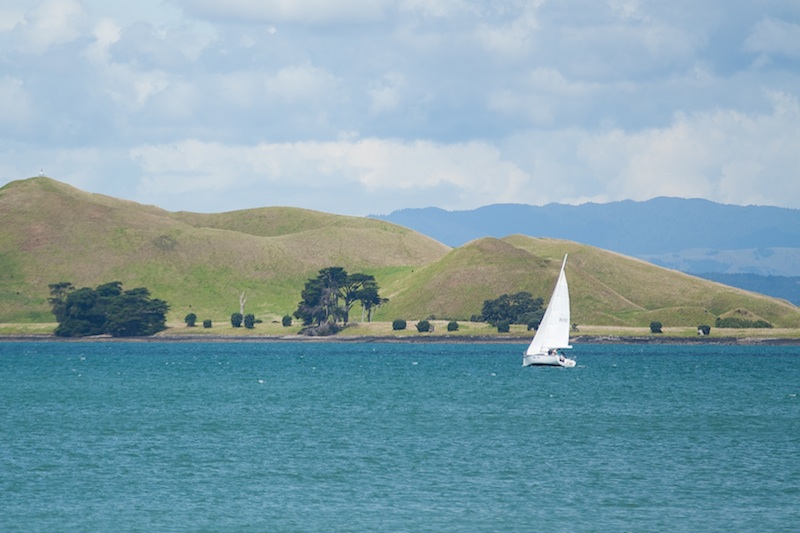
The skyline might be running along the upper third tri-line, but it does nothing for the shoreline

Take the examples with the solitary yacht. The first one (above) has the skyline is running mostly along on the upper third, but the shoreline is perilously close to the centre. By cropping a bit from the lower half, I've been able to place the shoreline on the lower third, giving it an overall better feel.

Pushing the shoreline, and indeed the skyline, lower, has a more pleasing impact

That shoreline is so strong in this image that it needs to be properly accommodated to prevent the photo from looking oh-so-obviously split in half.

In fact the blue of the sea is so strong in this picture that if you wanted to, you could even push it a little further down the image, which pushes the actual horizon closer to the centre of the frame. Of course, that might not float your boat at all!

An even lower shoreline might work, too, given how strong it is

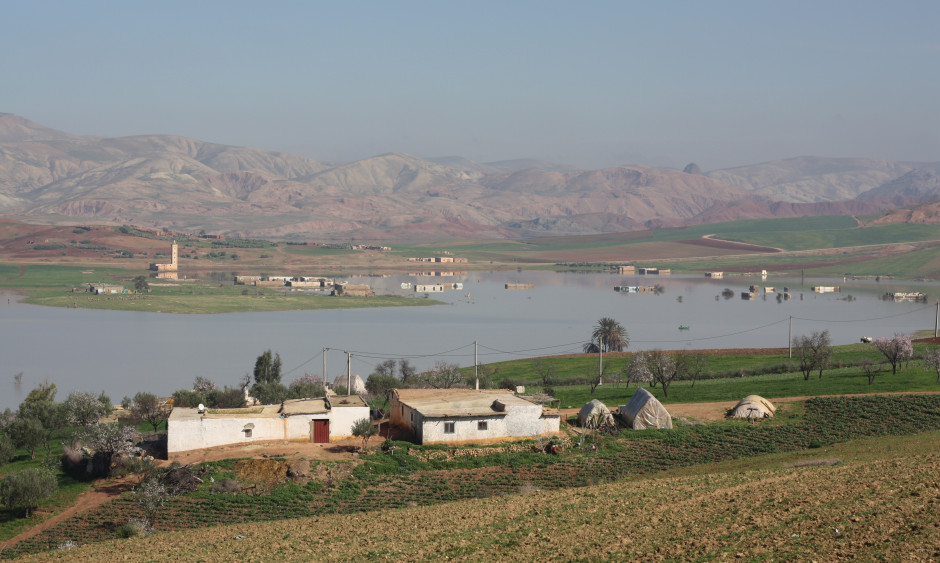
If you've an image where you have three or more strong dividing lines running through it, the chances are that one of them will end up running straight across the centre of the frame, with others above and below it. Provided that the central line isn't overwhelmingly strong and obviously bisects the scene, there should be sufficient movement across the entire photograph to keep it fluid and interesting. You can see that in the photo of the flooding I took in Morocco (down below). The floodplain runs through the centre of the image (look carefully and you can see the reflections), but the skyline and the shoreline are both strong enough to stop it from coming over as boring. In other words: don't worry too much.

When there are multiple dividing lines running through your images - use your judgement!

Finally, don't forget that if you're using a non-destructive editing package, there is nothing to stop you from playing around with the composition of your image until it looks right. Apart from making that picture look pretty, it'll also ensure that the next time you encounter a similar situation, you'll have a better idea of what works and you'll have to do less fiddling in your editing suite.

Oh, actually, this is finally: make sure your horizons are straight.

Arrests at Olympus

There's not masses to report here, but it would seem as if former Olympus chairman Tsuyoshi Kikukawa, former Vice President Hisashi Mori, and former auditor Hideo Yamada have all been arrested by Japanese authorities for their parts in the scandal that has rocked Olympus. You know, the one where Olympus covered up huge losses with some very dodgy accounting, cost former Chief Exec Michael Woodford his job when he uncovered it, and resulted in Olympus' share price taking a monstrous tumble.

Whilst Kikukawa, Mori, and Yamada all left their jobs last year, the remainder of the old board is still in place and is currently being sued by Olympus. Yes, that does seem like a rather odd situation, doesn't it?

That's about it for the moment, but heaven only knows how the stock market will react to it.

(Headsup to The Online Photographer and the BBC)

The wild blue yonder of straight horizons

Horizons: they are very definitely meant to be level in our photos. Whenever I see a lop-sided horizon, it sets my teeth on edge. Nature intended that they be straight, at least as far as our eyes can see, and our inner ear knows this. A wonky horizon will likely make anyone looking at it feel uncomfortable, as their eyes will be telling them one thing and their feet another, but they won't necessarily be able to pin-point why. And you definitely don't want that.

They also seem to be something that I am perenially unable to get right when I take a photo. (Unless I'm using a tripod, of course, then you use a dinky spirit cube in your hot shoe.) I know that they need to be level, so I try my utmost to make them that way, but they always need tweaking. I don't know, maybe I stand funny, or something.

The fix, however, is easy. Whether you're using a free online editing service or have the mighty power of Lightroom or Aperture behind you, there're tools to straighten photos. I've picked two as examples - one free, the other paid-for and swanky - to give you an idea.

If you use Pixlr (Pixlr.com, possibly my new free online suite of choice, following the demise of Picnik), it's very simple. Upload your JPEG photo into Pixlr Express, select Adjustment, and then Rotate. Then all you need to do is use the slider to alter the angle of the image so that the horizon comes up straight. There's even a useful grid to help you get it right.

Straight horizon


Use Lightroom 3 and you have three straighten options, all of which are found in the Crop panel on the right-hand side. The first is under the Crop tool, and you adjust the angle by eye, using a grid overlaid on the image to help you. The second uses the slider, allowing you to adjust the slant of the image by a precise number of degrees. The third is by far the easiest. Click on the Angle tool and then use it to draw on your image, following the line of the horizon. It'll correct the angle of the image to that line. Simple! (And it also works the same for vertical alignment, too, ensuring that buildings don't lean to the left, or whatever.)

Of course, if you want to deliberately set your skyline askew, there's nothing wrong with that and you can use these same tools to achieve that end. Just make sure that it's off-kilter enough that it's easily identifiable as deliberate. (And I'm reliably informed by one Haje Jan Kamps that a purposefully skewed horizon is called a 'Dutch Tilt'.)

Doing it deliberately with a Dutch Tilt

If you're now permanently unable to look at another picture without being able to spot the wonky skyline, I'm sorry. But you never have an excuse to be riding off into a crooked sunset again!

Keep track of your camera with CameraTrace


Being the dutiful and conscientious photographers that we are, it's likely that our camera kit is insured to the hilt, and then some more for good measure. (If not, please go sort it now. Right now. This'll be waiting for you when you get back.) That way, if some miserable thief should steal away into the night with your Canon 5D Mk II, your Nikon D3s should meet a watery fate tumbling from your hands into the murky blackness of a canal, or some other grim and grisly fate should befall your Sony A77, you'll be able to - doubtless after much sighing, frustration, and possibly even blood-letting - replace it with something new and shiny. But wouldn't it be awesome if you knew that there was a way to help locate a lost camera, or potentially bring a thieving git to justice? Well, bring on CameraTrace.

It's an online camera registration service that'll set you back the princely fee of $10 per camera. If some dastardly sod does waltz off with your treasured kit, you can fire up CameraTrace's search technology to trawl the EXIF data of photographs on famed photo-sharing sites Flickr and 500px to look for camera serial numbers that match yours. When you've located your camera in the clutches of AN Other, CameraTrace will help you complete the necessary police paperwork to try to reclaim it, too. (As they rightly point out, you shouldn't try to recover it all by your lonesome - you don't know who might have it.)

Of course, this will depend on the new user taking photos with your camera and uploading them with EXIF data intact to Flickr or 500px. Without the serial number, you're scuppered, and if they use Picasa, you're out of luck, too. At least for the moment, anyway. GadgetTrak, the developers, are working on increasing the websites covered.

More than just that, though, they also provide camera identification tags so that should you somehow manage to leave your camera on a train and it's picked up by a Good Samaritan, there's an easy - and anonymous - means of returning it to you, via an identification number and a website. And they'll ship the tags world-wide, too, so even if you live in Outer Mongolia, you can still tag your camera.

Sound like a good idea to you? You can sign up for it here.

The most photogenic festivals in the world

Are you dreaming of travelling the world, camera in hand? Sure, you can go to the world heritage sites, the famous waterfalls and the prettiest viewpoints around the world, but if you really want to capture the essence of a place, it's worth doing some planning, and capturing the festivals and events that make the local cultures sparkle with awesomeness.

I've collected 25 of the most photogenic festivals and events around the world - Time to start saving some pennies and dusting off that passport!

1. Carnival - Carnival is a festival that is celebrated in many Catholic areas around the world. The Carnival in Rio de Janeiro though is by far the most famous. It is a huge event and lasts for almost an entire week. People flock to this festival for its colorful costumes, parades, and cultural festivities.
20110201_img_0416_600px.jpg

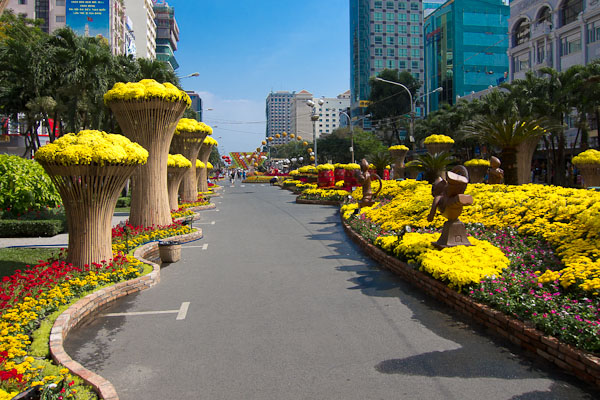
Chinese New Year: And this is before the streets fill with people!

2. Chinese New Year - The Chinese New Year is an amazing festival to photograph. Every year, there are many colorful floats and clothing items all over the streets of China. It gives photographers a chance to see the beauty of the Chinese culture.

3. Dia de los Muertos - Dia de los Muertos is a traditional Spanish festival that occurs each year in November. It is a day for honouring the dead, and it is full of traditional ceremonies and beautiful alters that each family makes for their dead loved ones. It has been compared to Halloween in the United States, and it's famous for getting a little bit crazy...

screen_shot_2012_01_24_at_161926.jpg

Photo: Dia de los Muertos (cc) Sébastien Prescott on Flickr.

4. Diwali - Diwali is a huge festival of Hindus. It is a celebration of happiness and joy, and it is a great place to photograph the culture of Hindus.

5. Cocuk Bayrami - Cocuk Bayrami, or Children's Day, is a Turkish holiday. On this day, children from all over Turkey dress up in national costumes and sing and dance.

6. May Day - May Day is celebrated all over the world. It is a festival that often includes children and is full of colourful costumes and different cultural events depending on the country that you are in. Search the internet to find a May Day festival near you.

7. St. Lucia Festival of Lights - St. Lucia Festival of Lights or St. Lucia's Day is a December festival, celebrated in much of Scandinavia. It is full of beautiful, traditional costumes, and candles a-plenty; great opportunities for photography!
screen_shot_2012_01_24_at_162337.jpg

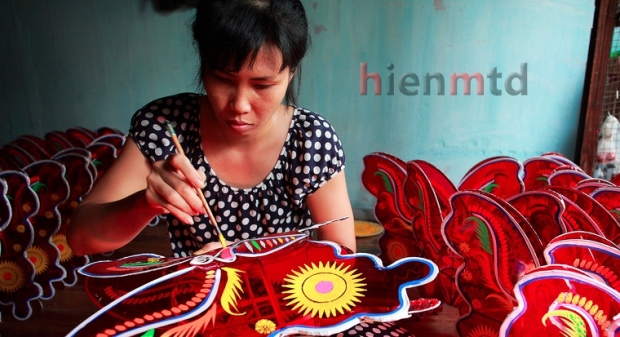
Photo: Đèn trung thu (cc) HienMtd on Flickr.

8. Trung Thu - Trung Thu is a traditional Mid-Autumn Festival in Vietnam. It is a festival that focuses on children and education. During this festival, there is a parade of lanterns in which children take part in.

9. Mardi Gras in New Orleans - Mardi Gras happens all over the world in many Catholic areas. It is normally a part of Carnival, but in many places it is celebrated instead of Carnival. If an American photographer doesn't want to travel too far to photograph an amazing cultural event, then they should go to Mardi Gras in New Orleans.
20110413_img_4228_600px.jpg

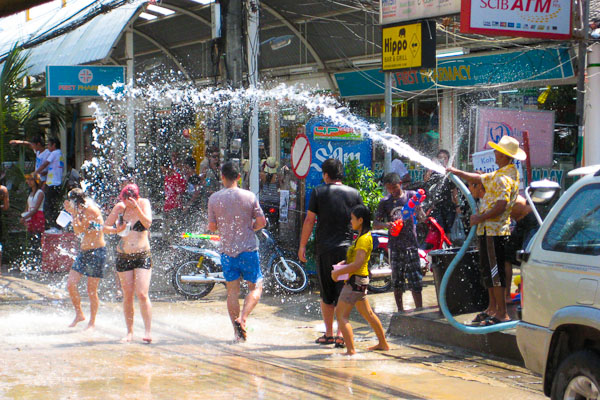
Photo: Songkran: it gets wet, but it's really good fun!

10. Songkran - Songkran is a Thailand festival that celebrates the new year. It is a national holiday, and is often full of water fights that make amazing photographs.

11. Tomatina - Tomatina is a festival in Spain that is a massive tomato fight. Photographers that flock to this festival definitely need to invest in a good cover for their cameras, otherwise they might get tomato sauce on their lens!

12. Boryeong Mud Festival - The Boryeong Mud Festival is held in South Korea each year and it is full of fun. Every year the citizens of South Korea go to the streets and have a massive mud fight. It is definitely an exciting festival to take part in - keep your camera well protected, though!
screen_shot_2012_01_24_at_162717.jpg

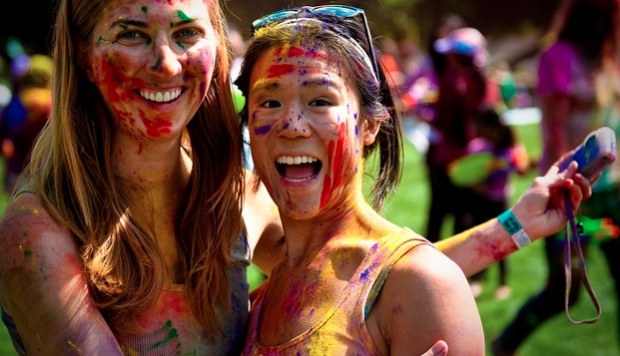
Photo: Stanford Holi : Best Friends (cc) Chris Willis on Flickr

13. Holi - The Indian Holi festival is a very widely known festival that happens after the full moon in March. It is often considered a festival of thanksgiving, and it draws extremely large crowds each year.

14. International Pillow Fight Day - International Pillow Fight Day happens all over the world and is a joy to watch. On this day, people head to the streets and start pillow fights with fellow participants. This is a fun and exciting event to photograph - check the website to find out where your local event is going down!.

15. Burning Man - The Burning Man festival is an annual festival in Nevada. It is a festival that is dedicated to art, self expression and self-reliance. Well, that, and an extraordinary amount of drugs, of course. Not all Burning Man participants are happy to be photographed, but ask for permission and snap away!
screen_shot_2012_01_24_at_162931.jpg

Photo: Queen's Day 2008 (cc) Hans S on Flickr

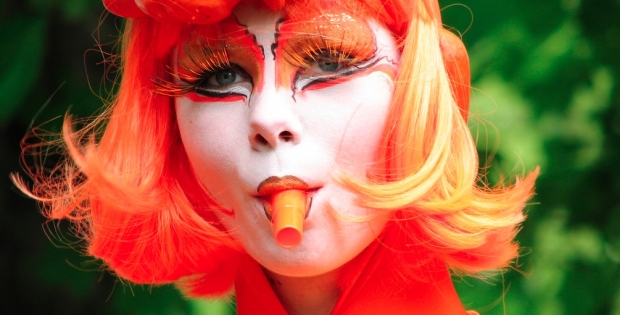
16. Koninginnedag (Queen's Day) - Koninginnedag is a festival in my native Netherlands that is held to celebrate the Queen's birthday. It is also a day in which everyone wears orange, gets inordinately inebriated, and goes to swim in the canals. Quite extraordinary, really...

17. Festa de Sao Joao - The Festa de Sao Joao is held in Brazil each year and it is the celebration of the summer solstice. People come from all over Brazil to light bonfires and do many traditional dances during the longest day of the year. flavorsofbrazil.blogspot.com/2010/06/happy-midsummer-feliz-festa-de-sao-joao.html

18. Homowo Festival - Homowo Festival is held in Ghana each year. It is a traditional festival from the Ga people of the Greater Accra Region. It is an event that not many photographers frequent, but it is a gorgeous festival filled with life and traditional ceremonies that are not seen very often.

19. Harvest Moon Festival - The Harvest Moon Festival in China is held every lunar month. It is full of traditional ceremonies and romantic festivities.
20110531_hk310102_600px.jpg

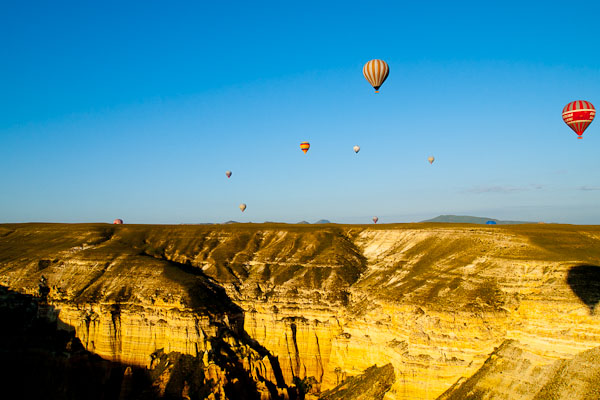
Ballooning: Join in for some spectular photo opportunities!

20. Balloon Festival - The Albuquerque International Balloon Festival is a breathtaking event to photograph. Every year, thousands of hot air balloons are set off into the air in Albuquerque. It is a must see event for every photographer. Of course, ballooning

21. Ku'omboka - Ku'omboka is a festival that is full of traditional culture in Zambia. It is held each year on Easter and it is full of traditional ceremonies and cultural events. http://www.liyoyelo.com/news/kuomboka.php

22. Lake of Stars Music Festival - The Lake of Stars Music Festival is a three-day long music festival held in Malawi each year. The festival is full of local music stars and even some big name international ones. It is a great place to photograph the culture of Malawi.

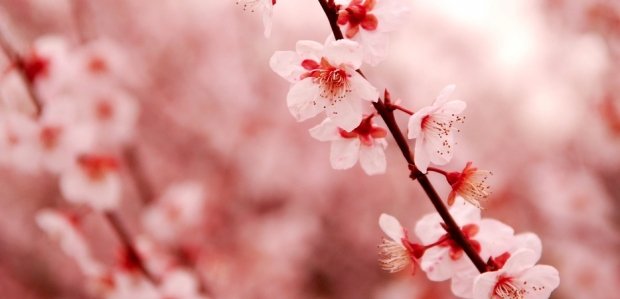
23. Cherry Blossom Festival - The Cherry Blossom Festival is held all over Asia and is a beautiful festival to photograph. The festival begins each year whenever the cherry trees bloom. People flock from all over Asia to view the gorgeous flowering trees.
screen_shot_2012_01_24_at_163234.jpg

Photo: Cherry Blossom (cc) Kiuko on Flickr.

24. Naadam - Naadam is held every year in Mongolia. It is a huge festival full of parades and classic Mongolian dancing. It is a wonderful cultural experience.

25. Pushkar - Pushkar is a festival in India that is considered one of the largest camel fairs in the world. It is held in India and it is full of camels, livestock such as chickens and cows and live music that plays well into the night.

Photographers all over the world flock to each of these festivals - with great reason; there's something about their celebration that makes people spring to life; and there can be little doubt that the joie de vivre shines through in your images as well!
Canon 100mm f/2.8 Macro: A love story

Some times you find a lens that is so relentlessly delicious that you simply have to write it a love poem. Since I'm not a poet, I fear it may merely have to be these words. Think of it as short prose, perhaps, masquerading as free-form poetry.

This photo:

6847881597_bff897ee4a_o.jpg

was taken with a Canon 100mm f/2.8 Macro lens. The Non-image-stabilised version. It costs $570 / £420, and is a truly magnificent piece of kit. For one thing, it is supremely sharp. It's a 100mm lens that's perfect for portraiture, and it's bright as well - at f/2.8, it's great for photographing in relatively low light.

Of course, its crowning feature is the 'macro' bit, and that is where it truly shines. The photo above was taken free-hand: No tripod, no flashes, no lighting; just my Canon EOS 550D, and the Canon 100mm lens. It's a little bit grainy, mostly due to having to shoot at ISO 800 to get the shutter speed high enough to be able to get the shot without much motion blur.

I know I keep raving about my 50mm f/1.4, but I've gotta say; this 100mm f/2.8 is storming up there as one of my all-time favourite lenses.

Borrow it if you can, hire it if you must, buy it if you love it.

Happy Valentine's Day! :)

Winners of the Macro Challenge announced


Update: A winner has now been found - see the bottom of this post for the answer, and thank you for playing everybody! :)

Can you guess what this is? (If you've read my book on macro photography, you're disqualified from entering, as it contains the answer ;)

To help you along a little bit... The photo is taken with a Canon MP-E 65mm lens. That's a particularly epic lens for macro photography; it starts at 1x magnification, and goes all the way to 5x. On a crop-sensor camera, you get even better effective magnifications, obviously... It's really good fun to play with, actually; if you get a chance, try to rent one from a camera rental store for a few days.

For this particular photos, I used the twin-flash kit on the lens as well. The exposure was 1/90th of a second at f/2.8 and ISO 100. I believe it is taken at around 4x magnification. The only editing is a slight crop, some sharpening, about 20% desaturation, and about 30% extra contrast.

The result!

So, in a week, there were exactly 200 people who guessed; and of those, only the 20th and 73rd guesses were correct.

The guesses were overwhelming; more than three quarters of you guessed it was paper... Which was correct, in a way, but you failed to specify what kind of specific paper it was, so I'm afraid I can't accept that as the right answer...

The photo above is of a cigarette (Specifically, a Marlboro Light, I believe). The faint lines on the side are from the cigarette factory, and the brightness at the top of the image (and the darkness at the bottom of it) are due to the curvature of the cigarette itself.

screen_shot_2012_02_14_at_131429.jpg

However, only Harald Halvorsen and Jon Garrett guessed correctly. Since there were only two people who got it right, I've decided to give both of them the first prize; Harald or Jon, if you're reading this: You'll have an e-mail with instructions how to claim your prize waiting for you in your in-box!

To everyone else: Well done, and thanks for playing! :)

Bonus

Here's a photo of the tobacco from inside the cigarette:

screen_shot_2012_02_14_at_132015.jpg

Red eyes and how to avoid them

The Red Eye phenomenon is something that occurs when you take a picture of someone. If you have a compact camera and you’ve taken a few rolls of pictures, chances are that you have stumbled across the phenomenon, during which the eyes of your subject end up glowing an eerie red glow.

It's easy to avoid, and easy to fix if you failed to avoid it, but  in this article, we'll take a quick look at the science behind red eyes, and the steps you can take to avoid it.

Why does this happen?

If an eye had absorbed all light, then this wouldn’t happen. In fact, if an eye had been theoretically flawless, the red eye effect would not have existed at all. What happens when you see the red eyes on pictures, is that the flash is reflected in someone’s eye. The reflection is red because of all the blood vessels inside the eye:

redeye_01.jpg

So… How do we avoid red eyes?

Removing the red eye effect can only be done by changing one of three things: The size of somebody's pupil, or the distance between the flash and the lens. Changing either of these things will reduce or remove the red eyes completely.

1) Turn off the flash.

This is the point most people forget about. Obviously, if you can do without a flash, either by increasing the light in the room, by switching a faster ISO value, or using a faster lens

redeye_02.jpg

No flash; no red-eyes. Simple!

2) Move the flash further away from your lens

This is a bit harder with compact cameras, but if you have an SLR, you should definitely get an external flash that connects to the hot shoe of your camera. For one thing, these flashes are a lot more sophisticated than the internal ones, but they are also are significantly further away from the lens. Because of the additional distance, the reflection from the back of your eyes never reaches the lens, and the red-eye effect is reduced or removed:

redeye_03.jpg


3) Make the iris smaller.

The final thing you can try is to make people's irises smaller: You may have noticed that the red-eye effect is stronger in low light (it's a little bit obvious; that's the only time you'd be using a flash anyway, right?). The reason for this is that if someone's eyes are adjusted to low light, the aperture of their eyes (their irises) will be large:

redeye_01.jpg

However, if there was a way to simply reduce the size of their irises, you'd get much less of a red-eye effect, simply because mot as much light would be able to hit the lens:

redeye_04.jpg

So, how do you make someone's eyes smaller? Here's three ways:

You could try to turn on the anti-red-eye function that probably exists on your camera. This function usually sends off a few short flashes, or it will shine some other sharp light into your “victim’s” eyes. This makes their irises smaller, and the problem diminishes.

Turn on more lights. This has the same effect as above, but it also has some other advantages: One, you get more even light, two, depending how sophisticated your camera is, it might fire a less powerful flash, giving a more natural light. Three: you might get away without using a flash altogether.

Make sure your subjects aren’t drunk. Have you ever noticed that if you take a set of photos at a party, how there seem to be more and more occurrences of the red eyes? Not a coincidence. People who start to become intoxicated have slower reactions – this applies to eyes as well. The eyes just won’t contract as quickly, leaving you with red-eyed pictures.

Finally a quick note on compact cameras

Switching to a faster lens on a compact camera is obviously not possible. What few people realise, however, is that almost all compact cameras have lenses that gather much more light when they are fully zoomed out.

In low light, you should therefore consider zooming out and go closer instead of using the zoom to frame your pictures. On an SLR camera, look for a lens with a larger maximum aperture.

Compact cameras: down, but not out


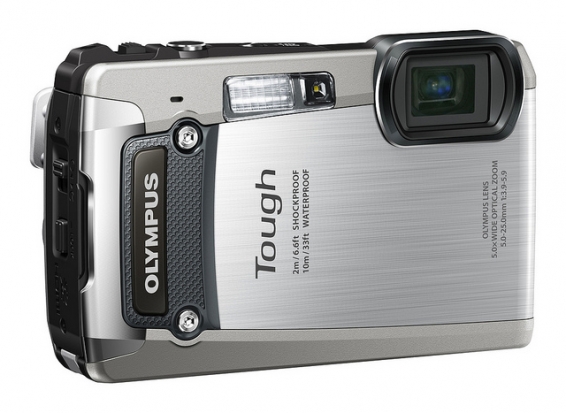
The Olympus TG820: waterproof, shockproof, crushproof, freezeproof, and it takes photos.

It's an inescapable, plaintive cry: the compact camera is in decline! You can scarcely go a week without hearing someone lament that sales of compact cameras are falling; that the ubiquity of camera phones is eclipsing the point-and-shoot; that on Flickr there are more photos taken with iPhones than anything else. And all of these statements are true. Compact camera sales fell by roughly 30% in 2011 compared to 2010 figures (and they were down in 2010 on 2009 sales). Annie Liebovitz pulled out an iPhone on Rock Center and recommended it as a snapshot camera. And the iPhone 4 topped the list of popular cameras in Flickr's January 2012 stats. But none of this means that the compact camera is dead. Not quite yet, anyway.

Over the past two weeks Canon, Nikon, Olympus, Pentax, and Sony have all released new compact cameras. We're not talking about piddling little things that they're rolling out because they've some peculiar obligation to the format; some of these are highly specced shooters with a distinct market in mind: considered pieces of kit that are being produced because they fulfil a demand from photographers. I'll grant you that a few of the gimmicks on some of the cameras do reek of desperate attempts to convince a generation of iPhoneographers that they need a compact, but that is to be expected. They're in the business of making money and they're going to try their hardest to poach back the market from Apple, Nokia, Samsung, et al. But whilst the camera phone definitely fulfils the photographic expectations of a swathe of people who need nothing more than a handy-dandy picture-snapper in their pocket, it doesn't provide for everyone who wants an easily-accessible camera.

Without exception, all of those manufacturers with new releases in the past two weeks have included a camera in the lineup that is waterproof and shockproof. In Nikon's case it was only waterproof to three metres and didn't enjoy the most flamboyant functionality ever, whilst Olympus' TG820 can cope with being crushed by upto 100kg as well as temperatures down to -10 degrees Celsius, water to depths of 10 metres, and being dropped from two metres; but they highlight a particular target market.

For people who love to snowboard, snorkel, and rockclimb, and take photos whilst they're at it, they want a camera that can withstand at least some of the perils that might befall it but still deliver photos that do justice to their fantastic pursuits. They want a decent optical zoom and a reasonably sized sensor, they might even want full manual control, and they want it to be small, easy-to-use, and all in one place. Changing lenses on a Nikon V1 whilst clinging to a mountain face isn't ideal, no matter how small it is, and the digital zoom on an iPhone 4S is never going to be as sharp as the 5× optical zoom on the Olympus TG820. It's the compact rugged camera that offers them what they need - photographically and practically - so that they can take photos they can hang on their walls with a camera they can also dip into water, throw onto snow, drag through a sandstorm, or drop onto rocks.

For my money, Sony is on to something with its TX200V. When you read the spec, you get the impression that it's a relatively competent compact; it has a touch-screen, 18 megapixel sensor, 5× optical zoom, HD video, and a gamut of other toys. That it's waterproof to five metres, freezeproof to -10 degrees Celsius, and dustproof are almost after-thoughts in its design. But it's a clear indication of a purpose that the compact camera fulfils: they should be able to go anywhere and take a half-way decent picture in the process.

I started taking photos when I was young, around five years old, using my Ma's Olympus Trip. When I was seven, my parents bought me my own camera; it was an Agfamatic that took 110 film cartridges, had a push-pull wind-on mechanism, and a telephoto lens that slid across the normal lens for closer-up goodness. Until it was replaced about three years later with a far more sophisticated Pentax compact, it was my pride and joy. Having my own camera from such a young age taught me something valuable about photography - and it wasn't just about the principles of light and focus and perspective. It was that photography is a craft; a camera is a specialist tool and it demands specialist skills to get the most out of it.

Compact cameras fulfil this incredibly important need: they provide young photographers with the opportunity to learn and develop with dedicated equipment, but equipment that simultaneously doesn't have to cost a prince's ransom and won't overwhelm them. I might let my niece play around with my SLR whilst I'm standing there, but I wouldn't dream of letting her walk off with it alone, if for no other reason than it's damn heavy for her. Would I prefer that she learned about proper focusing and the rudiments of manual control on a real camera: of course I would! As for being able to wander off by herself and explore her photographic creativity: hell yes! Everyone has to start somewhere, and compact cameras are ideal nurseries for novice photographers; they're definitely not to be sneered at.

Aside from the practical, there's a philosophical element to learning photography with a proper camera: it allows new photographers to gain an appreciation for photography as an art-form, not as something that's a bolt-on to a ubiquitous piece of gadgetry. I want photography to be universally appreciated and accessible, and camera phones allow for that; they're also a fantastic first step into the photographic waters for some people. But in between iPhones and inerchangeable lenses, we need something else, and that something else is the compact.

I use my iPhone to take photos; I also use my compact camera; and I use my dSLR. Sometimes I even drag out a film camera. My iPhone hasn't replaced my compact camera as a picture-taking device; rather, it has augmented my photographic arsenal. It's one more way that I'm able to paint with light. When you think about that in terms of volume of photos taken, it's easy to see that with so many devices out there taking so many photos, camera phones will be topping the league tables of most-used photo-taking device, given that almost everyone has one. Furthermore, when you remember that the total number of photos being taken is now divided amongst four major categories of camera - phone, compact, EVIL, and SLR - the proportions are going to have changed from the days when just compacts and SLRs were the cameras of choice.

Right now, my compact camera does things that my iPhone is only dreaming of, and coupled with its size, that's why I have it. And just as the technology that's in a camera phone will continue to develop, so will other cameras. Consequently, I can't see the day just yet that I'll be relinquishing the compact that I keep in my bag. Of course, that sort of logic won't apply to everyone, and more people will reach a point when they can abandon their compacts for their camera phones, but having all of these choices is no bad thing.

There's also this idle thought that occasionally comes to entertain me when I think about the development of camera phones. Would it be possible that their evolution will eventually come full-circle? As they become increasingly powerful and versatile, will their primary function cease to be that of a phone, and will they essentially morph into a compact camera again? That's probably a long way off, but I wouldn't place it beyond the realms of possibility.

Yes, the compact camera market is declining; no, I don't think it's terminal. The compact camera is another choice for people who want to take photos, and in some respects, it's a choice that satisfies some important gaps in the market. For some people, it's precisely the camera that they need. So they might be down; but they're definitely not out.

Gallery: Embedded with the Territorial Army


For one of my final years of university assignments (I was an International Journalism student at Liverpool John Moore's University), I contacted the Territorial Army to see whether they would let me come along on a training exercise. They agreed, and I spent a long week-end in the rain and the fog, chasing people holding guns with my Canon.

This was back in 2003, and I just re-discovered and re-edited the original files. I remember clearly editing them, one by one, in Photoshop, the first time around. This time. I gave them the Lightroom treatment, in order to make them look like older photographs; Like the ones you might see coming out of the makeshift dark-rooms in conflicts in the 1950s and 1960s, perhaps.

The photos are in the gallery carousel above. Enjoy!


A photo competition for February!


Kites for sale on the beach at Viareggio, Tuscany

In honour of the grand and crazy trip that I'm currently enjoying, we thought that a suitable theme for February's competition would be flight. Whether you choose to submit a picture of a seagull, a 747, a bumble bee, or a kite, it doesn't matter: your subject just needs to be airborn with intent.

If you submit the winning entry, you'll win yourself a 12" Fracture courtesy of the wonderful guys at Fracture. (And if you've not checked out their work, then you should!)

The competition opens today (Thursday 2 February) and closes on Thursday 23 February. Entries need to go into the Small Aperture Flickr pool, but please remember that it's one submission per person.

I've reproduced The Rules, in case you need to refer to them, but otherwise, good luck!

The Rules

  • If you decide to enter, you agree to The Rules.
  • You can’t be related to either me or Haje to enter.
  • One entry per person – so choose your best!
  • Entries need to be submitted to the right place, which is the Small Aperture Flickr group.
  • There’s a closing date for entries, so make sure you’ve submitted before then.
  • You have to own the copyright to your entry and be at liberty to submit it to a competition. Using other people’s photos is most uncool.
  • It probably goes without saying, but entries do need to be photographs. It’d be a bit of strange photo competition otherwise.
  • Don’t do anything icky – you know, be obscene or defame someone or sell your granny to get the photo.
  • We (that being me and Haje) get to choose the winner and we’ll do our best to do so within a week of the competition closing.
  • You get to keep all the rights to your images. We just want to be able to show off the winners (and maybe some honourable mentions) here on Pixiq.
  • Entry is at your own risk. I can’t see us eating you or anything, but we can’t be responsible for anything that happens to you because you submit a photo to our competition.
  • We are allowed to change The Rules, or even suspend or end the competition, if we want or need to. Obviously we’ll try not to, but just so that you know.

If you've any questions, please just ask!

Design-led? Actually, I think the Pentax K-01 means business


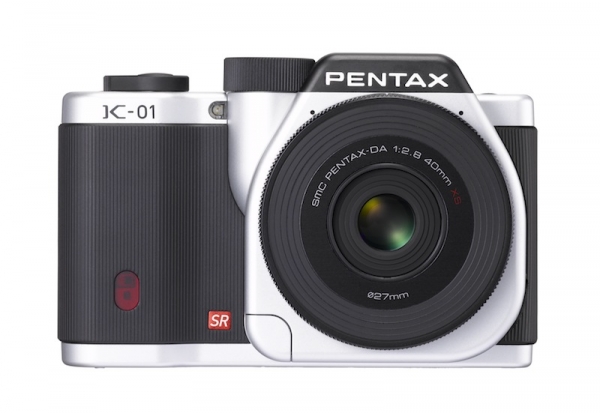
The Pentax K-01

Pentax launched a new mirror-less interchangeable lens camera today: the K-01. It's bigger than we're accustomed to in this breed of camera - in size it's definitely no match for the cute and quirky Pentax Q, a camera that certainly had its stumbling points, but isn't being replaced by the K-01 - and the line is that it's a design-led camera aimed fashionable-types, and possibly a younger market. Given its looks, I'd certainly vouch for it being design-led, but I think that Pentax has a lot more going on with this camera than just a niche market of fashionistas and trendy-types.

First, there's the CMOS sensor, which measures 23.7×15.7mm. That's the standard measurements for an APS-C sensor, one with a 1.5 crop factor, as you'd find in a Pentax K-r, for example. This isn't some piddling thing that's about the size of a newborn baby's toenail. Sure, this makes the camera a whole lot bigger than the pocketable Pentax Q or the Nikon 1 series, but it's still 30% smaller than a K-r, and the larger sensor has its advantages. It also happens to have 16.28 megapixels of resolution and a sensitivity range of ISO 100 to 25,600 (when it's expanded).

Second, the K-01 is compatible with all Pentax K-mount lenses, including those produced for film cameras. (If you want to use your 645 lens on a K-01, you'll need an adaptor, though.) That's just made the K-01 a whole lot more attractive to anyone who's ever owned a Pentax interchangeable lens camera - provided that they still have their lenses, of course - and to people considering a mirror-less camera as stepping stone between a compact and an SLR, so that they won't be shelling out for even more lenses.

If we want to be really forward-thinking about things, let's consider the potential day when Pentax decides that SLR cameras really aren't where it's at anymore. With the K-01 technology in place, they might lose some photograhers who do still want their optical viewfinders, but they'll keep those who are happy with an electronic viewfinder, because they won't have to invest in new glass.

And it does all things that you expect of a high-end camera now: there's 1080p HD video (with a choice of frame rates: 30, 25, or 24 frames per second); there's an HDR function; a burst mode of upto five images per second; and let's not forget the toys.

With all the toys and gizmos that Pentax has put in the K-01, they're making it quite an attractive camera for anyone considering the leap from a compact, too. It does the auto-mode thing; it has 19 different scene modes, ranging from nighttime to backlit silhouette; its in-camera editing allows you to give images a cross-processed or bleach-bypassed look; and there are 19 different filters, for example miniaturisation, which can be applied multiply to an image.

But there's one final place where the K-01 is also holding its own: price. Body-only, it costs around £630. With the 40mm lens (which is the thinnest interchangeable lens on the market), it's £680; with the 18-55mm and the 50-200mm lenses, you're looking at £800. That's in the same ballpark as the Nikon V1 and significantly less than the Fujifilm X-Pro1. The chances are, this will come down after launch, too.

No, the K-01 isn't as pocktable as other mirror-less interchangeable lens cameras, but it is smaller than your average dSLR, and that 40mm pancake lens is tiny. In the K-01 you have the beginnings of a compromise between camera size and sensor size; between pocketableness and image quality. This incarnation might be design-led, but who knows where any more K-0 series cameras might lead.

Our high-key photo competition winner is announced!

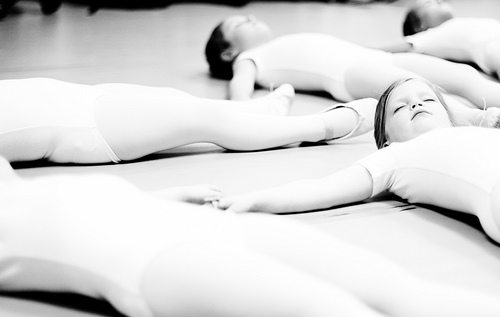
For January, we were looking for bright, airy, and positive high-key images to kick off the new year. This was the entry that made both Haje and me go 'Yes!' It's calm, delicate, and gorgeous.

1st year of ballet

Congratulations, Hooker771 (he doesn't give his real name on Flickr), for your charming First Year of Ballet. You've just won yourself a 12" Fracture.

Details of our February competition will be going up very soon!