camera obscura

Making a Pringles Can Obscura

I spent Saturday at the Cambridge Festival of Science and Royal Photographic Society's photography day, listening to talks on megapixels and watching videos of caesium react with water in slow-motion. It was mostly a fun and informative experience, but apart from the caesium videos, the best bit was sitting inside Fotonow's Camper Obscura. That, just as its name suggests, is a camper van that has been transformed into a camera obscura. A camera obscura is the basis of any photographic camera, from a pinhole to a dSLR. A camera obscura is literally a dark (obscura) room (camera) with a hole poked into it, through which light can pass to create an image of the outside world on a screen. There are room-sized camerae obscurae in Bristol and Edinburgh, but they don't have to be walk-in activities. It's easy enough to scale them down and make something portable. I was aiming for something more along these lines when I decided to devise my own.

Of course, if you replace the screen with photo-sensitive paper you have a pinhole camera and by steadily improving the light-gathering and focusing abilities of the hole, with lenses, you end up with a camera more akin to those we use every day. But that's another project for another day.

Undeterred, I looked around for some DIY camera obscura instructions and found the perfect example on Exploratorium, which used a Pringles can. Seeing as Haje has already used a Pringles can to create a cheap macro extension tube, it seemed entirely appropriate to transform the snack container into a portable camera obscura. A Pringles Can Obscura.

1. Take one Pringles can

After securing a can of Pringles either from a nearby shop or your pantry, you'll need to divest it of its contents—whether you eat them all or transfer them to a new container is up to you—and then wipe it clean and keep the lid.
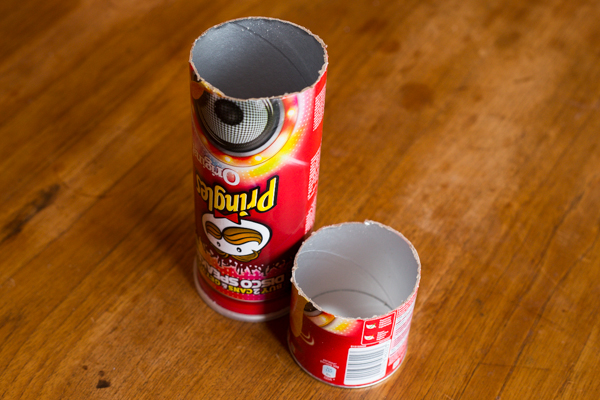
One Pringles can, two pieces

Draw a line around the tube, about 6cm or 2½" up from the base. Using a craft knife, or in my case, a bread knife, cut through the tube so that you're left with two pieces. The shorter section will be from the bottom of the can, and the longer section from the top.

2. Make a screen

You need to make a screen onto which your image will be projected inside the can. The cheapest and most readily available means to make one is from tracing paper.
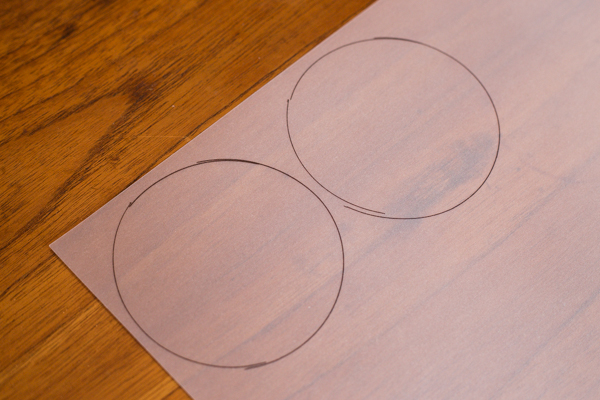
I drew a spare, just in case.

Place the lid of the Pringles can on a sheet of tracing paper, draw around it, and then cut it out. Secure the tracing paper on to the top of the tube using the lid.

3. Put the can back together

Rather than reconstruct the can with the two cut ends meeting again, you want the cut end from the bottom section of the can meeting the lidded, tracing-papered end from the upper section. Secure them in place using gaffer tape or electrical tape. No light should be able to pass through the join.

I got so carried away sticking it together that I forgot to take a photo. I'm sorry.

4. Pierce a hole

In order for the light to pass into the can and create an image, pierce a hole using a drawing pin in the base of the can.
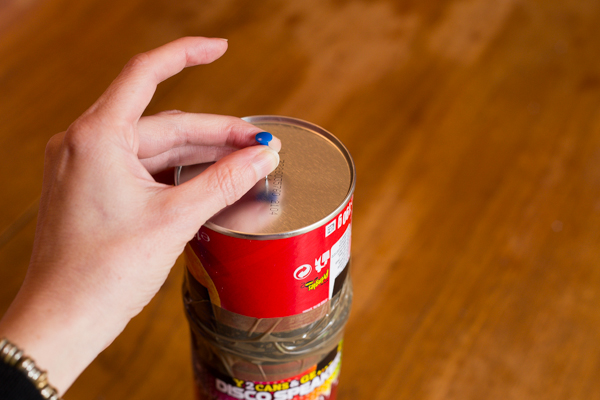
Wanton assault with a drawing pin

5. Finish off your Pringles Can Obscura

To make sure that you don't end up with spurs of cardboard poking into your face when you hold your Pringles Can Obscura to your eye, tape up the cut surface with some electrical tape. And if you don't want it to resemble a Pringles can that you've hacked up, wrap some coloured paper around it.
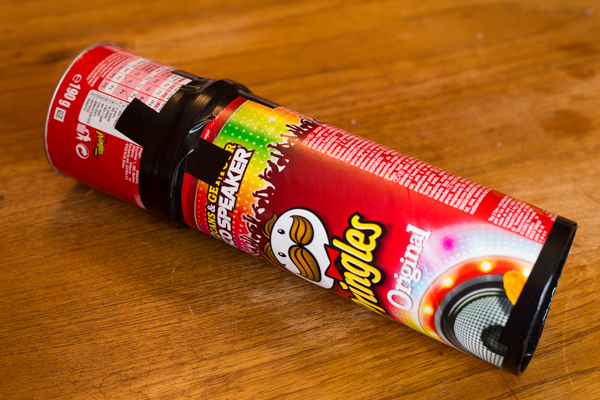
A Pringles Can Obscura!

6. Head out into the light

The brighter the day, the better the image you'll be able to render on your screen. Just remember that everything will appear upside down. And then it will be a case of moving nearer and farther away from your subject to get it in focus.

It's a great tool to remind you just how simple the principles of photography are, and to get you back in touch with moving subjects into and out of focus.

(And don't go getting any ideas about the gorgeous image of the tree. That's obviously, from the Camper Obscura.)

Photography History: Before Film


A few weeks ago, I had a long and interesting discussion about the History of Photography with a friend of mine, and I discovered that while photography is incredibly close to my heart, I didn’t really know all that much about everything that has happened in the past.

Obviously, that had to change – I give you the first in a 3-part series entitled, without a shred of originality, History of Photography. This time around, we’re having a look at what happened before they went ahead and invented film… 

The Camera Obscura

The primary grounding principle of photography was already know as early as the fifth century B.C.E. It was the Chinese philosopher Mo-Ti who remarked at this time that when a small hole is opened up on one side of a darkened room, light diffuses through this hole onto the opposite wall in the form of an upside-down projection of the outside scene, a phenomenon almost identical to what happens on the inside of a modern film camera.

In the eleventh century the Islamic scientist Ibn al-Haytham elaborated this principle further by conducting experiments which made use of a lantern placed strategically in front of a similar setup in order to create this effect artificially. He was also the first to document this phenomenon in detail by creating diagrams which give a hypothetical account of the trajectory of light as it passes through the dark room hole. Al-Haytham is to this day widely respected for this important contribution. (His face is printed on the Iraqi 10,000 Dinar note.)

During the Renaissance period in Europe many other scientists including Leonardo Da Vinci invented further improvements to this device, including modifications that allowed for the use of a small box for projection instead of a large room and a lens instead of a simple hole. This allowed for a much clearer projection of the image. Using mirrors, the image could then be projected onto a piece of paper which artists would use as a tracing image. However, it was not until 17th century that the German scientist Johannes Kepler gave the device its name: the camera obscura, Latin for “Dark Room.”

Several room size camera obscuras still exist today including a very large one in San Francisco, California which, built in the shape of a modern 35mm film camera!

For more information on camera obscuras, Bright Bytes and Wikipedia have loads of interesting info

Nicéphore Niépce

Photography developed out of the principle of the camera obscura when the French inventor Nicéphore Niépce created the first permanent photograph in 1825. Now, instead of projecting the image onto a blank screen, it was projected onto a pewter plate which was coated with a light-sensitive petroleum derivative. This chemical then reacted to the light by creating a colored imprint of the projected image. However, because of the nature of the chemical, it took eight full hours for the picture to become exposed. Niépce’s first photograph using this process is also the earliest known photograph which is still in existence. It can be seen here along with further information about its creation and preservation.

Later Niépce began experimenting with a new silver-based compound which allowed for a shorter fifteen minute exposure time. This was still arguably too long for practical photographic portraiture. However, one of Niépce’s photographs from this period did accidentally become the first photograph of a human being. He had set his equipment up at the end of a street and intended to capture the landscape of the town. Most of the traffic on the street is invisible to the camera since it is moving to fast for the fifteen minute exposure to capture. However, there just happened to be a single man stopping to have his shoe shined on the corner for a period which was just long enough for his image to be imprinted on the photograph. This picture can be seen here.

Louis Daguerre

After the death of Nicéphore Niépce, his assistant Louis Daguerre continued his work and made improvements to the photographic process. Most importantly he invented what is known as the “Daguerrotype Process.” The process further reduced total exposure time and thereby made photographic portraiture a commercial reality. At the same time that Daguerre was perfecting his process a Brazilian inventor named Hercules Florence was developing an almost identical process. It was he who gave this process the name “Photographie.”

More about Daguerre? It’s fascinating stuff – check out wwar.com and Wikipedia’s entry on the Daguerrotype

William Fox Talbot

Meanwhile in England, another inventor was also working on a similar photographic process. This man was William Fox Talbot, the first photographer to employ a “negative” in his process. This would allow him to create a single negative image during exposure which would then be used to print an unlimited number of positive copies. This became the model for most photographic processes which would follow during the next 100 years and beyond. In addition to his achievements as a photographic inventor, Talbot was himself a groundbreaking photographer, with work ranging from portraiture to images of Paris and London.

Today there is an entire museum dedicated to Talbot, his inventions, and his photographs – for more, check out The Correspondence of William Fox Talbot and ‘Talbot’ vs. ‘Fox Talbot’

John Herschel and Anna Atkins

John Herschel was a mathematician and astronomer who made several improvements on and experimented with Talbot’s model. Among these improvements, was a process called “cyanotype” which produces a blue colored print. In addition, it was Herschel who supplied Talbot with the terms “negative” and “positive.” Another photographer named Anna Atkins later used Herschel’s cyanotype process to produce a series of books on plant life illustrated with blue-tinted photographs. For this work, she is known as the first female photographer.

For more on John Herschel try the following links on seds.org and wikipedia; For more on Anna Atkins and her beautiful cyanotype prints try
Getty

Frederick Scott Archer

By the 1850′s the interest in and demand for photographs was growing at an steady rate. Unfortunately, both of the dominant photographic procedures were still terribly flawed. The Daguerrotype could produce a very fine picture, but it required a still relatively long sitting time for portrait customers. On the other hand, Talbot’s process, although it was more efficient, produced an image with weak contrast and poor definition.

As a solution to the problem, Archer invented his own process named the collodion process. In an act of photography history sainthood, Archer decided not to patent his invention, but instead, to allow its use by one and all alike, without fee. Partially as a result of this failure to protect his own interests, Archer never attained financial success. When he died in 1857 he was poor and relatively unknown.

However, Archer’s developments and those of his predecessors led to the immanent invention of film which was to revolutionize the world of photography once again…

Haje’s History of Photography

The History of Photography part 1 - Before Film
The History of Photography part 2 - The Firm Era
The History of Photography part 3 - The Digital Era


Do you enjoy a smattering of random photography links? Well, squire, I welcome thee to join me on Twitter -

© Kamps Consulting Ltd. This article is licenced for use on Pixiq only. Please do not reproduce wholly or in part without a license. More info.